

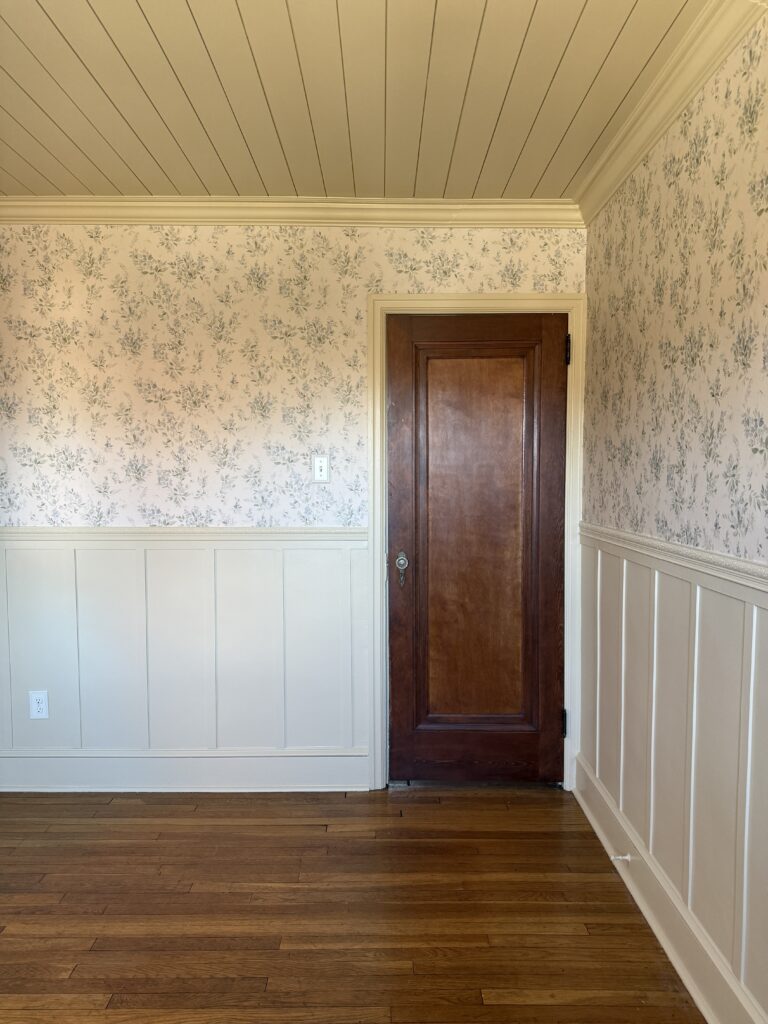
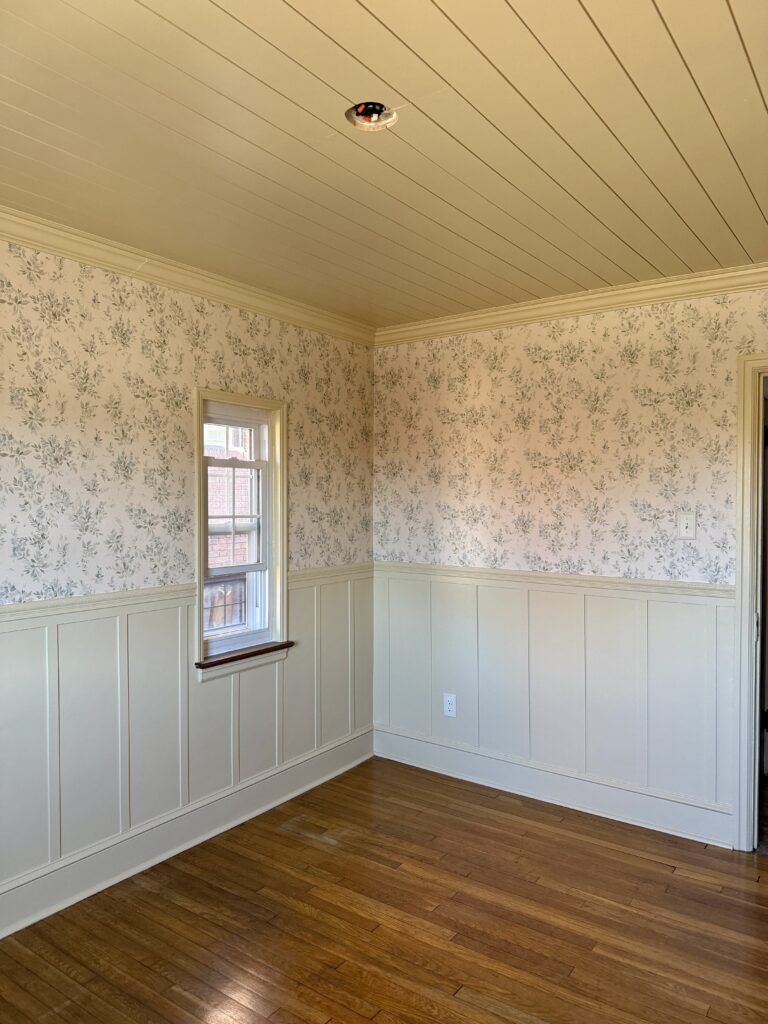
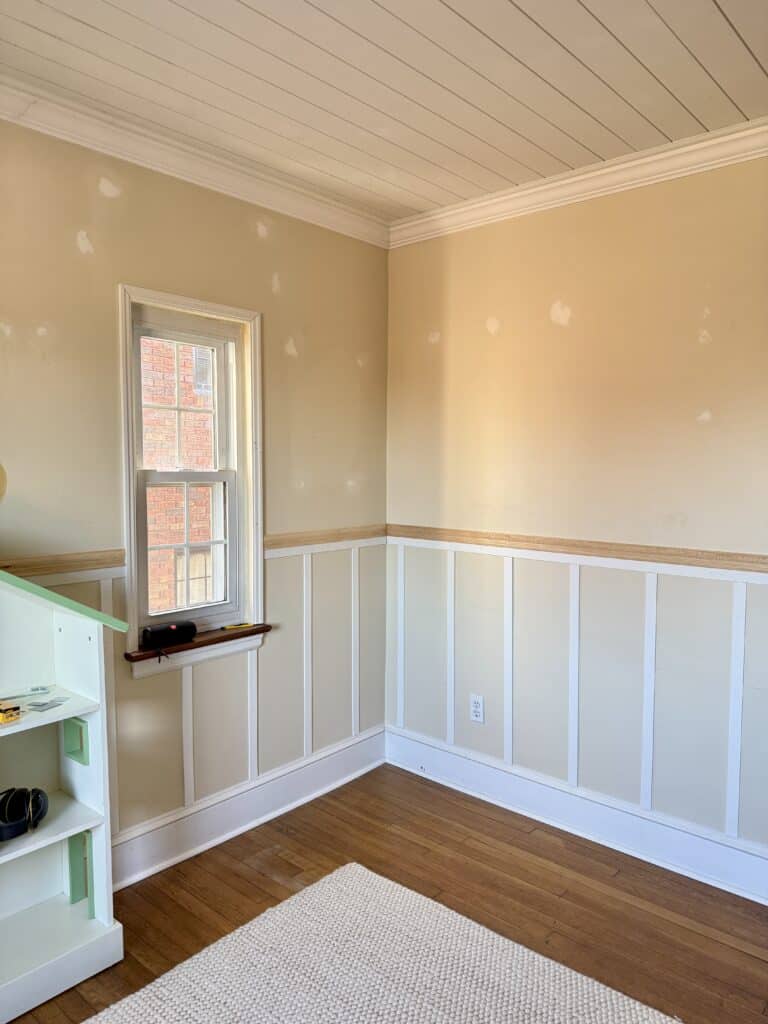
We’re expecting a baby girl in two months and I, of course, want to make her nursery charming and beautiful. Wallpaper was a must for me, but it’s expensive! One way to help cut down the cost is by only using it on the top half of the walls. For the bottom, I decided to go with a DIY board and batten wainscoting.
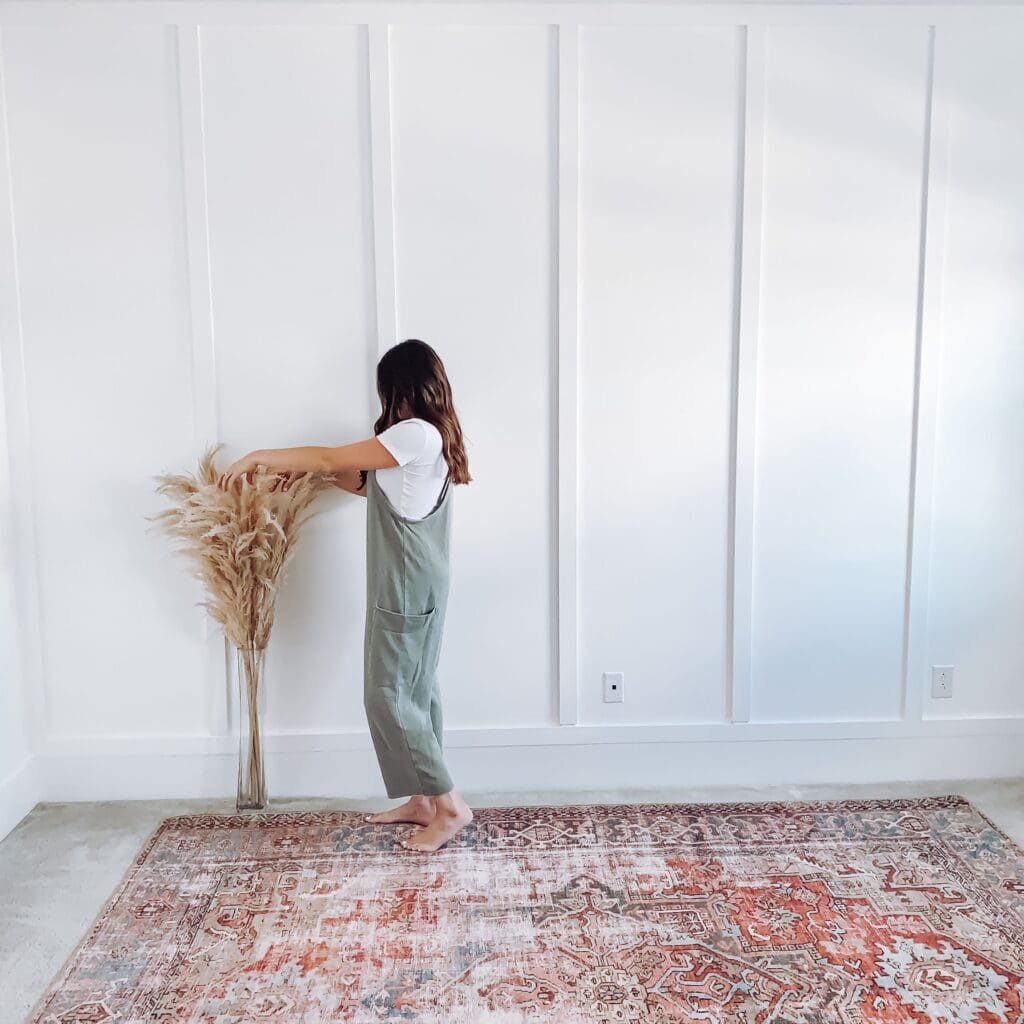
Trust me when I say this is such an easy beginner DIY. Matter of fact, my first ever solo DIY project was a board and batten accent wall in our bedroom!! In this post, i’ll walk you through my step-by-step tutorial!
Disclaimer: This post contains affiliate links. This means, if you purchase something from a link I provided, I will receive a small commission. This is at no extra cost to you! Thank you so much for the support!
TOOLS:
MATERIALS:
Board and Batten vs Wainscoting
These terms tend to be used interchangeably, but they’re not the same!
Difference Between Wainscoting and Board and Batten
Board and batten is a specific type of wall treatment, or paneling. A traditional board and batten wall starts with a thin layer of backer board (the “board”), followed by vertical boards (the “battens”) evenly spaced out that would cover any seams. Backer board is great for covering textured walls and creating a smooth surface, but you’ll find that many people skip this portion if they already have smooth walls.
Wainscoting is any decorative paneling on the bottom portion of the wall. This can include box moulding, shiplap, beadboard, raised paneling, etc. When board and batten is installed on just the lower portion of the wall, it’s considered board and batten wainscoting.
Board and Batten Rules
I’ve gotten questions about the “rules” when it comes to board and batten wainscoting, so let’s chat about that! Keep in mind, rules can be broken. These are more like guidelines, but they can definitely be helpful when planning your board and batten project.
Rule of Thirds
For a visually balanced space, a good rule of thumb is setting the height of the board and batten to either 1/3 or 2/3 of the ceiling height. For example, with 9ft ceilings, your wainscoting would look lovely at 3ft or 6ft high.
But again, this is just a guideline, and one I don’t always follow! I decided to do a height of 45″ with our 8.5 ft ceilings. This height just felt visually right to me and I also wanted the wainscoting to be higher than certain furniture in the space like our crib, glider, and changing table.
Batten Spacing
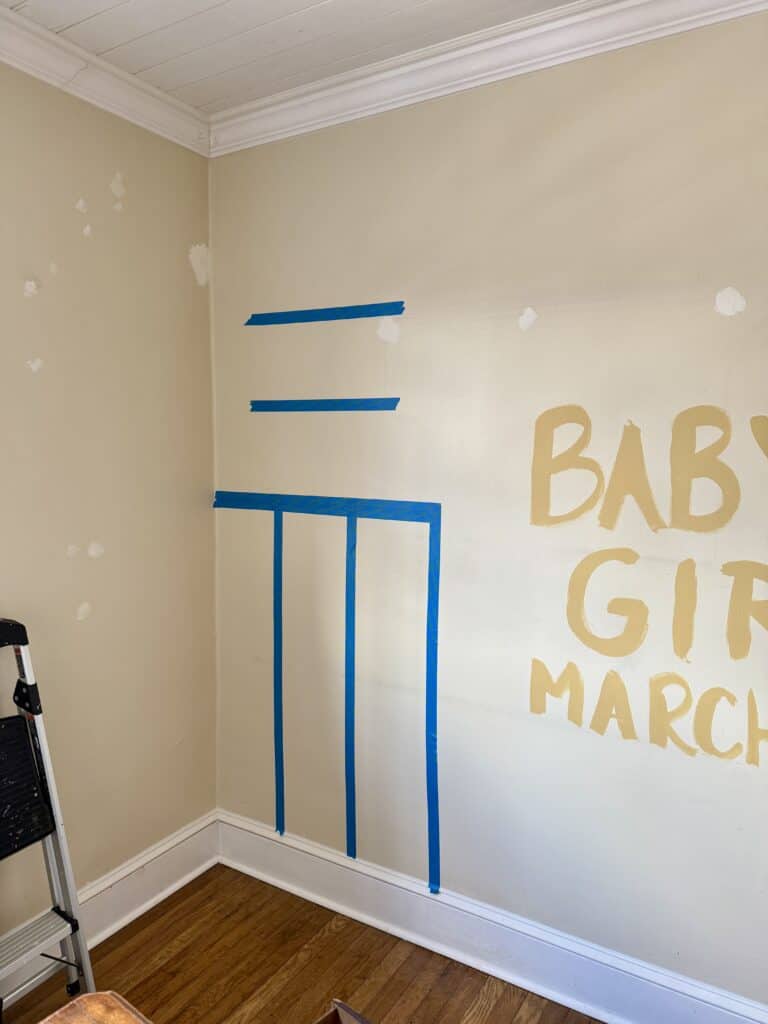
The most common batten spacing is around 12″-18″. But again, there’s no hard-and-fast rules! YOU get to decide on the design. The size of your room can also play a role in spacing. For our little nursery, I wanted our vertical battens pretty close so I went with 10″ 🙂
Tip: Use painter’s tape to help visualize the spacing! And don’t forget about outlets and light switches as you plan your wainscoting design.
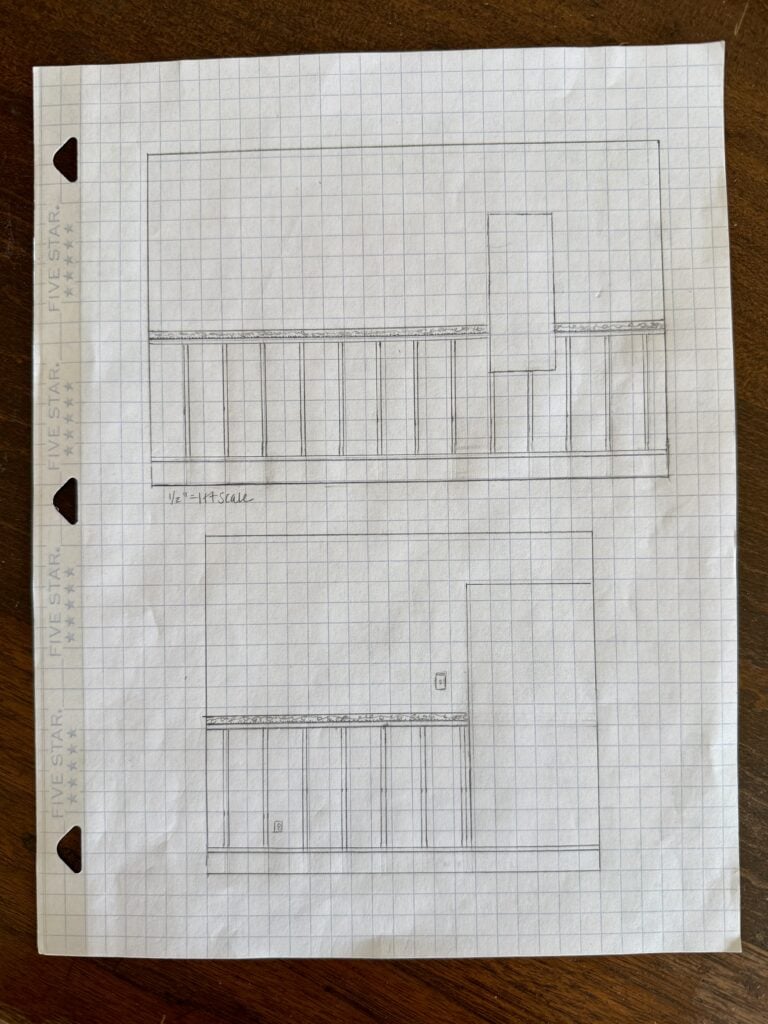
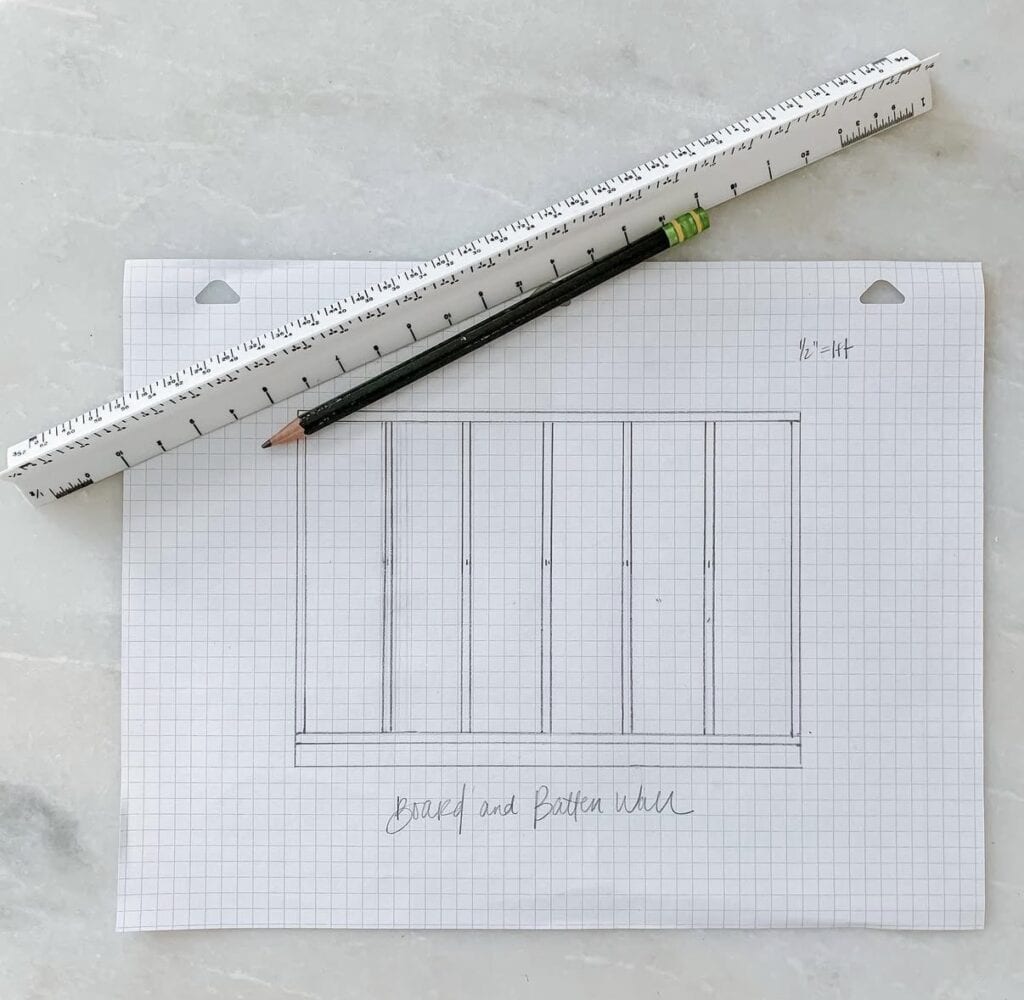
I personally like to make an elevation to scale! This is something I just enjoy doing and I like to save the drawings as keepsakes!
Material Sizes
Consider the scale of the room when you’re choosing materials for your chair rail and vertical battens. The most common batten width is between 2.5″-4″, which you can easily find at Home Depot or your local hardware store. Also, if you’re installing the battens on top of your existing baseboard, the thickness of the boards is important. If they’re too thick, the boards will jut out beyond the baseboards.
I wanted a really dainty aesthetic for our nursery board and batten wainscoting, so I used these lattice trim pieces to achieve that look! They’re only 1/4″ thick and 1.5″ wide. These also sit pretty nicely on top of our baseboards!
How to Install Chair Rail
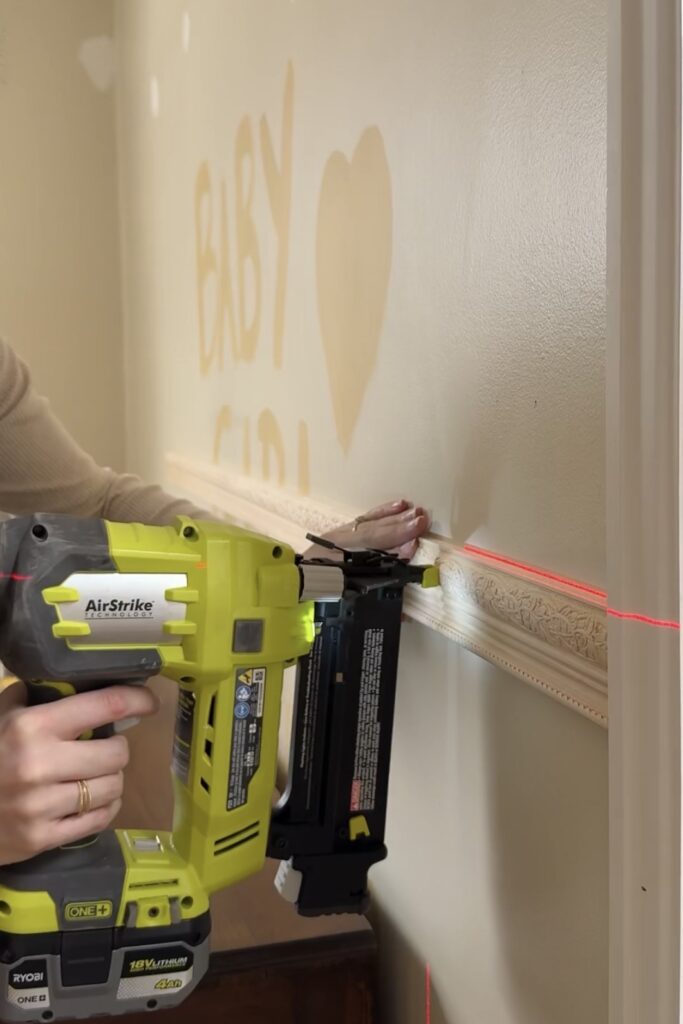
Chair rail isn’t a necessary part of board and batten wainscoting, you can just use a batten piece as your top rail, but I wanted something more decorative so I did both. Regardless of what you’re using as your top ledge, this will be your first step! Installing chair rail is really easy to do.
When you’re cutting chair rail molding, you want it to sit on the back fence of your miter saw. For the wall corners, you’ll cut at a 45 degree angle.
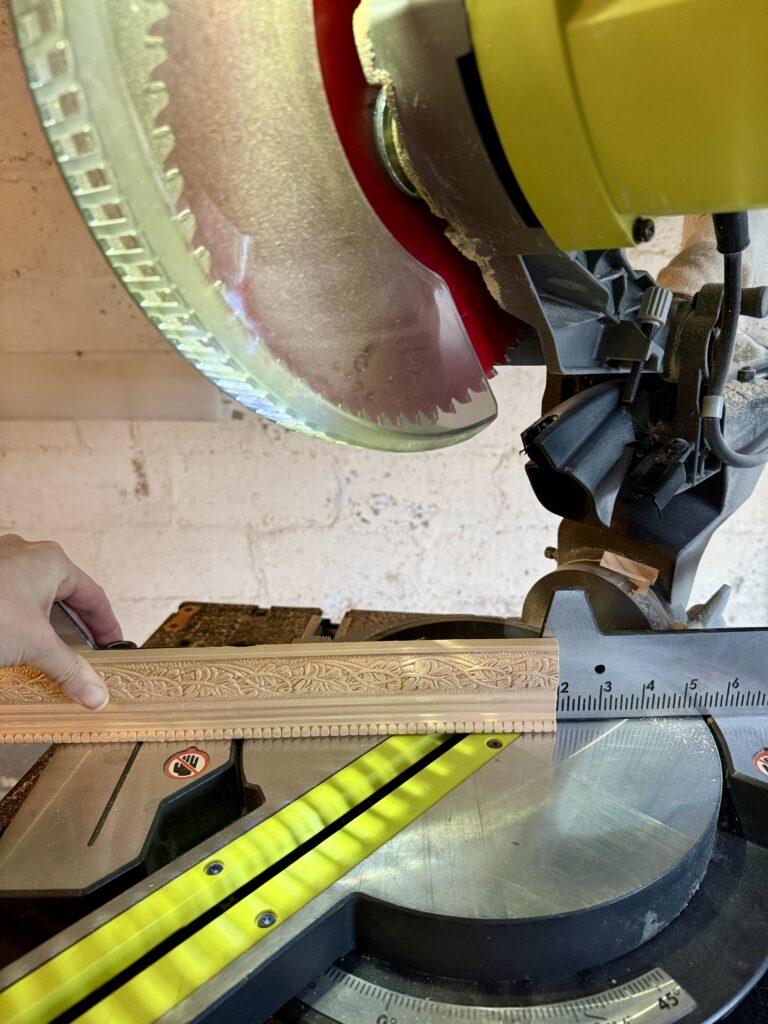
I decided to have the beaded part of the trim on the bottom, so that’s how I set it up on the miter saw!
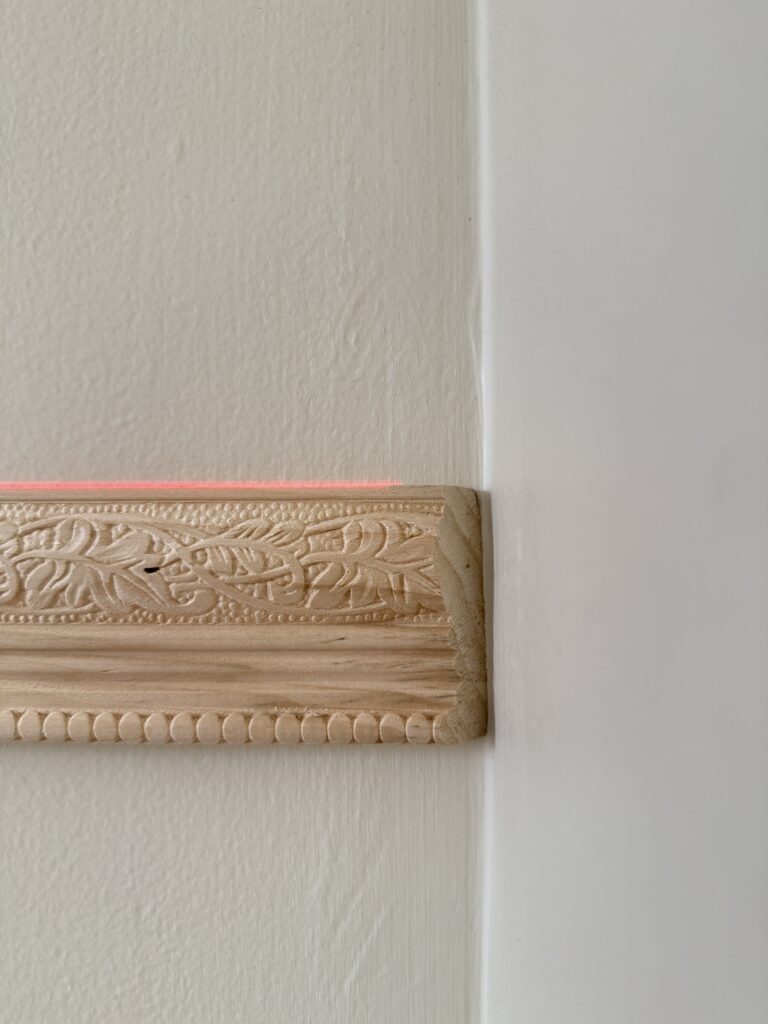
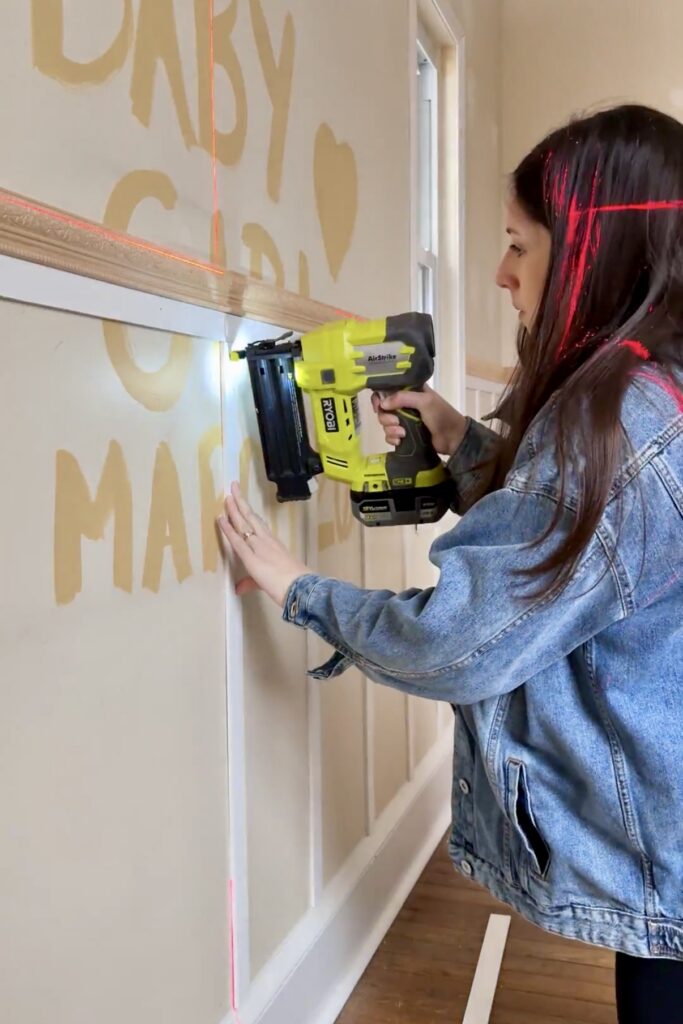
For chair rail installation, you’ll first want to mark a level line (or use a laser level) at the height you chose for your wainscoting! Liquid nails or construction adhesive isn’t necessary, just use your brad nailer. Since these are horizontal boards, you can simply nail into the studs! We used 1.5″ brad nails with this type of trim.
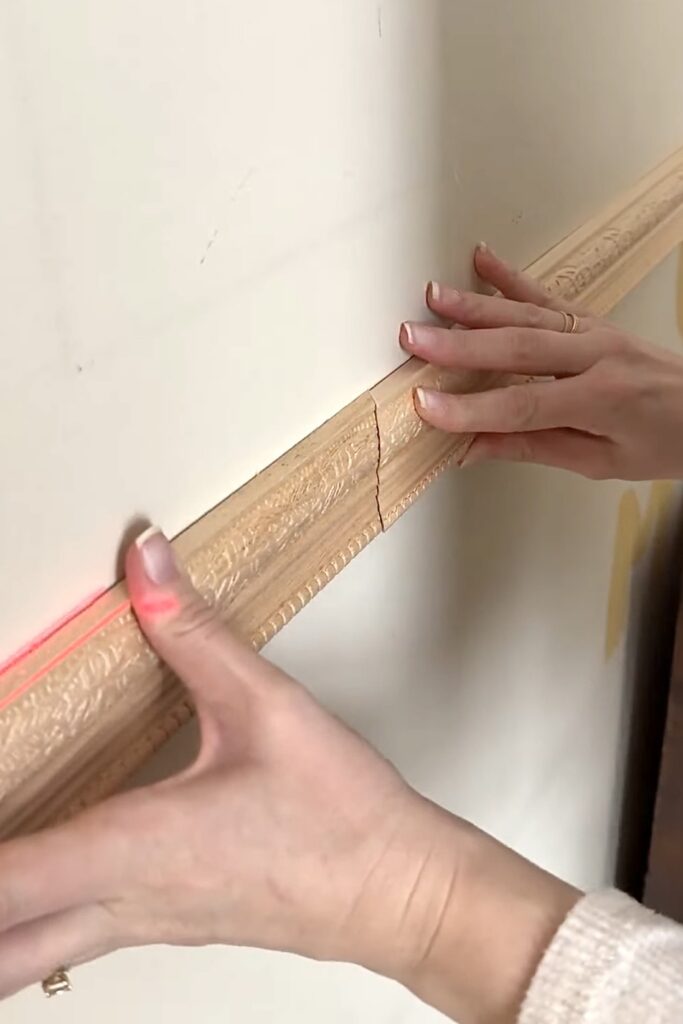
If your trim pieces aren’t quite the length of your wall, you’ll have to join two pieces together. In this case, I like to do what’s called a scarf joint. Essentially, you’re just joining the two pieces together with a 45 degree angle cut- very simple! This type of joint hides a little better than a butt joint (a straight cut), but it isn’t necessary!
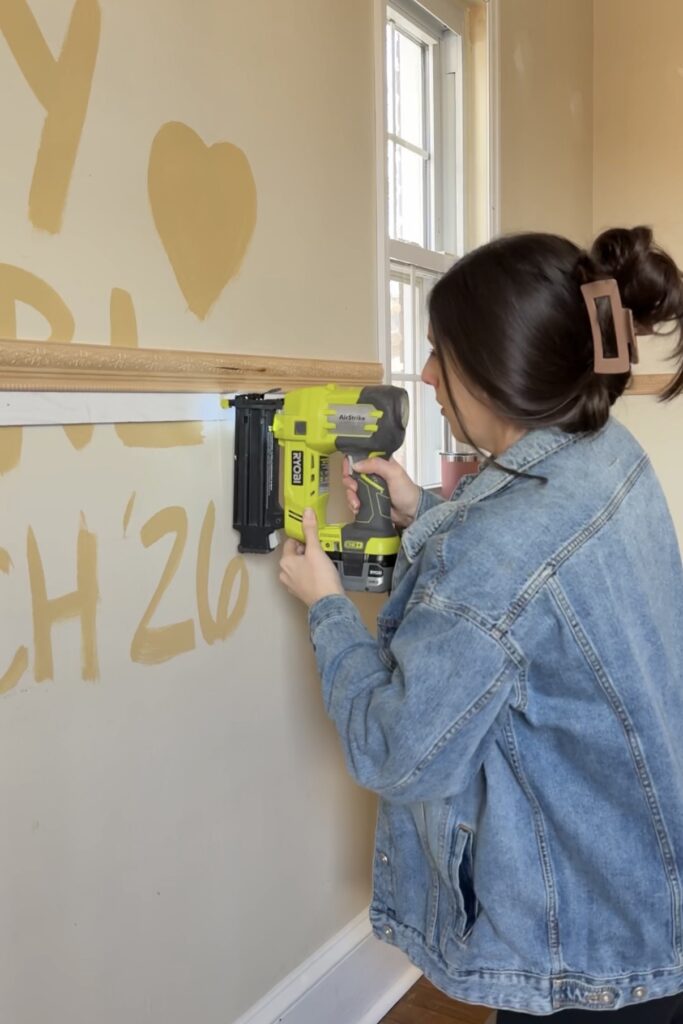
I repeated this process with lattice trim since I wanted a top horizontal board for the battens!
Vertical Battens
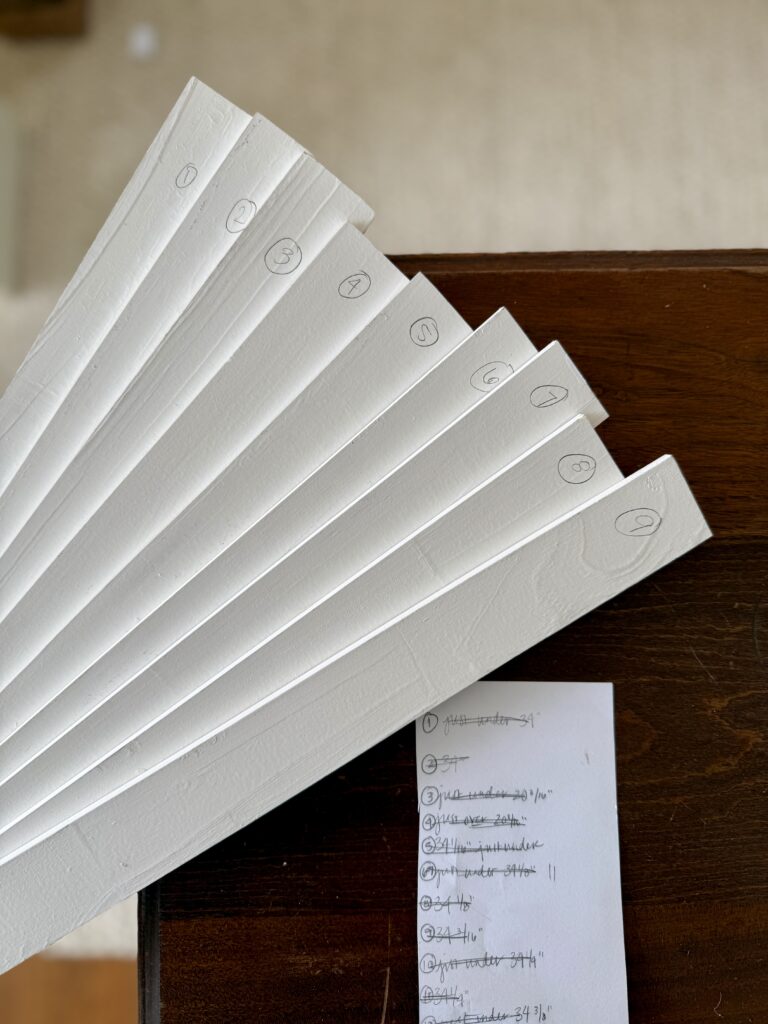
Before installing the vertical boards, it helps to mark the exact spacing. As I mentioned before, we decided on 10″ spacing. I went around with a ruler and a scrap piece of my batten and marked the placement.
If you don’t have a laser level, this is also a great time to mark a straight line for each board.

Our old home has extremely uneven floors and crooked walls so I measured for every batten piece individually! I’d work one wall at a time and measure for each vertical board from the top of the baseboard up to the horizontal pieces. I recorded the exact measurements on a sheet of paper and numbered the boards. This way, I could make several cuts at once, which actually saved me so much time.
By the way, this is my favorite measuring tape for precise cuts!! (Here’s my video on why!)
Once they’re all cut, it’s really as simple as setting up the laser level with the lines you marked and then nailing them in! Since I used lattice trim, which is really thin, I used 1″ brad nails. Again, liquid nails or construction adhesive is definitely not necessary. The boards are lightweight enough that nails will hold them right in place!
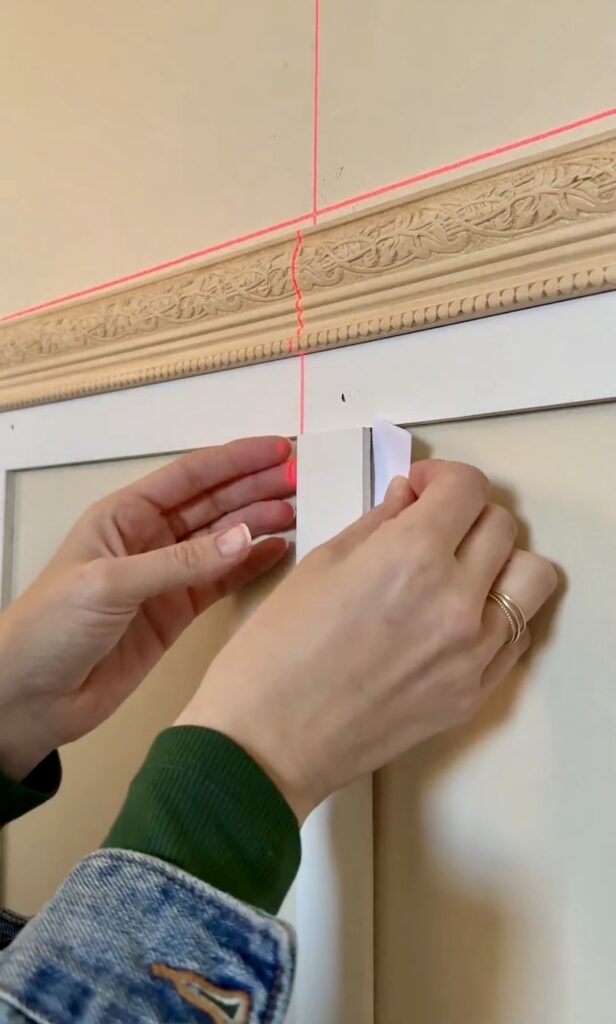
If your walls are uneven, you may notice that the vertical battens may not be flush with the horizontal battens. When this happens, I like to use scrap pieces of cardstock paper and place them behind the board that needs to be shifted forward.
Finish Work
It always requires a little extra effort to do the finish work, but it’s absolutely worth it every time.
- Use wood filler or spackle to fill in the nail holes and seams
- Caulk the seams where the batten boards meet the wall and along the top board
- If you used unprimed pine boards, be sure to prime these before painting!
Other Board and Batten Wall Ideas
Board and batten is extremely versatile! Here’s a few other ideas of how you could incorporate this wall treatment into your home:
Do an accent wall
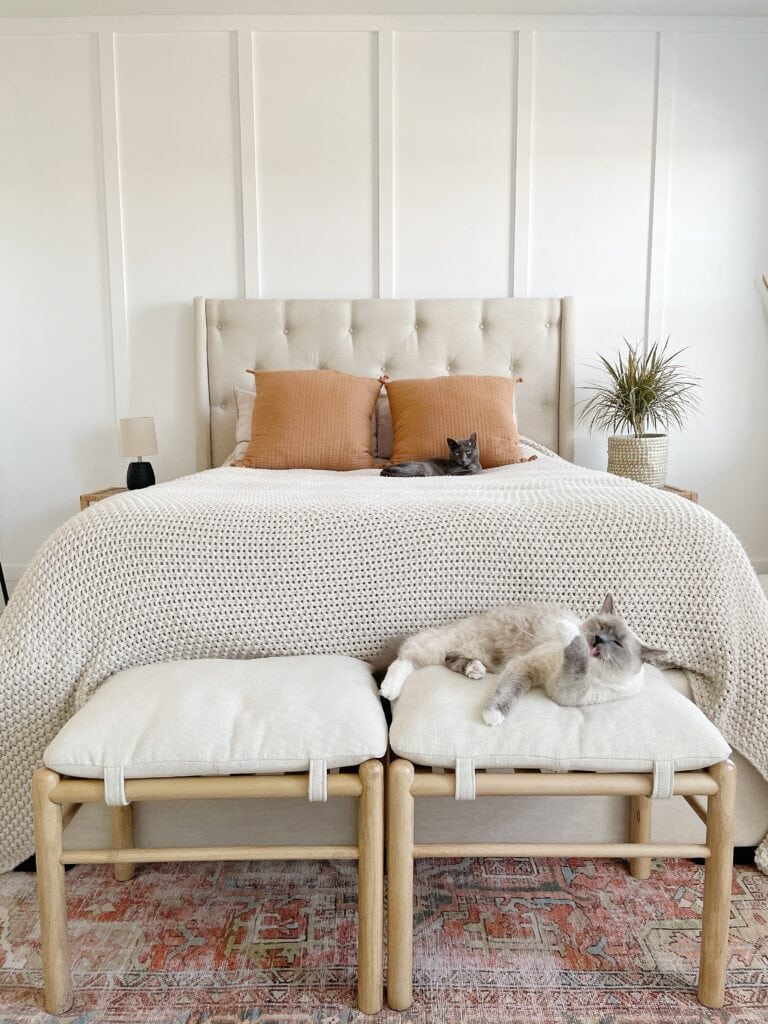
Accent walls are a great way to cut down on cost and highlight a specific wall in your home. You can even go bold and paint it a pop of color! My very first solo DIY project was a board and batten accent wall in our bedroom. I was so proud!!! Also, keep in mind that installing your board and batten floor to ceiling can make your room look taller!
Make it double as a shelf
Use a wider board as your top ledge so it can be used as a shelf for art, decorative knick knacks, etc! I’ve been wanted to try this somewhere! I think it’s so fun to add in behind a bed. You can even get fancy add a brass gallery rail to the shelf like I did for this DIY wine rack!

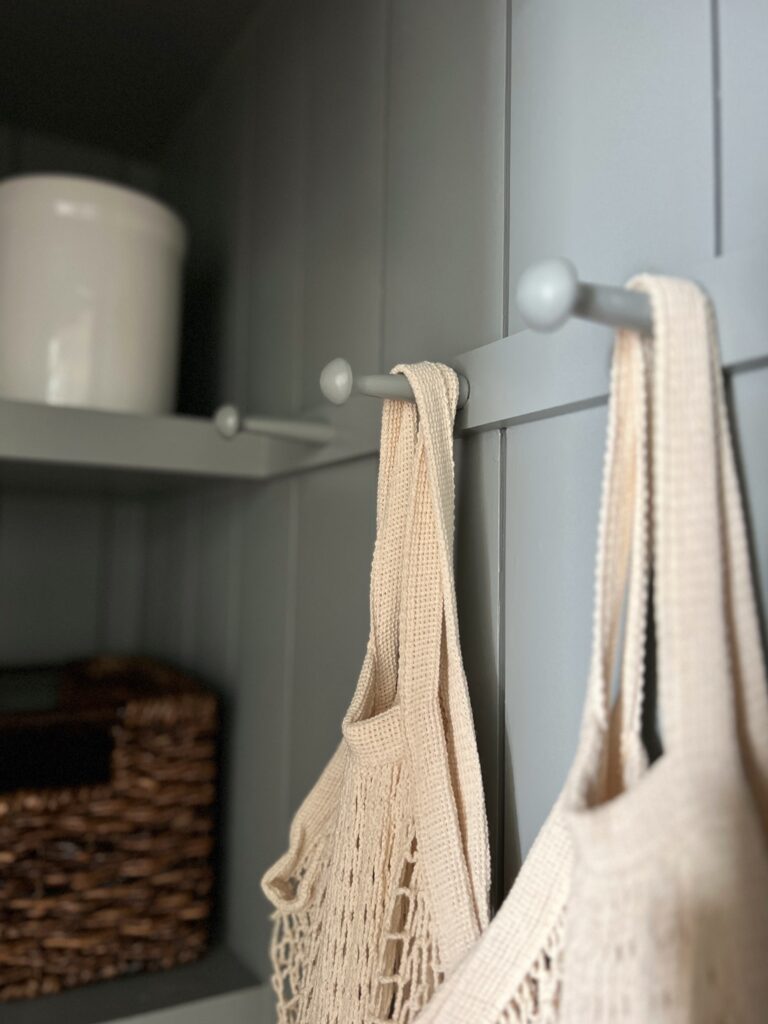
Add shaker pegs
This is a great way to make your board and batten more functional! You would just add some shaker pegs to the horizontal batten piece, similar to how I did here in our small pantry makeover.
Enhance it with extra trim
For a more traditional look, you can add extra trim pieces within the batten boards! I did this for our recessed paneling in our old living room and it’s still one of my favorite wall treatments!
Our Nursery Wainscoting and Wallpaper
We’re still working on our baby girl’s nursery, but i’m already so in love with the board and batten wainscoting with the floral wallpaper! Be sure to stick around to see how it all turns out 🙂
Here’s a couple tutorials for the projects done in this nursery so far:
As always, thank you for being here! I hope this tutorial was helpful! Please let me know if you have any questions.
Elisha
