

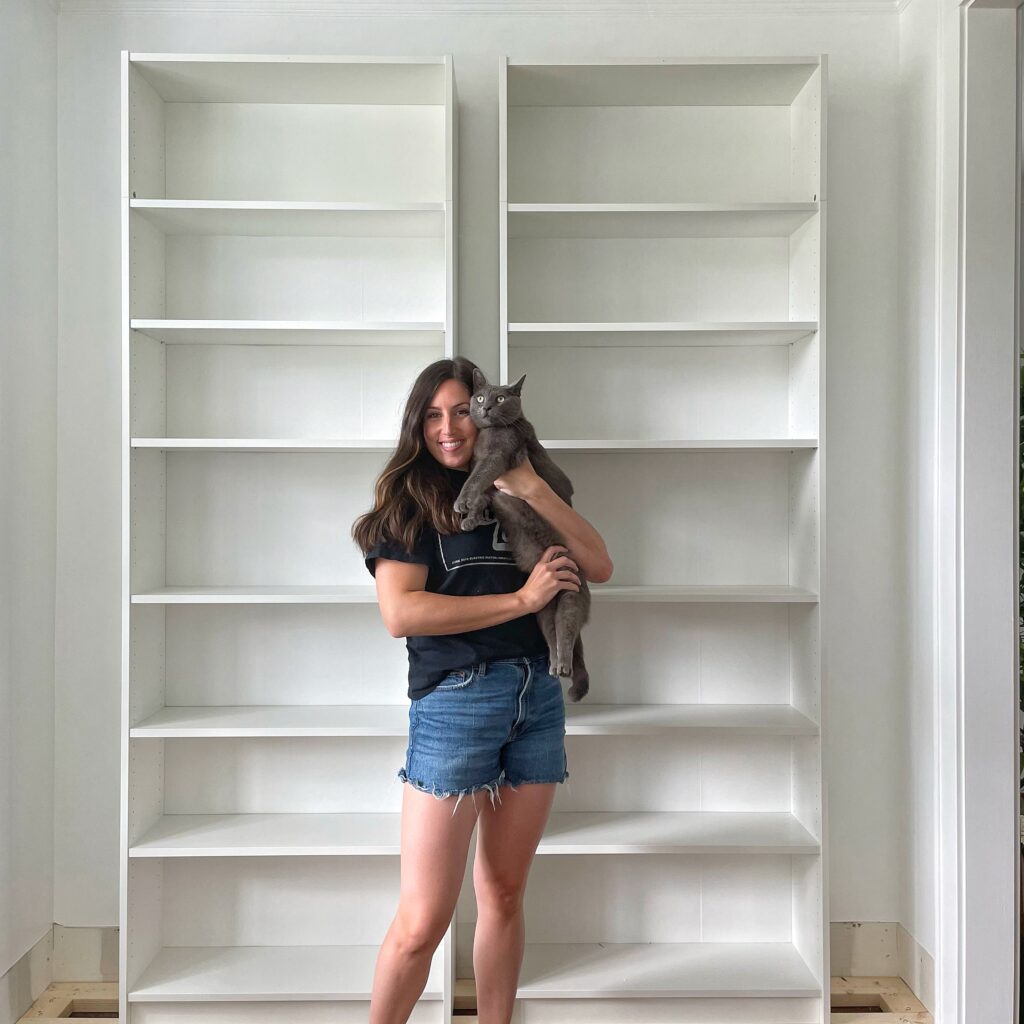
We all love a good Ikea built-in hack, am I right?! I sure do and this Ikea Billy bookcase hack is my all-time favorite! Let me start by saying that this was my first time trying a bigger build, and at the time I wasn’t even comfortable using a drill. My experience with DIY was very limited and I definitely didn’t consider myself a “builder” of any kind.
Was I intimidated to try this DIY? Yes, absolutely. But am I glad I went for it anyway? Yes, absolutely. I’m also happy to report that many people have used my Instagram stories to do their own custom look built-ins!
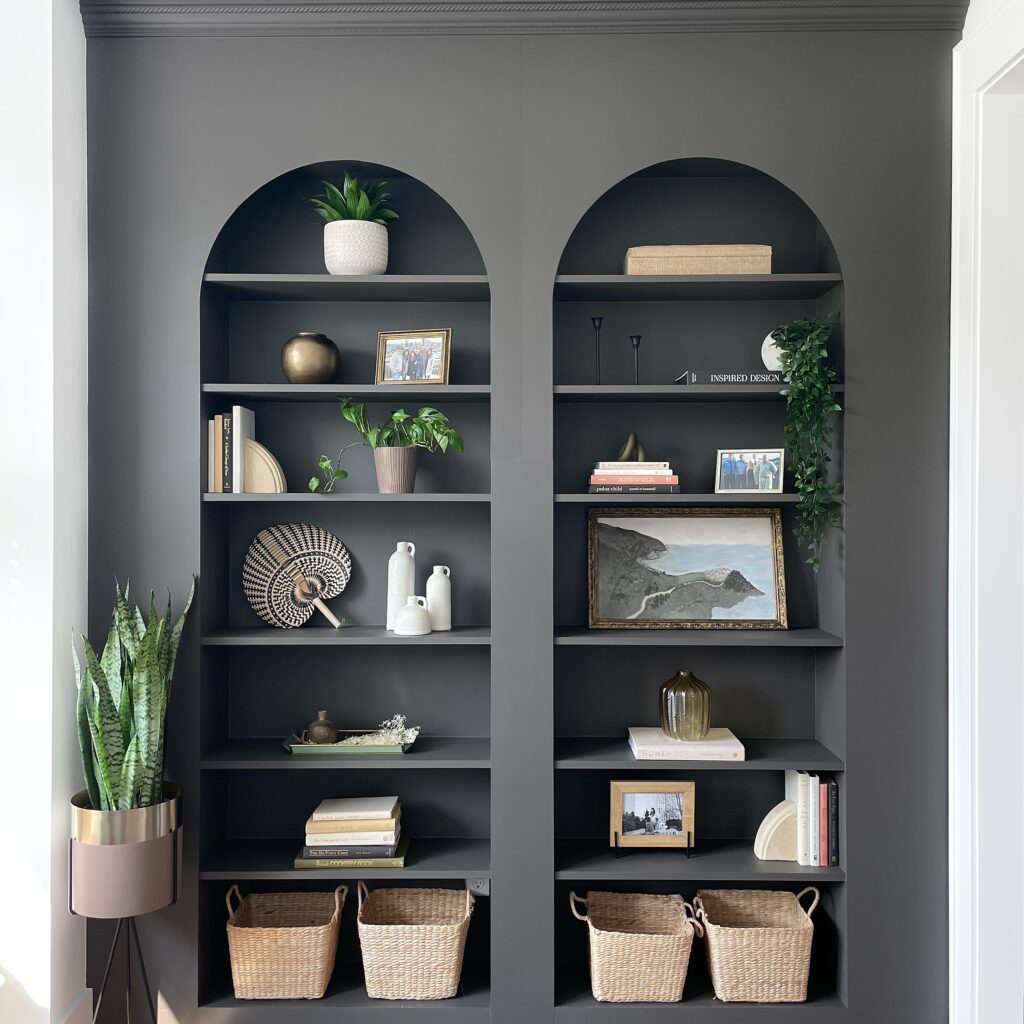
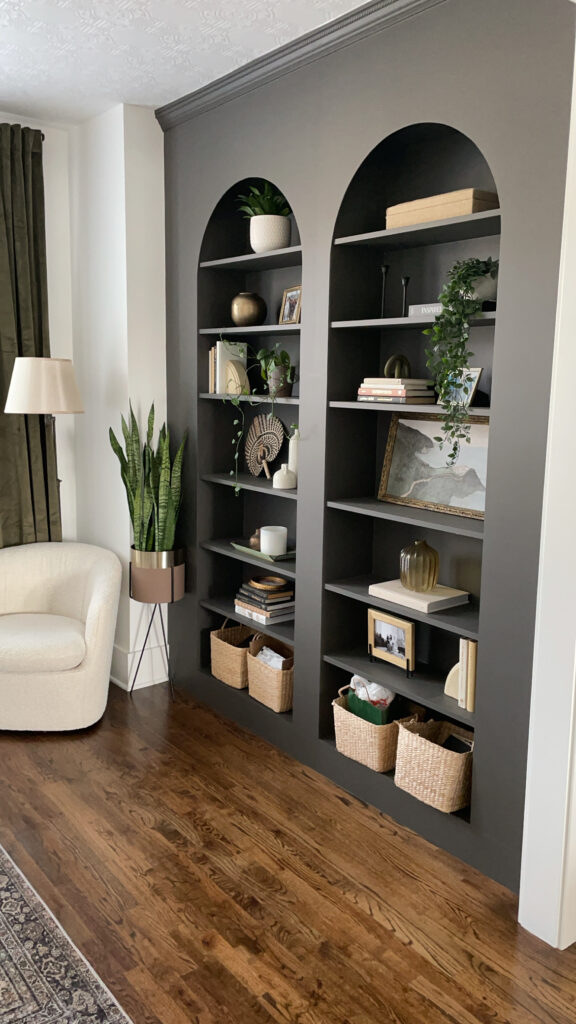
I made these built ins for my home office (which by the way is a very small room), but they would also be awesome in a living room, a bedroom, or even a fancy library wall with a ladder! There are so many possibilities and you can’t beat having extra storage space!
Disclaimer: This post contains affiliate links. This means, if you purchase something from a link I provided, I will receive a small commission. This is at no extra cost to you! Thank you for your support!
materials:
- Ikea Billy Bookcases
- 2x4s (I used around 10)
- Construction Screws
- Crown Moulding
- 1/4″ Plywood (or hardboard)
- Brad Nails
- Spackle or Wood Filler
- Caulk
- Sanding sponge
- Tack Cloth
- Primer
- Paint Color #1
- Paint Color #2
Tools:
- Painter’s Tool
- Hammer
- Box Cutter
- Nail Gun
- Miter Saw
- Sander
- Drill
- Jigsaw
- Jigsaw Fine Blades
- Table Saw or Circular Saw
Step One: Remove Existing Trim
If you have baseboards or crown molding, you’ll want to remove them before starting on the built-ins!
We had a small of piece of picture molding installed a couple inches down from the ceiling. I ended up just removing that from the entire room since I was also doing a fluted wall opposite from the built-ins as well.
Check out my DIY fluted wall tutorial here 🙂
How do you remove baseboards and crown molding?
This part is easy! First, you’ll score the seam with a utility knife (this is to cut through the caulk).
Place your painter’s tool on the seam and gently tap the handle with a hammer until the baseboard starts to separate from the wall.
Once it does, move down a foot or so and keep loosening as you work your way down. If you try to pry it off without loosening the length of the full board, it will likely just break.
I actually like our baseboards so I always try to remove them carefully in hopes to reuse them.
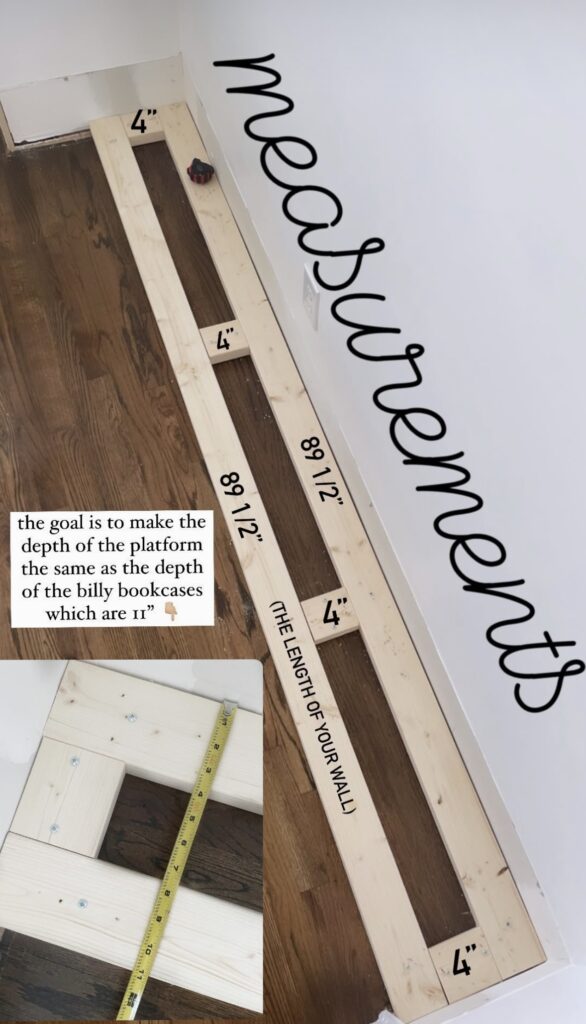
Step Two: The Platform
You’ll want your platform to be the same depth as your bookcases.
The depth of Ikea Billy bookcases is 11″. Since 2x4s actually measure at 3 1/2″ (did you know that??), they’ll account for 7″ of the depth. So I cut my middle pieces to be 4″.
The 2x4s get drilled directly into the floor. I recommend drilling a pilot hole first to help guide your screw!
What’s the purpose of the platform?
I get this question often! The platform is helpful for a few reasons.
Houses aren’t perfect and sometimes our floors aren’t quite level. Luckily, ours was level without any adjusting. (I just placed my large level on the 2x4s to check) If you aren’t as lucky, you can add shims as needed until it is!
Also, it props up the Ikea bookcases so they’re not just sitting right on the floor. This was helpful to me because our ceiling height is 9ft and we have quite a bit of empty space at the top of the built-ins.
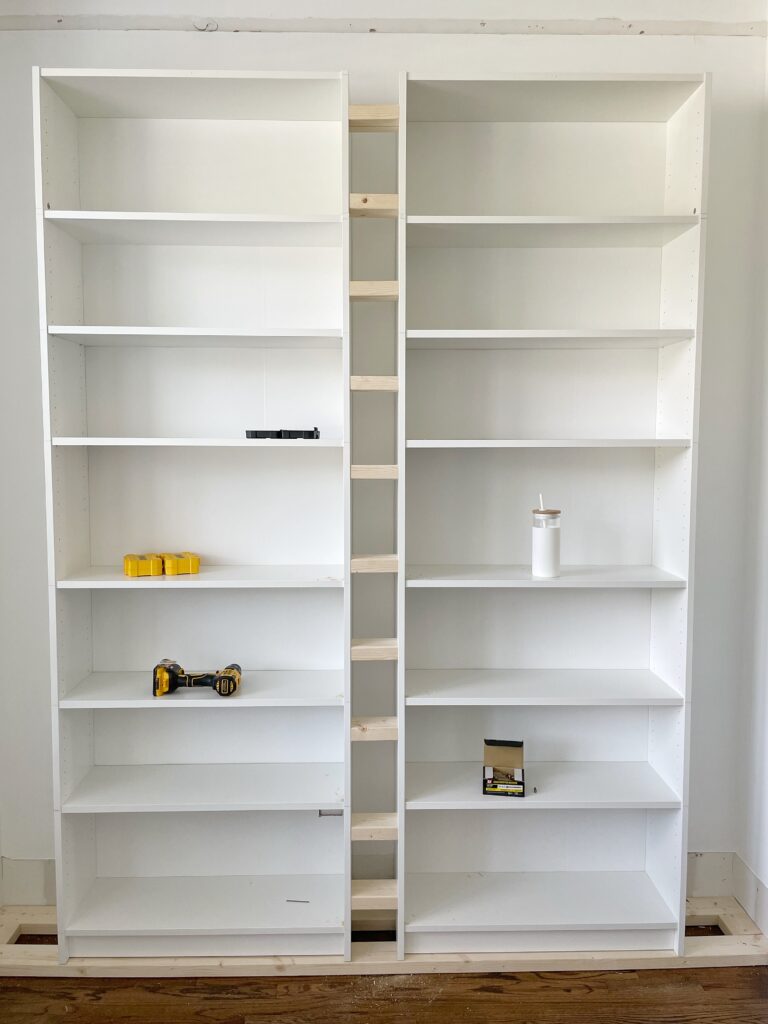
Step Three: Prepping the Bookcases
First and foremost, you’ll need to put your Billy bookcases together if you haven’t already!
Keep in mind that your shelf placement cannot be changed (unless you want to leave the adjustable shelves) so just think about what you’d like to store on them beforehand.
Something I would do differently!
The Ikea Billy bookcases come with a cardboard-like material for the backing.
If I were to go back, I would replace that with a sturdier material like hardboard. I can still see the folds in the back and it would look much more professional without!
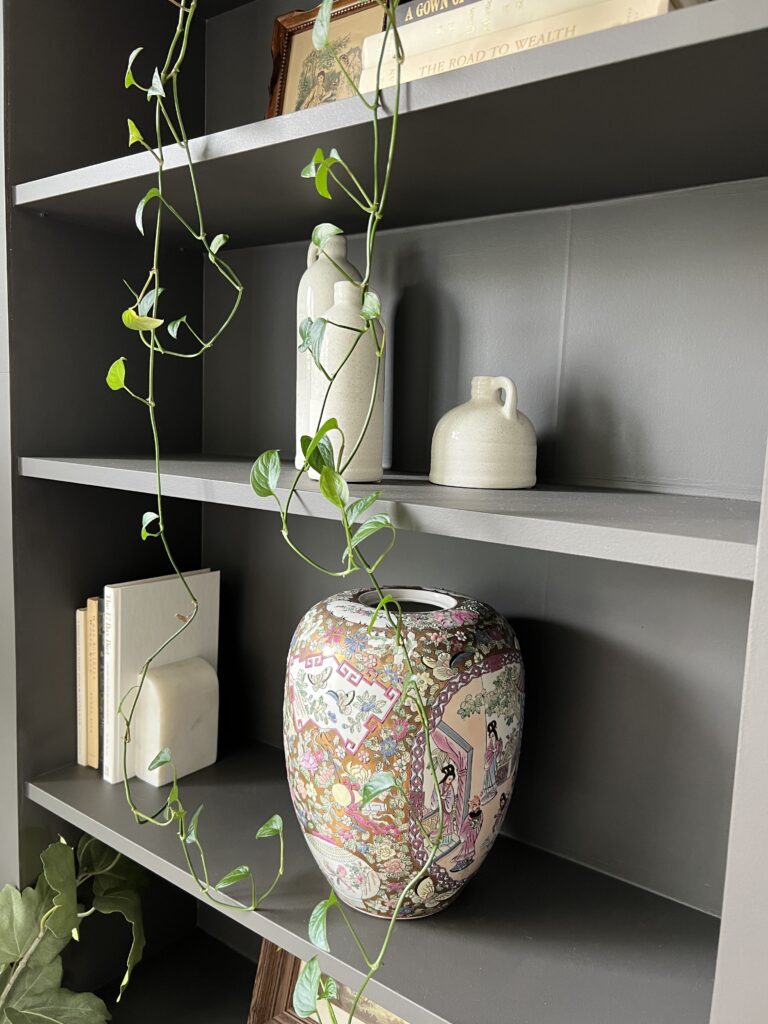
Nailing the backing in
Whether you end up keeping the backing the bookcase comes with or even if you’re using a sturdier material, it’s helpful to nail the backing into each shelf for less of a gap. See the photo below!
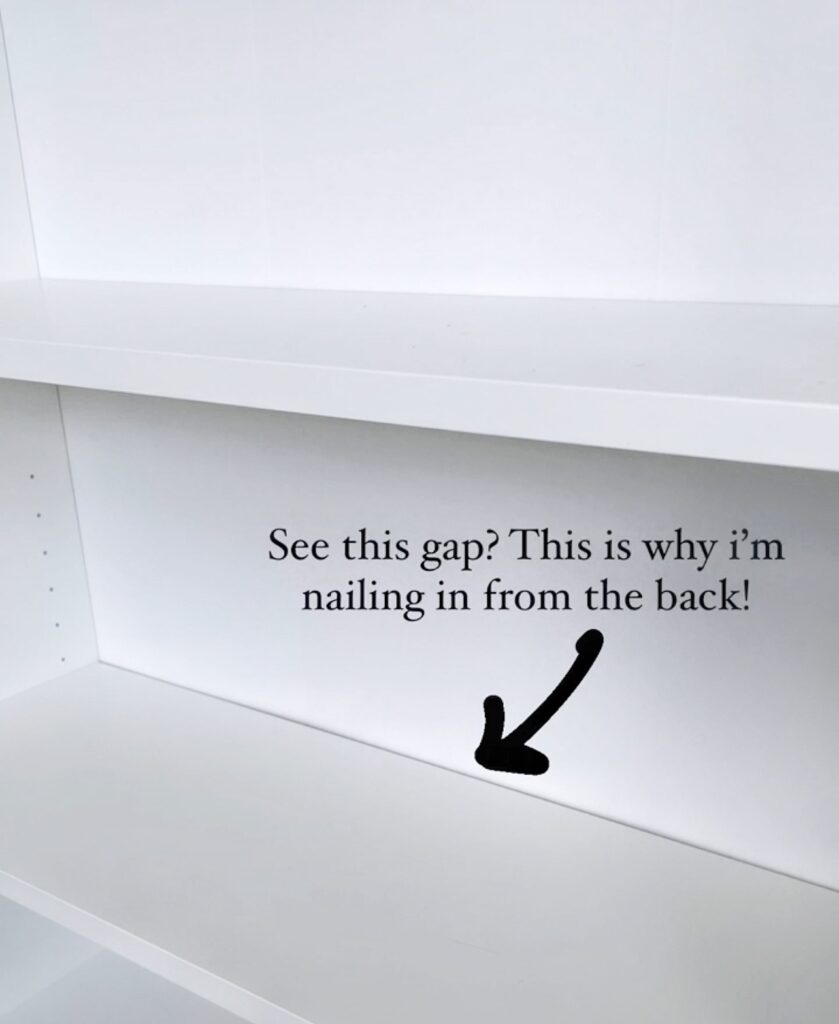
In order to nail into the shelves from the back, you’ll need to mark where to nail first!
I started by marking a line at the middle of each shelf. Then I took a small level and continued that line around the side, and to the back of the bookcase for each shelf.
What if there’s an outlet on the wall?
Now, I don’t know all the rules when it comes to covering outlets, but I was too nervous for code reasons to do that. We had one on the lower half of the wall and while I wasn’t planning to use it, I wanted to make it accessible just to be safe.
The first thing we did was mark the placement of our bookcases so we could measure the distance from the edge of the bookcase to the outlet.
Once I knew the placement, I just traced the outlet cover on the backing piece and cut it out with a utility knife! So simple.
The only issue is the outlet isn’t extended out far enough that it’s flush with the built-ins, but you can definitely get an outlet extender for a cleaner look. That was my original plan but I never got around to it. Ours is barely visible being on the bottom shelf and covered by a basket currently.
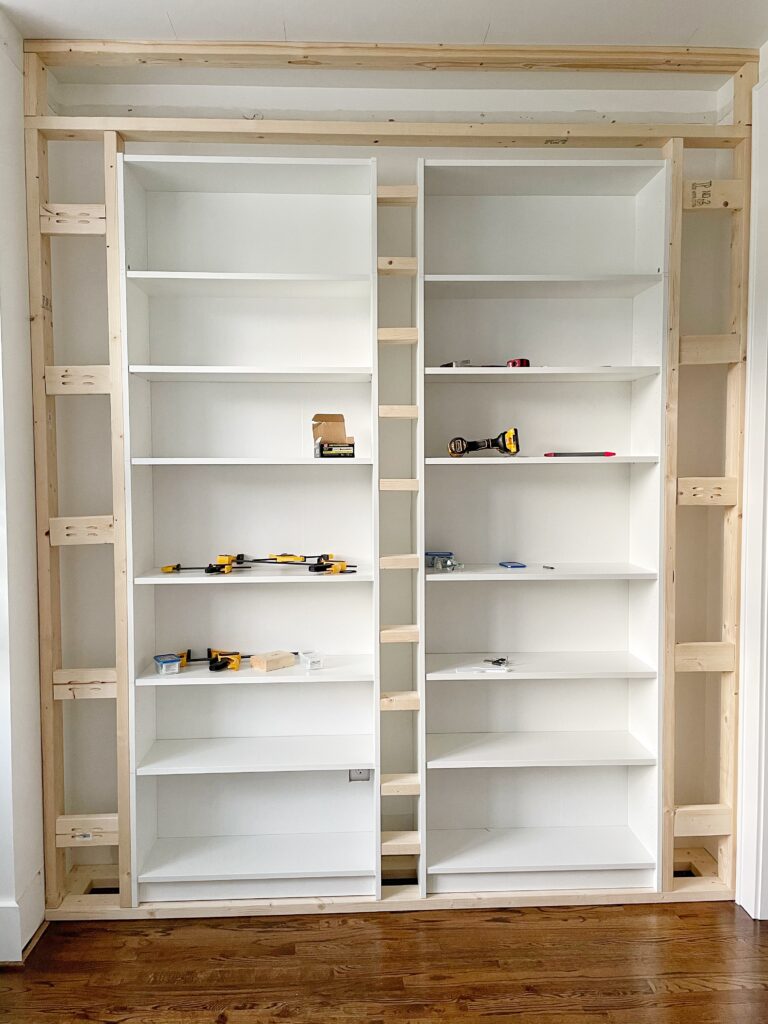
Step Four: Framing
The next step is the framing and this was the part I was most nervous about. It’s also going to be the most difficult to explain and I feel that it will be a little different for everyone. But regardless, I think it’s important to keep these goals in mind:
The main goals:
- Make sure the bookcases are secure.
- Space the 2x4s so that the front facing can attach in all the right spots! (you’ll see what I mean!)
- Try to have framing wherever your front facing seams will be (this is something I learned after the fact and wish I knew going into it!)
Framing the center
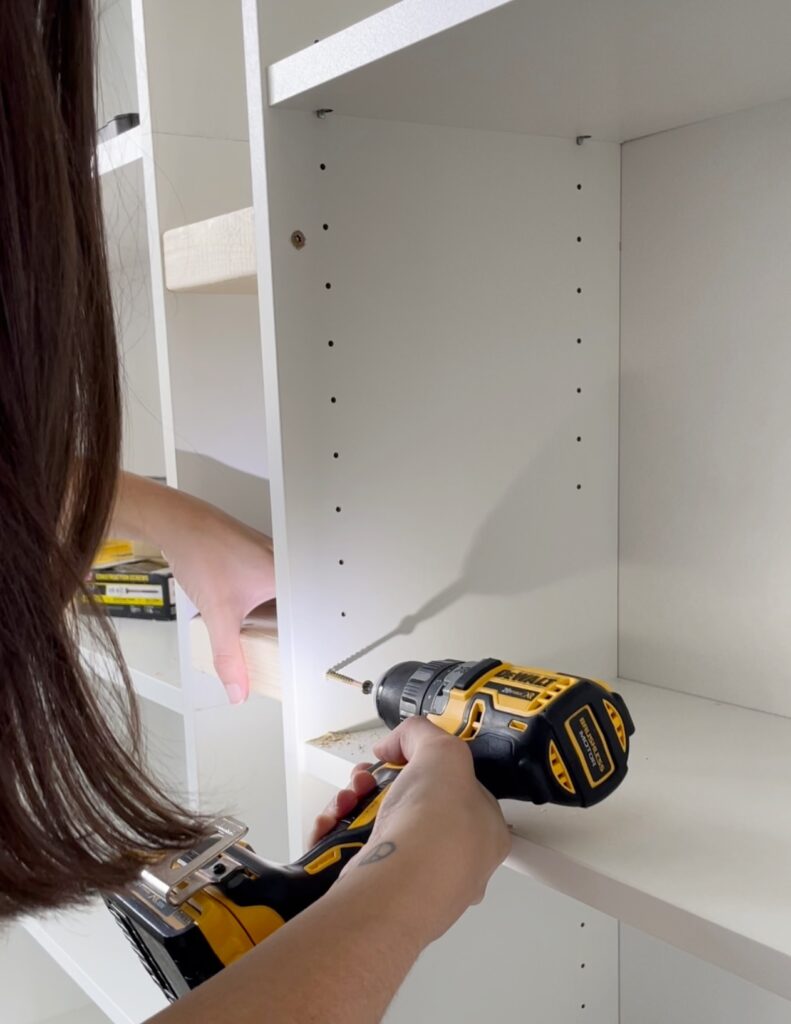
The first thing I did was cut small pieces of 2x4s for in-between the two Ikea bookcases. Of course you’ll want to determine your spacing first which will give you the measurement for these pieces.
All you have to do is screw them in from the inside of the bookcase. I made a pilot hole first and then screwed them in using 2 1/2″ screws. You’ll want to countersink the screws so you can fill them in with spackle later!
Framing the sides
This part definitely required some trial and error! Let me try to walk you through it without being too confusing.
First I screwed in 2x4s along the side of each Billy bookcase. I clamped the board in place, made pilot holes, and then screwed these in from the inside of the bookcase!
I then measured the amount of space to the left of the 2×4 I just attached and then subtracted 1.5″ (the actual width of a 2×4). This was my measurement for the middle pieces.
After those pieces were cut, I made pocket holes using a Kreg jig. Looking back, I wouldn’t have even bothered with the pocket holes.
I used the pocket holes to attach the middle pieces to one of the 2x4s (see the video below), but as for the one already attached to the bookcase, I just toe screwed those.
Toe screwing, or toe nailing, is a technique for joining two pieces at a right angle by screwing in at an angle!
One important thing to note is that on the right side of the built-ins, I had a very small gap in between the trim and the bookcases.
Before adding the framing on the right side, I wanted to double check and make sure that there’s enough space for my facing!
Framing the top
The final part of framing was for the top! I screwed a 2×4 into the top of the framing on the left and right side. Then I screwed in a couple middle support pieces.
Lastly, I added a one more 2×4 to the ceiling. If you look really close in the picture below, you can see that I marked the ceiling joists first so I could securely screw it into those. I found them using my stud finder!
Something i’d do differently
The more framing pieces, the better! If I were to go back and do it again, I would add additional support pieces along the sides, middle, and the top.
First I would add support where the seams of my facing will be. (That will make more sense in step five!) Secondly, I would add extra pieces above each bookcase in case I wanted to drill in sconces!
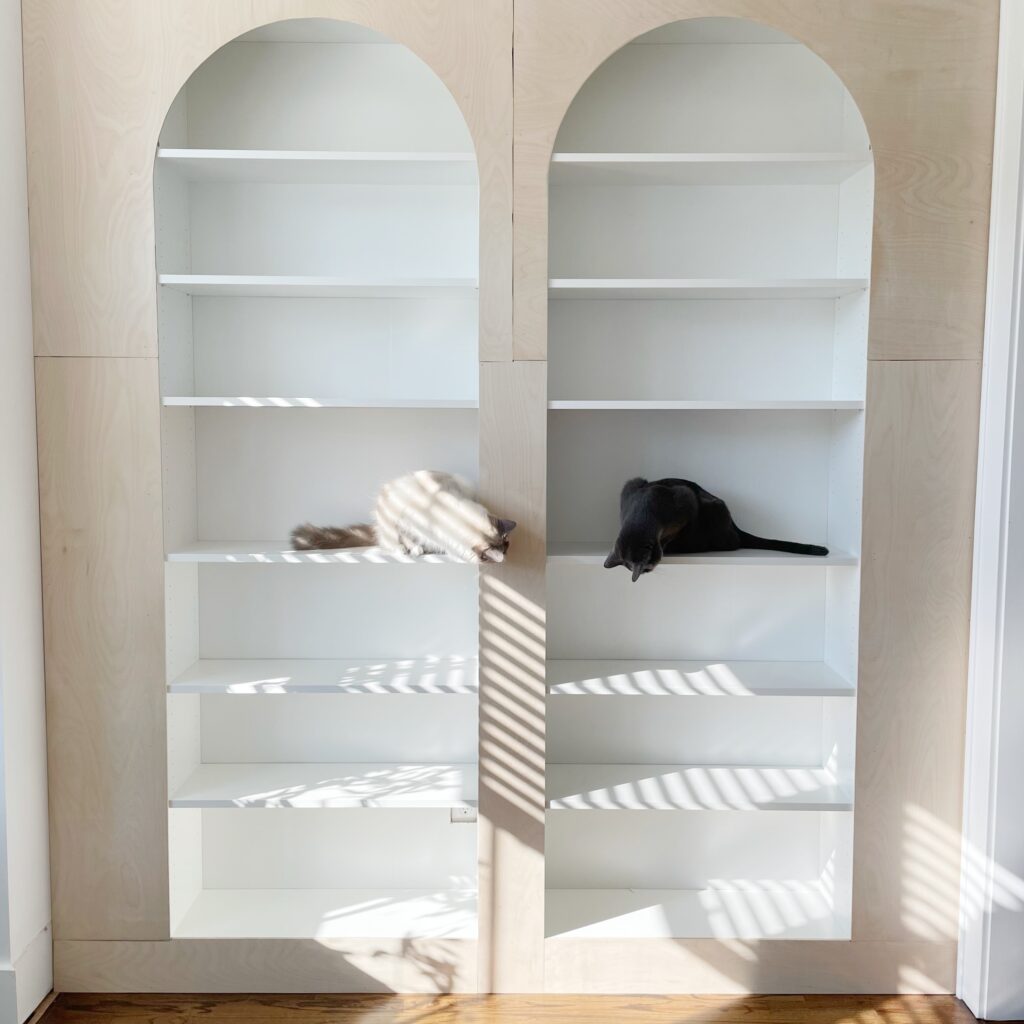
Step Five: Facing
This is best part because it finally starts to come together, yay!!
What material can I use for the facing?
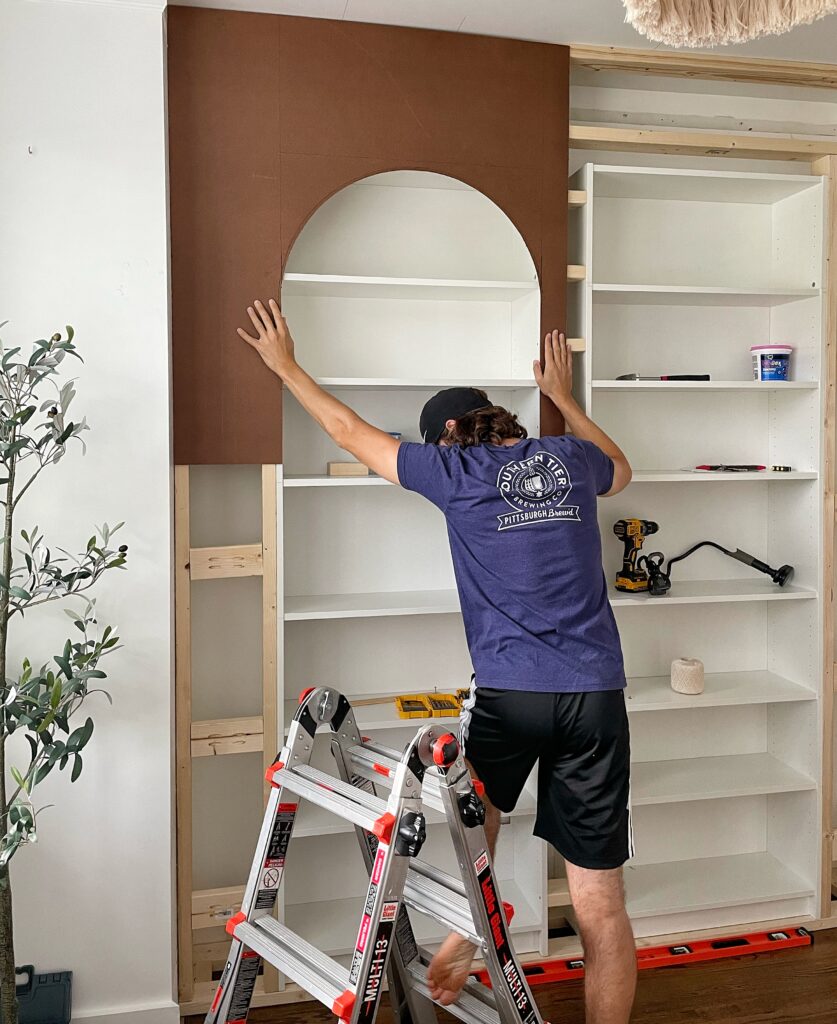
You have a couple options here. If you’re looking for a more budget friendly option, you can use hardboard. That was actually my original plan! You can see in the photo below I even cut it and everything.
Ultimately, I decided to go with 1/4″ plywood because it’s much sturdier than the hardboard! I’m glad I chose that route. It looks more professional and cuts a lot cleaner than the hardboard.
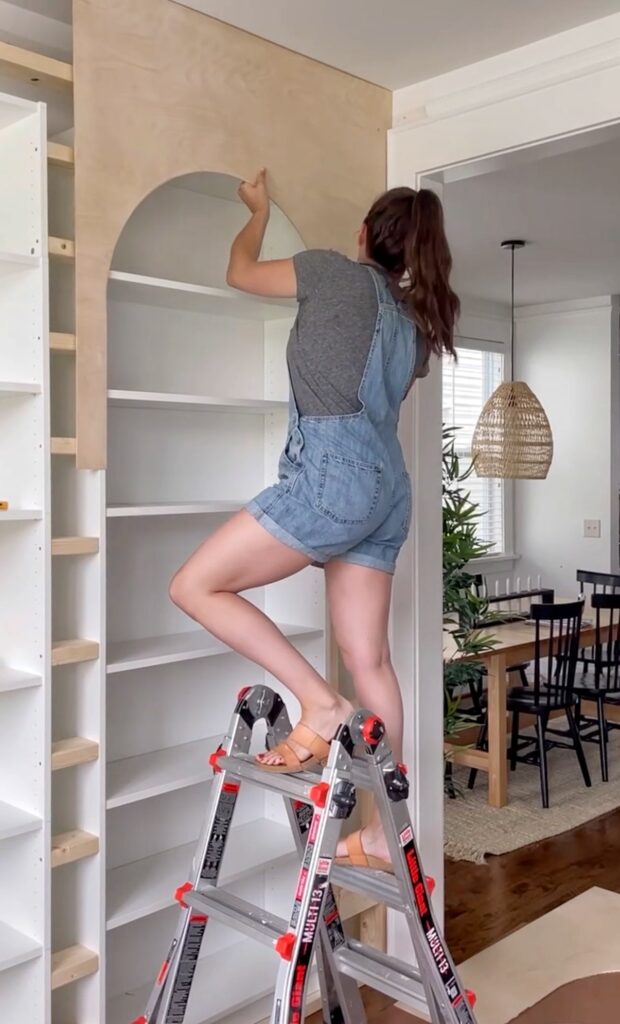
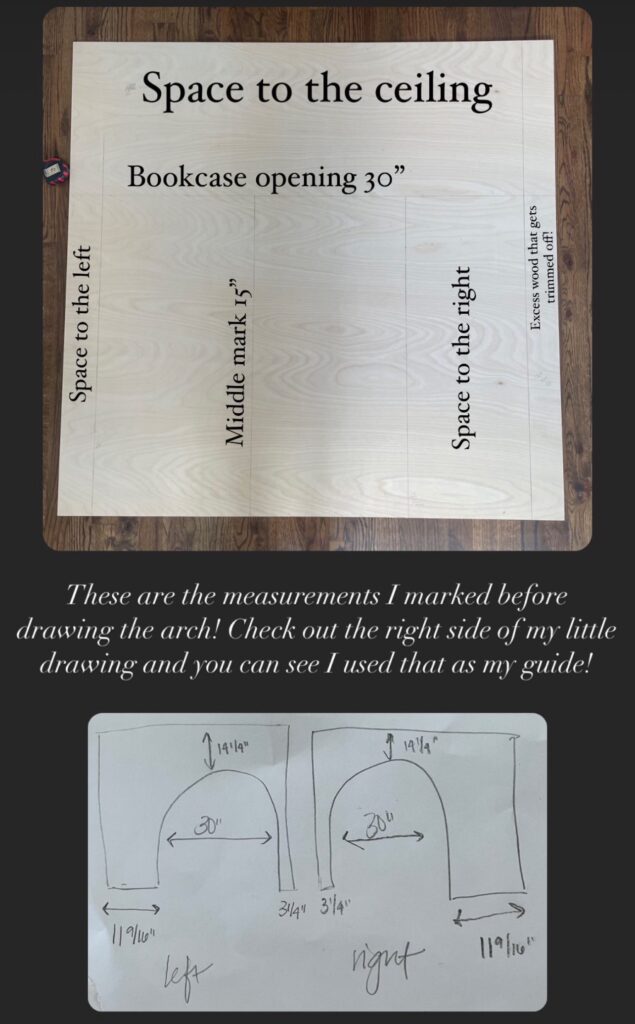
How do you measure for the arch?
This photo below shows how I got my measurements! First I sketched the outline of the openings and marked my measurements. Then I used a pencil and ruler on the plywood before cutting.
For the arch specifically, you’ll take the bookcase opening measurement and divide by 2. This will be the measurement you need when drawing the arch. (More on that in the next section!)
How do you draw the perfect arch?
You have a couple options for this. I experimented with two:
A string and a tack
This is the method I tried first.
You tie a string around a tack and a pencil, measuring to make sure it’s the proper length for the size arch you need. (For this project, it’s half of the bookcase opening which is 15″) Then you just pull taught and draw your arch.
I personally didn’t love this method and didn’t feel it was the most accurate.
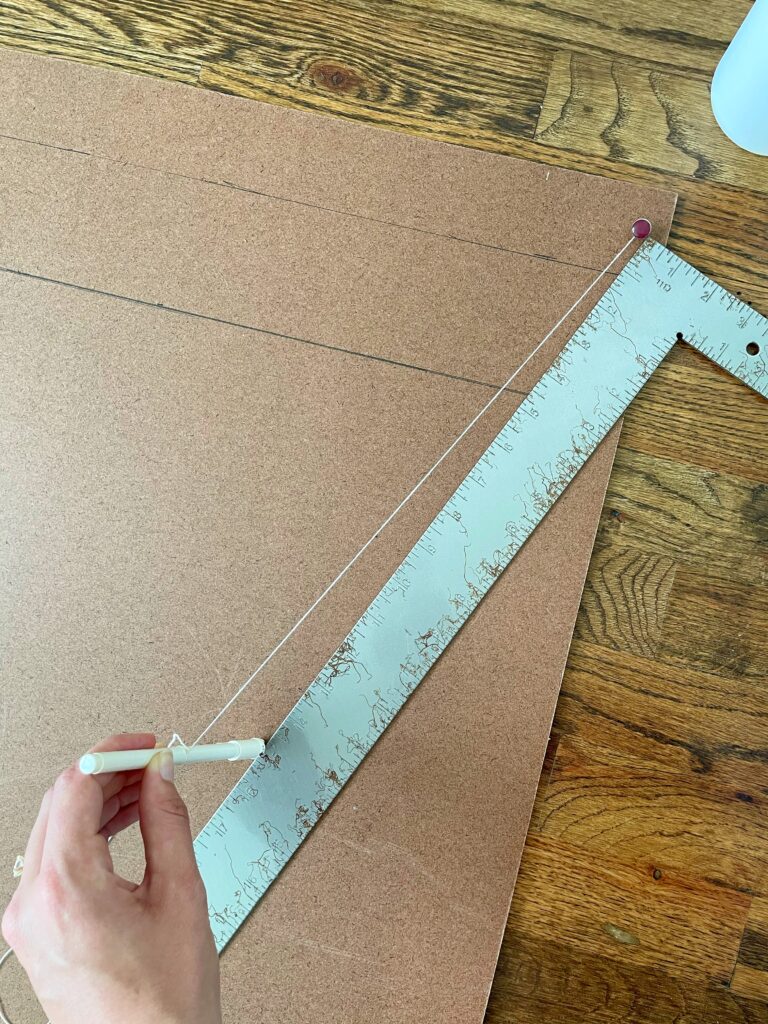
Make a jig
My papa taught me this trick and it will be my go to method from now on!
I took a piece of scrap lattice trim and drilled a hole small enough just so that my pencil lead can fit through.
Then, I partially screwed the other end of the trim into the plywood (make sure the distance between the pencil hole and the screw is the proper length- 15″ for this project) and drew my arch.
Check it out:
How do you cut an arch?
The best tool for cutting an arch would be a router, but if you’re like me, I don’t have that tool yet! I used my jigsaw and had great success. The trick with using a jigsaw is to go slow and to use quality blades! These are the blades I used when I cut my arch!
Attaching the facing
As far as attaching the facing, I just used my nail gun with 2″ brad nails and made sure to nail in only where the studs are located!
For the facing pieces other than the arches, you just have to measure, cut, and nail!
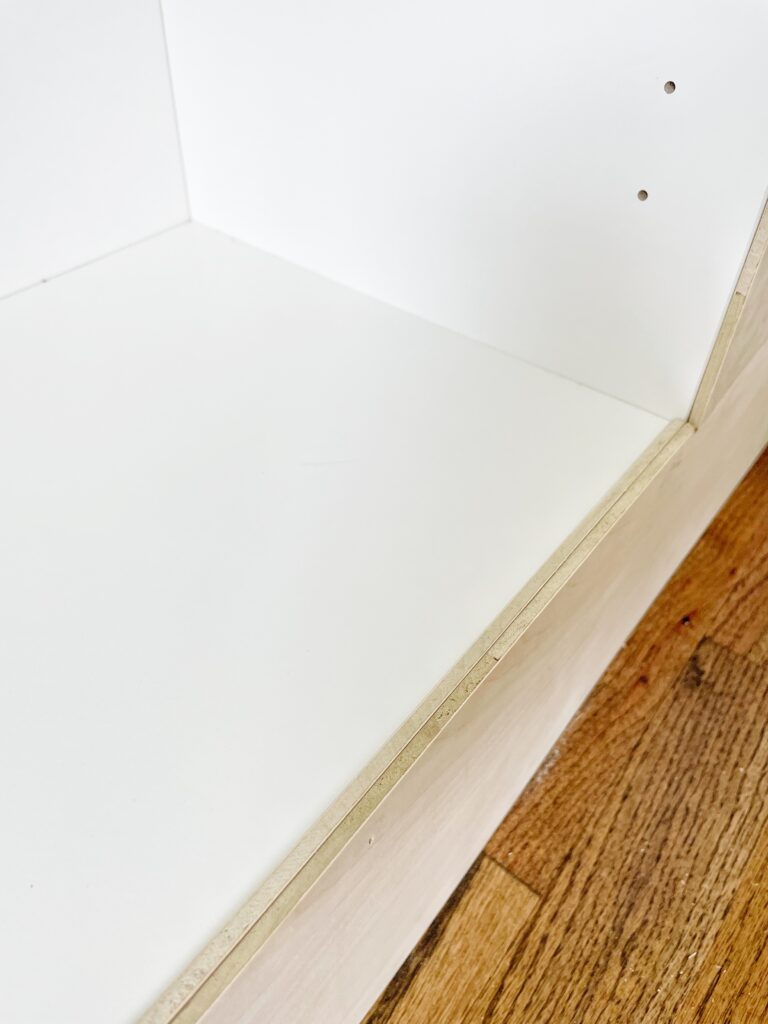
One thing I ran into at the bottom shelf of the front of the bookcases was a 1/4″ gap in-between the facing and book case. To fix this, I just slid in a scrap piece of 1/4″ plywood and nailed it in place. You can see it here:
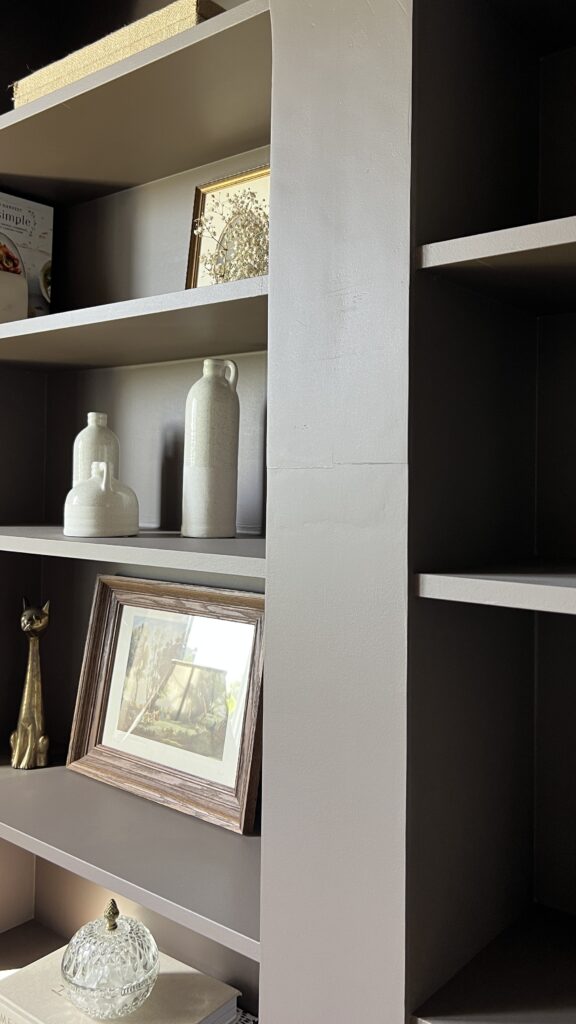
Making the seams less visible
The less seams, the better! This was something I didn’t think about when I did my built-ins, but it’s really important if you want a more professional finish!
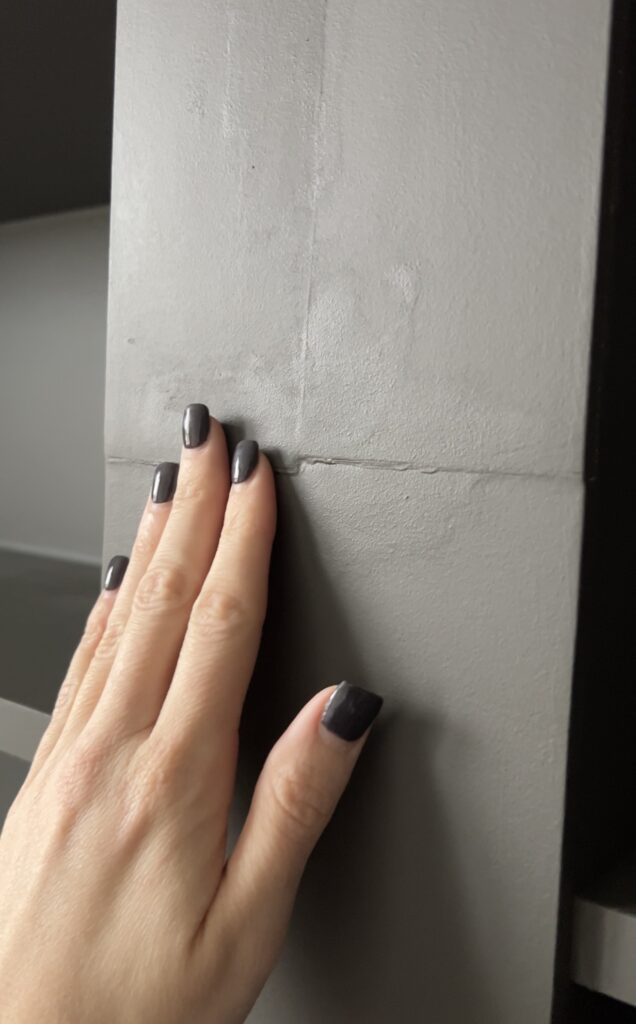
Also, make sure there’s a 2×4 behind any area that does have a seam! This is something I didn’t do and during the winter the seams started to crack. You can see it here in this video:
UPDATE: Fixing the seams
To try fixing this, I used flexible caulk in the gaps and re-painted the built-ins. But over time I was still not entirely pleased with how the seams looked.
I took fixing these seams again as an opportunity to change up the look of the built-ins in general! First let me show you what I did to fix them!
Initially I tried joint compound, but when I was sharing this on my Instagram stories, a friend recommended trying Bondo wood filler as joint compound tends to crack over time.
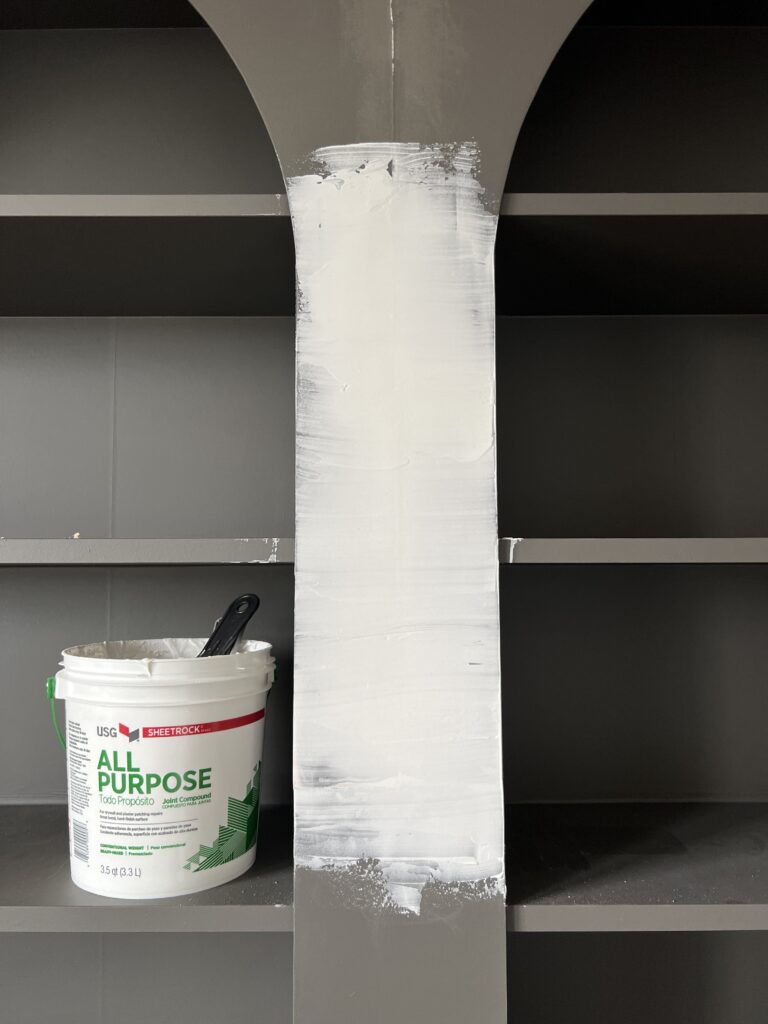
Bondo is incredibly strong so I felt good about her recommendation and decided to give it a shot! I’d used bondo once before on my DIY stair makeover.
It’s a little tricky to use (it dries super fast and smells terrible) but it is incredibly strong!
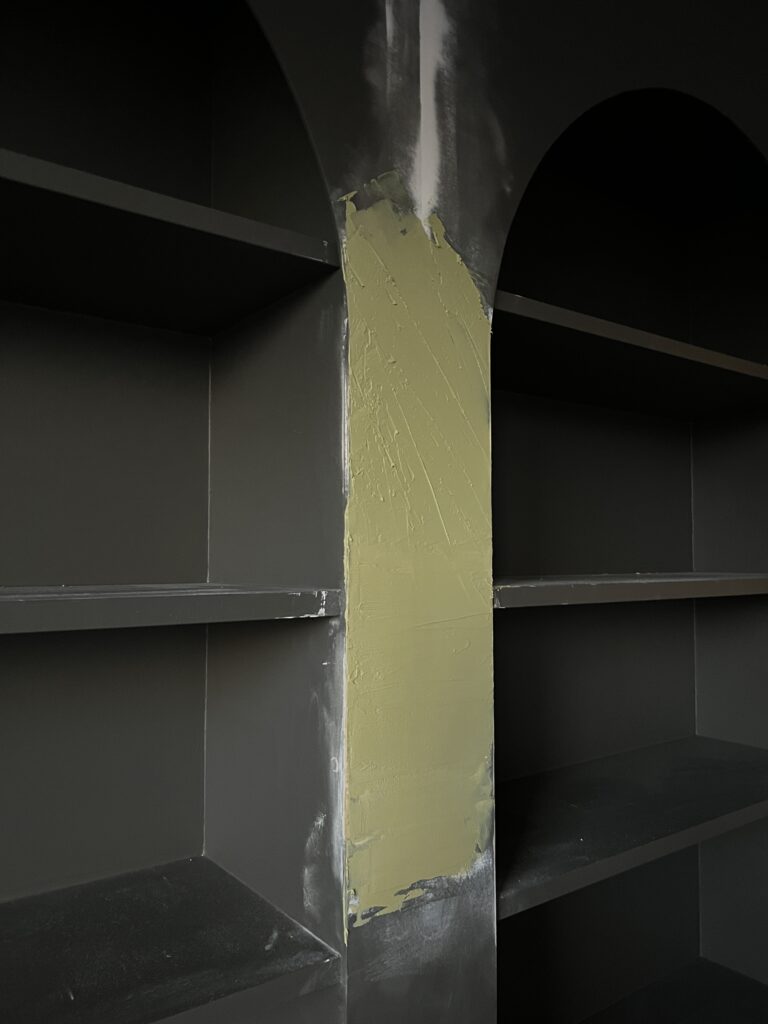
After this dried I sanded it down and primed the built-ins for new paint!!
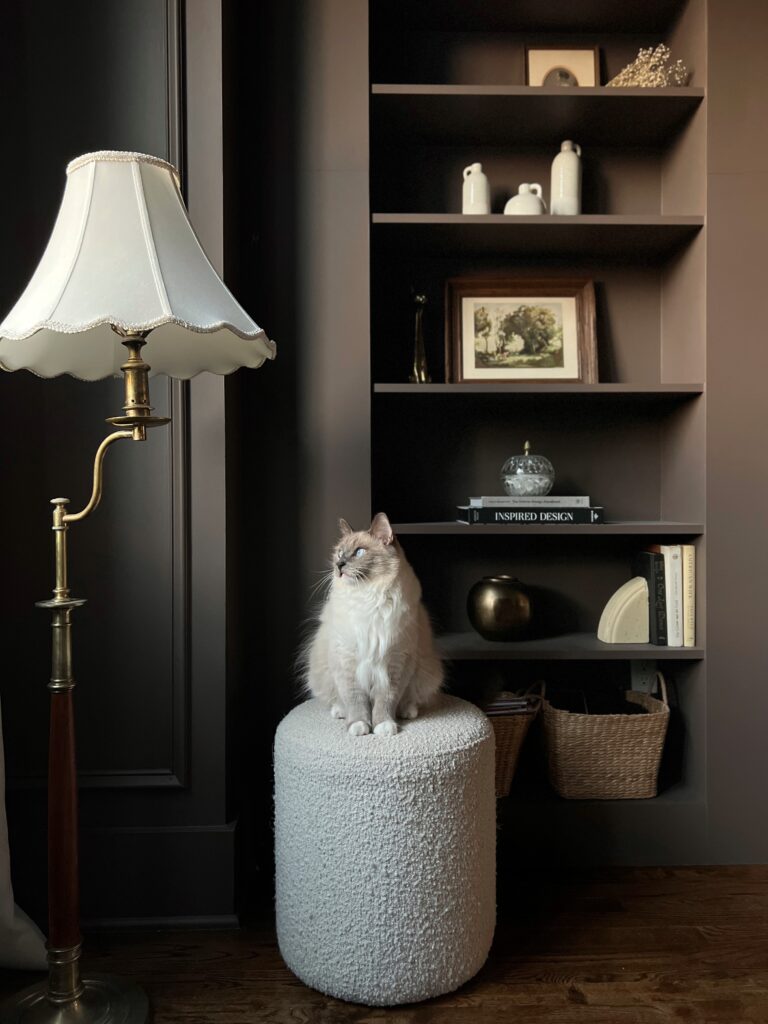
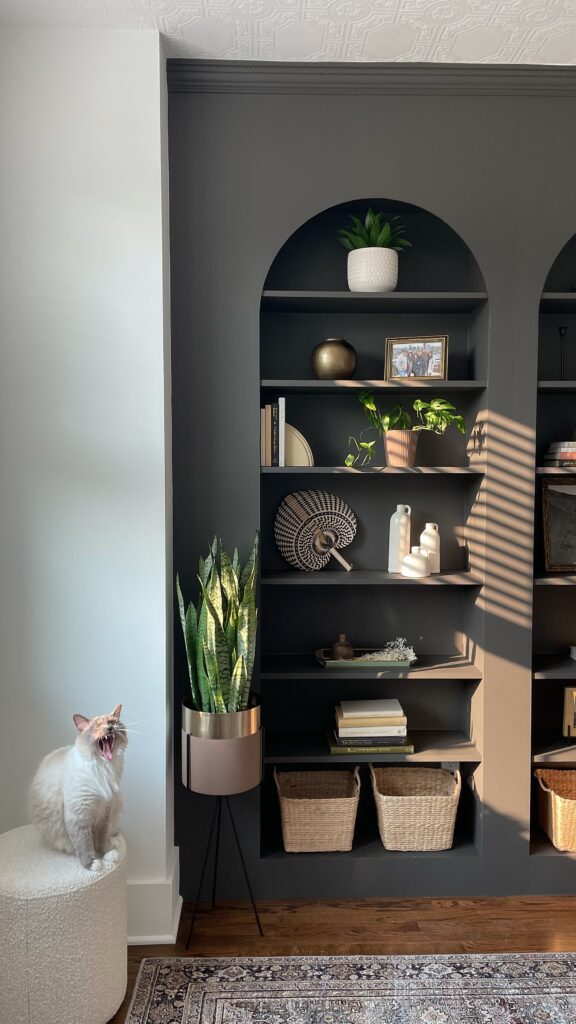
The new color for my arched billy bookcases (and my whole office) is London Clay by Farrow & Ball. I had it color matched at Sherwin Williams and I am absolutely in love!!
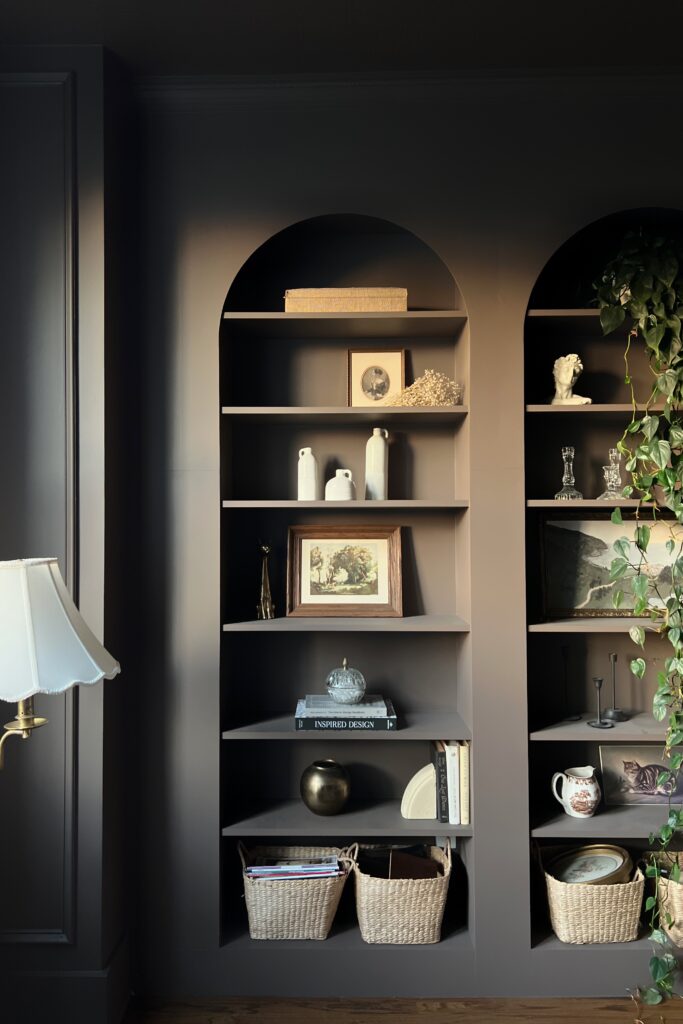
As for the seams, they are definitely still visible, but much cleaner looking than before!
The Bondo wood filler worked great so I’d recommend that if you run into this issue as well! I could have done a better job applying it, not going to lie, but even just from a few feet away it’s really hard to tell!
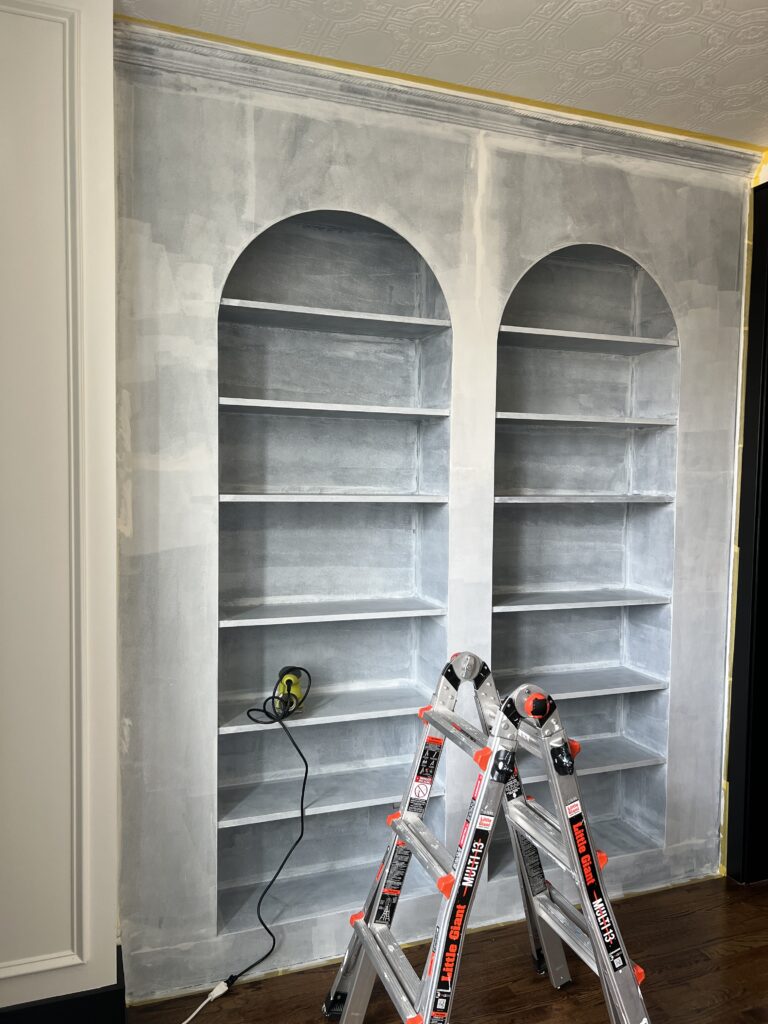
Step Six: Crown Molding
This step is completely optional, but it’s the perfect way to add some character to your DIY built-ins!! It’s my personal favorite touch!
Normally crown molding can be pretty tricky, but since I only needed one straight piece for this, it was super easy! This is the one I used.
I attached it at an angle with 2 1/2″ brad nails. I nailed in at the top of the trim, angled to hit the studs, and the also the bottom of the trim.
Check out my blog post on how to install crown moulding if you have to install crown on more than one wall!
Step Seven: Paint
I have a whole method for painting Ikea furniture.
It involves many steps to get a smooth finish without a paint sprayer, so I decided to do a second blog post with a full tutorial on how I painted these Ikea bookshelves. Check it out here!
This blog post will also cover everything I did to prep for paint including filling the nail holes, caulking, sanding, etc.
Other Ways to Create a Custom Look for Your Built Ins
This Billy bookcase Ikea hack is such an easy way to transform a space. I’ve seen so many variations and the options are endless. For more inspiration, check out this post: 13 Stunning DIY Billy Bookcase Built-In Hacks!
I dressed up my basic Billy bookcases by adding arches and crown molding, but here’s a few other ideas:
add doors
How cool would it be to have doors be on these?! Check out the Ikea Oxberg doors! They also make them with glass doors. Cabinet doors allow for closed storage which is definitely an added benefit!
a different layout
You can use three billy bookcases, for example! They also make single shelf versions that you could play around with depending on the size of your space!
add extra character
If you want to give your plain Billy bookcase a high end look, add sconces above each shelf. We have 9 foot ceilings so I really wish I planned for this and attached some 2x4s in the proper spots.
Another way to give your simple bookcase a different look is to adding trim work! In addition to crown molding, you can also add trim in between the bookcases or on the doors even!
I promise you doing built-ins is one of the best Ikea Billy bookcase hacks!! Not to mention, a simple hack. I could not be happier with the end result. I hope this full tutorial was helpful to you! If you’re a more visual person, check out my Instagram stories on how I did the built-ins.
Also, don’t forget to check out my other blog post on how to paint Ikea furntiure!
Elisha

Wow, amazing work, very inspiring 🙂
Thank you so much Grenadine!! It’s one of my favorite projects!
Sister, I’m thanking you from the bottom of my heart for this post!! I, naturally, found a tiktok and decided to do this and it didn’t have anywhere near the detail we needed to complete it. This saved many an argument and headache! Beautiful work and such a great tutorial!
Hi Courtney!! YAY! That truly makes my night. I totally KNOW the feeling when you see an amazing DIY with little to no instructions. Thank you for the sweet comment <3
Hey queen, how would using a 2×4 at the seems helped with the cracking? I’m about to start my shelves and want to avoid that
Hi Ashley!! YES I highly recommend minimal seams and having support behind them!! You got this ????
Hi Elisha!
This is amazing and I’m going to base mine off of this, however mine needs doors.
How would I go about that with the arch?
My space accommodates a regular sized Billy bookcase and one narrow bookcase. Do you think that it would look too off balance?
Hi Hanna! Thank you so much! I don’t have any experience with arched doors- i’m so sorry! But another option would be to get ikea doors for the shelves on the bottom half of the bookcases!
Hi Meila! Oh that’s so tough! I would try to get a visual if you could draw it to scale! Maybe you could even do 3 of the narrow ones?!
Amazing inspiration for these Billy bookcases! Honestly, I am blown away. Do you think this is doable on a carpeted room? Also curious, how long did this project take you? Thanks for such an in depth and articulate post!
Hi Rachelle! Thank you so much for the kind words!! You could definitely do them in a room with carpet, I think you would just want to cut away the carpet that they’ll rest on! As far as time, It’s so hard to say because I work in increments, but the built-ins before I painting them probably took a couple busy weekends (full days) and then the painting you could finish in a few days as well! I was pretty surprise with how quickly I completed them! Hope that helps!
Hi Elisha! Thank you for sharing your diy bookcase. Because of your detailed step by step method, I believe that I can definitely accomplish a similar project. I also appreciate that you took the time to meticulously document the process for the people ( like me) who work best when information is presented in an orderly manner. I am sure it was time consuming; and so I appreciate your effort even more. Please continue to present content of this standard. Looking forward to reviewing more of your projects and starting some of my own.
Hi Erica! Ah, that makes me so happy to hear! Thank YOU for taking the time to leave this comment- it makes my day! Good luck on your project and always feel free to DM me on Instagram if you ever have questions! Cheers <3
I SO appreciate the detail, photo & videos you posted. I am such a visual learner and many DIY posts skip steps which has left me confused. Very excited I found your page and I can’t wait to get started on this project!
That totally makes my day!!! I’m so glad you found it helpful and feel free to DM me in Instagram if you have any questions 🙂 Thanks Elizabeth!!
Thanks for such wonderfully detailed instructions! I just finished mine and I could not love it more!
Oh that makes me SO happy to hear!!! You’re very welcome and i’m glad you went for it! Enjoy 🙂
Hi, thanks for sharing this amazing post. You have written a very very clear blog, i’m going as far as saying that this is the best how-to-blogpost out on the internet in terms of clarity and detail.
In addition, the quality of your work itself is just impeccable.
I believe you leave no choice but to follow your blog closely!
Thank you!
Kind regards,
Raj
Hi Raj! Wow thank you so much, that means a lot!! Glad you have you following along 🙂
I love this tutorial! My husband and I are currently following your steps in our new home. Did you secure the shelves into the walls with anything different than the original metal ones? If not, what did you do to cover up the little metal but sticking out of the bottom?
Hi Hannah! Oh that makes me so happy 🙂 I’m honestly having a hard time remembering, but I feel like we actually *didn’t* secure the bookcases to the wall since the framing is attached to both the wall and the bookcases, making them secure! But If you did want to, I would get a little L-bracket to attach to the top of the bookcase and assuming you’re doing a facing, it would be hidden by that! Hope that makes sense! Good luck!!
Hi Elisha, thank you so much for this clear, detailed post. I’m working on something similar and your post is making it much more understandable! Other people who have e done this just say, “Now make the frame.” Not helpful!! Thank you for actually telling us HOW you made all these pieces. I do have one question for you (and I know it’s been a few years since you posted this so if you don’t remember, I understand!) when you secured the side 2 x 4s to the wall walls, were you able to secure them to a stud or did you have to use drywall anchors? I can’t seem to find a stud where they need to go and I’m worried about lining up anchors and screws! Thank you!
Hi Lauren! Awe, you’re very welcome, I’m so glad it’s helpful! I don’t believe I screwed them into studs nor used drywall anchors. I think the pressure from the small middle support pieces helped keep it sturdy!! 🙂