

How many times a day do you frequent your kitchen pantry? Too many? Same. Our pantry makeover DIY has been an absolute game changer for us!
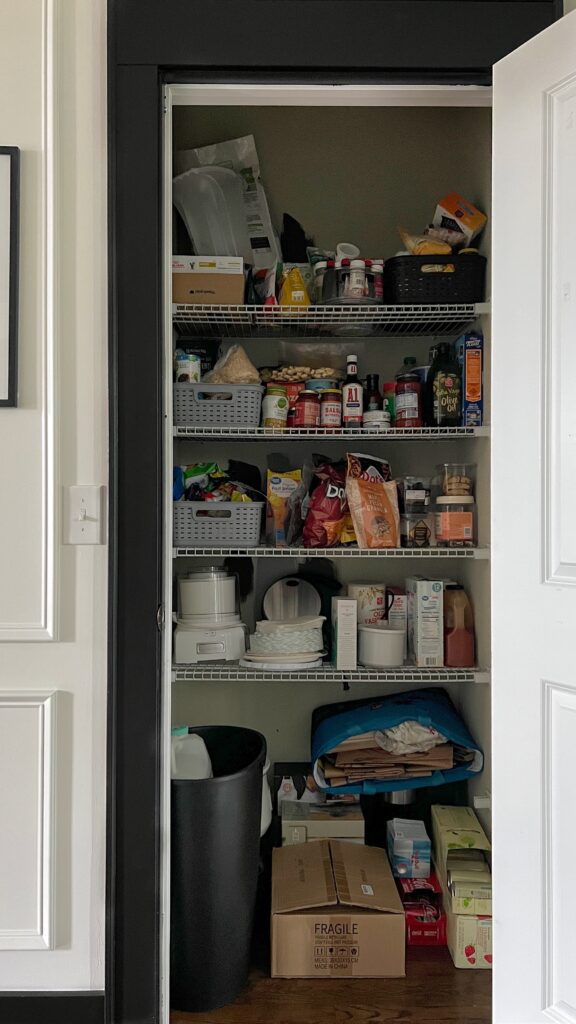
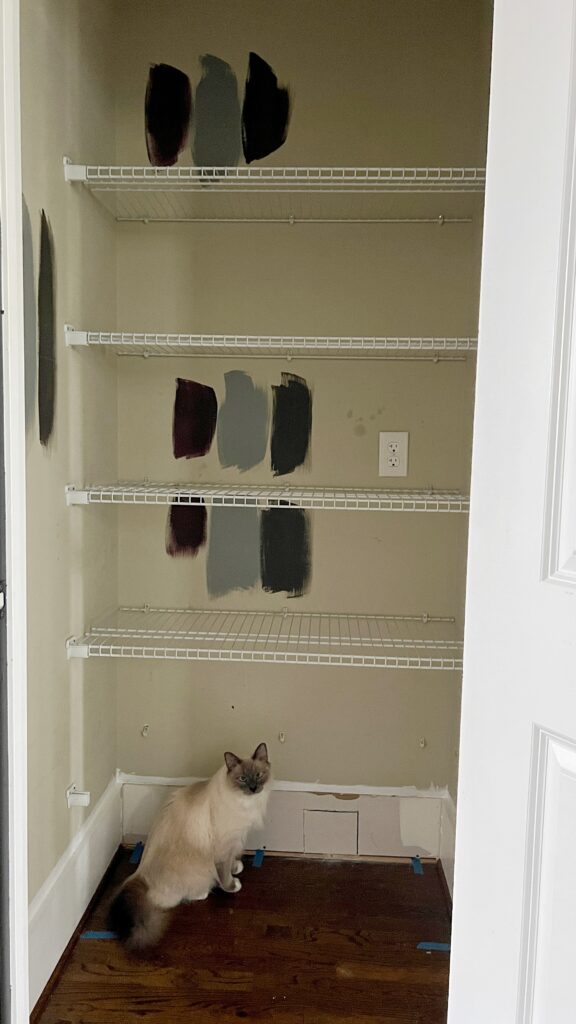
Not only was our pantry closet a total eye sore, but it also wasn’t a great use of space. Our small appliances were crammed on the floor alongside our canned drinks and grocery bags. And don’t even get me started on those wire shelves! It was a jumbled mess and I’d been dreaming about this project for long time.
Disclaimer: This post contains affiliate links. This means, if you purchase something from a link I provided, I will receive a small commission. This is at no extra cost to you! Thank you so much for the support!
Our small pantry makeover consisted of about eight different DIYs, so use the table of contents to navigate to the step-by-step tutorials that you’re interested in!! 🙂 You can also skip to “Pantry Sources” if you’re looking for a link to something in particular!
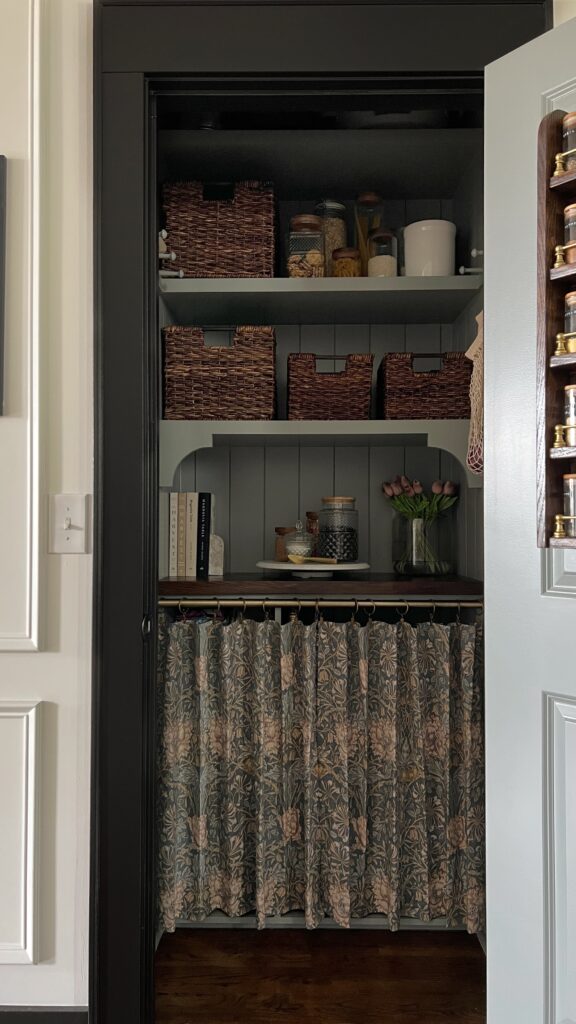
Before + After of Our Pantry Makeover DIY
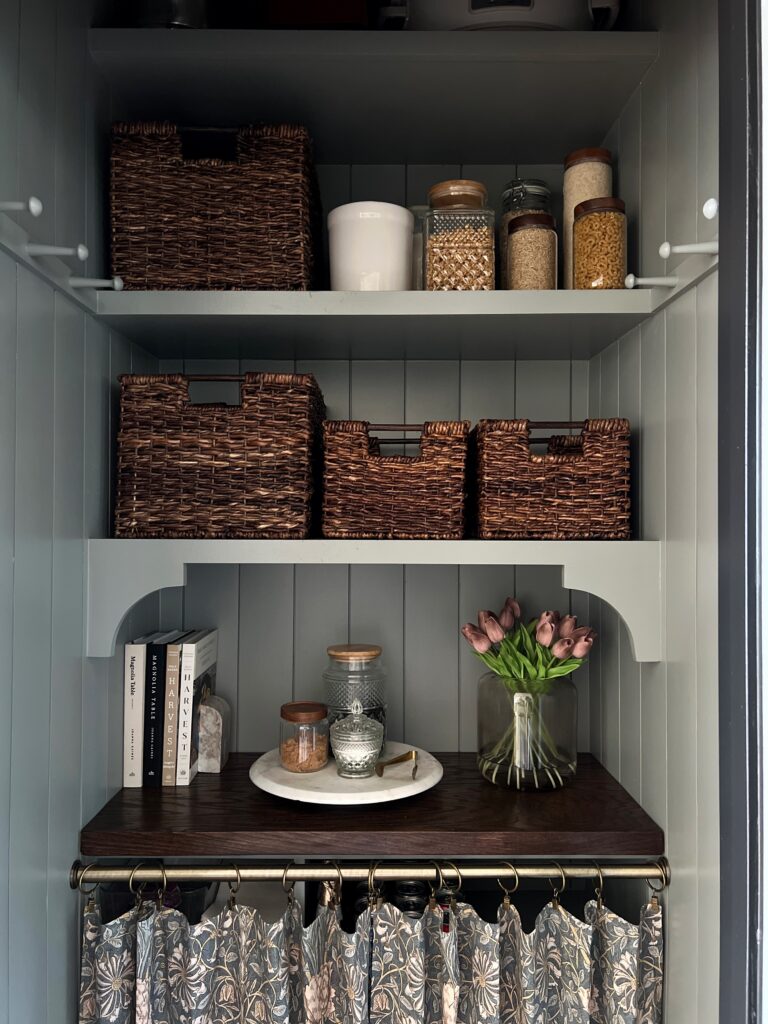
Small Pantry Organization
Just because you don’t have a walk-in pantry, doesn’t mean you have to sacrifice aesthetic. Ours feels like a mini butler’s pantry now and it makes me so happy! By the way, we’ve since moved and now we do have a butler’s pantry (yay!), you can check out our DIY walk in pantry makeover here!
Pantry Makeover Inspiration
Organization can be tough. There were many moments I wished I had a professional organizer to help me. But luckily there’s plenty of pantry transformations to explore on Pinterest!
Here’s my pantry closet Pinterest board!
A lot of my inspiration came from Laine and Layne’s corner pantry and James May Homes pantry.
What is the best way to organize a small pantry?
When you’re working with limited space, it’s important to figure out what storage systems would work best for your own small pantry makeover. Take inventory of your current pantry items and write a list of items you’d like to store in your pantry. Maybe you also need somewhere to store paper products or garbage bags?!
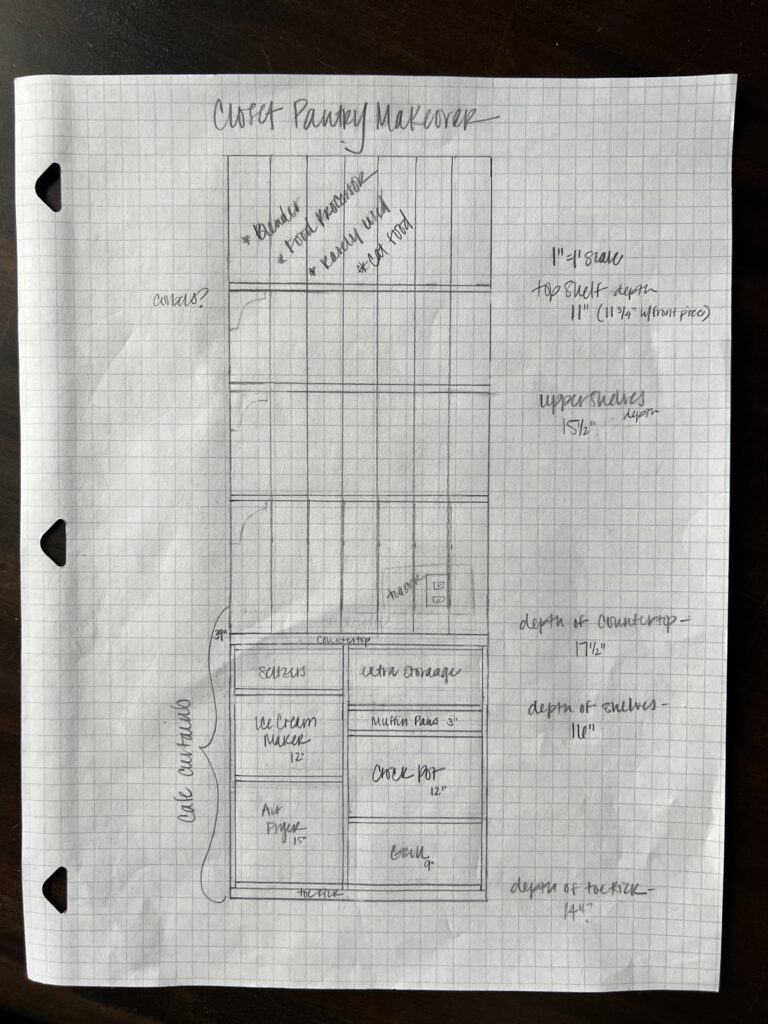
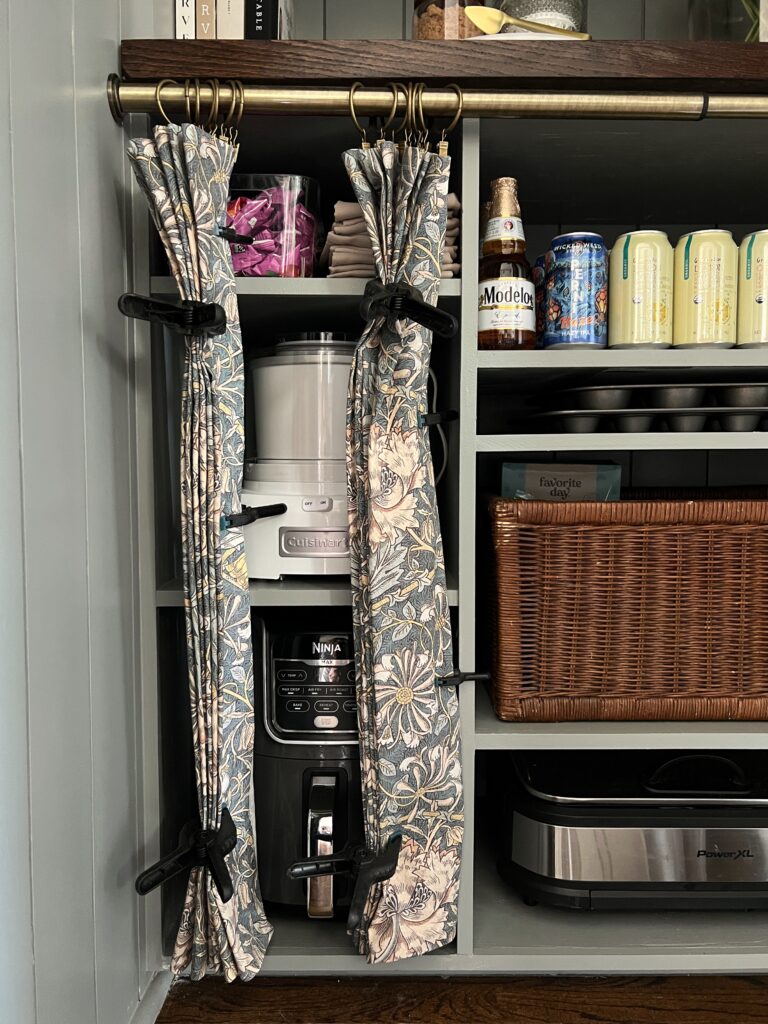
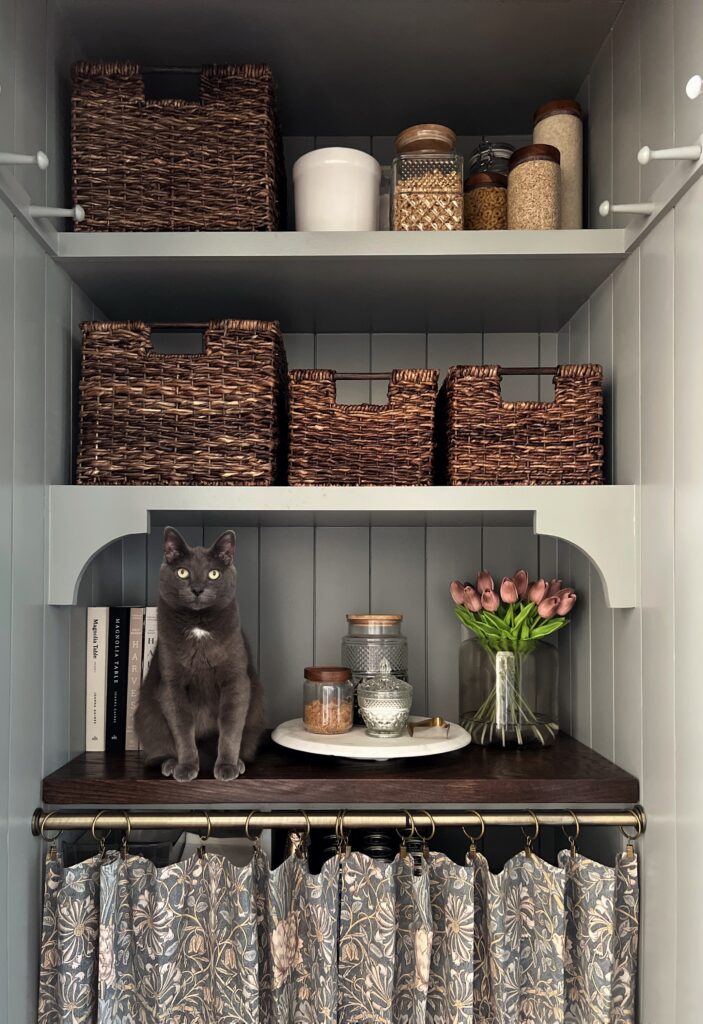
We knew we needed extra space to store our small appliances so the lower shelves were carefully planned to accommodate those! In the end, I did rearrange things just a bit until I found the pantry system that worked best!
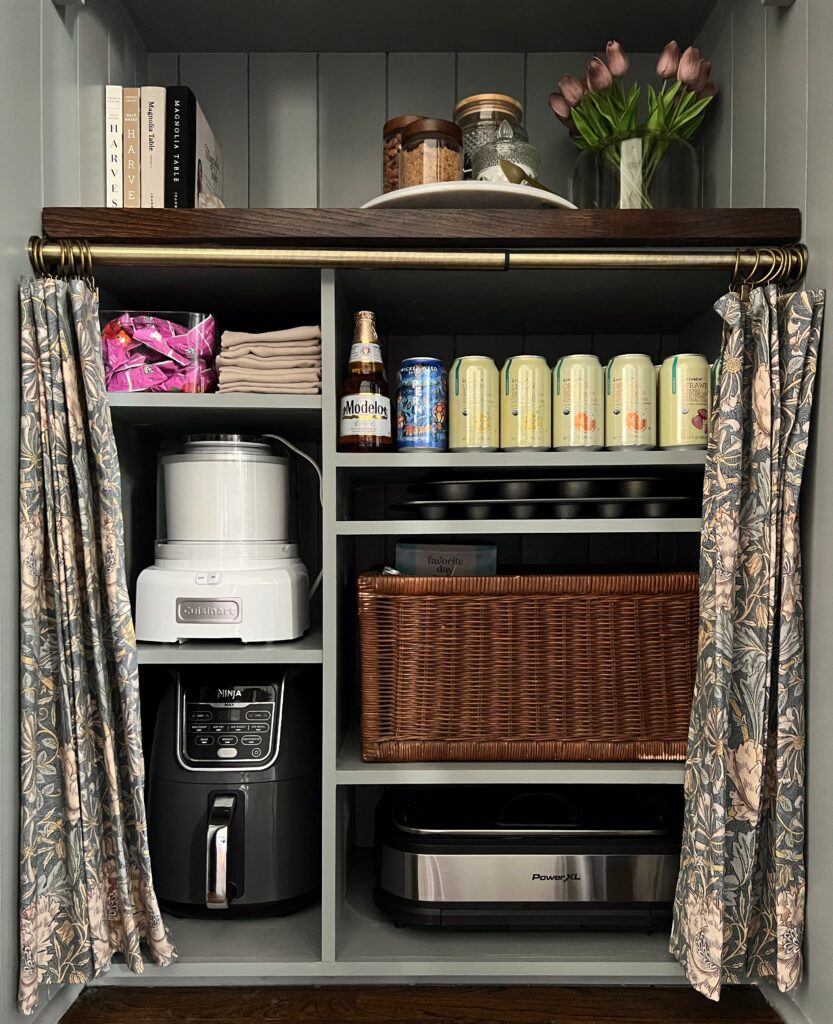
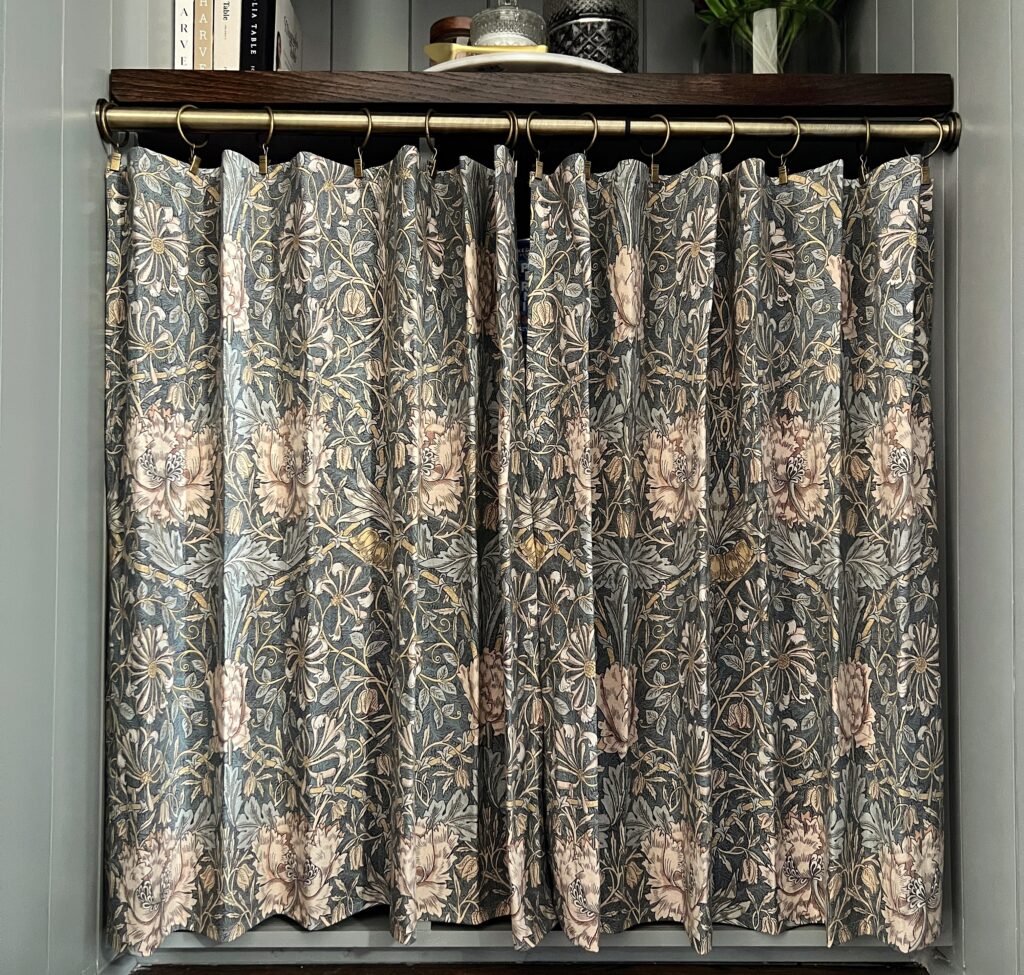
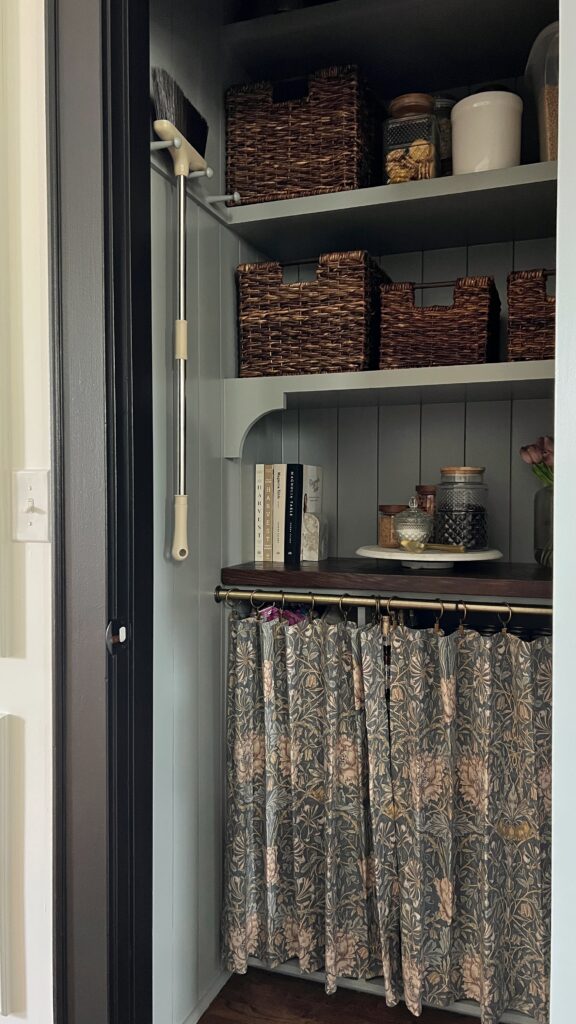
Small pantry organization tip: Use cafe curtains to cover up any open shelving that might be an eye sore!
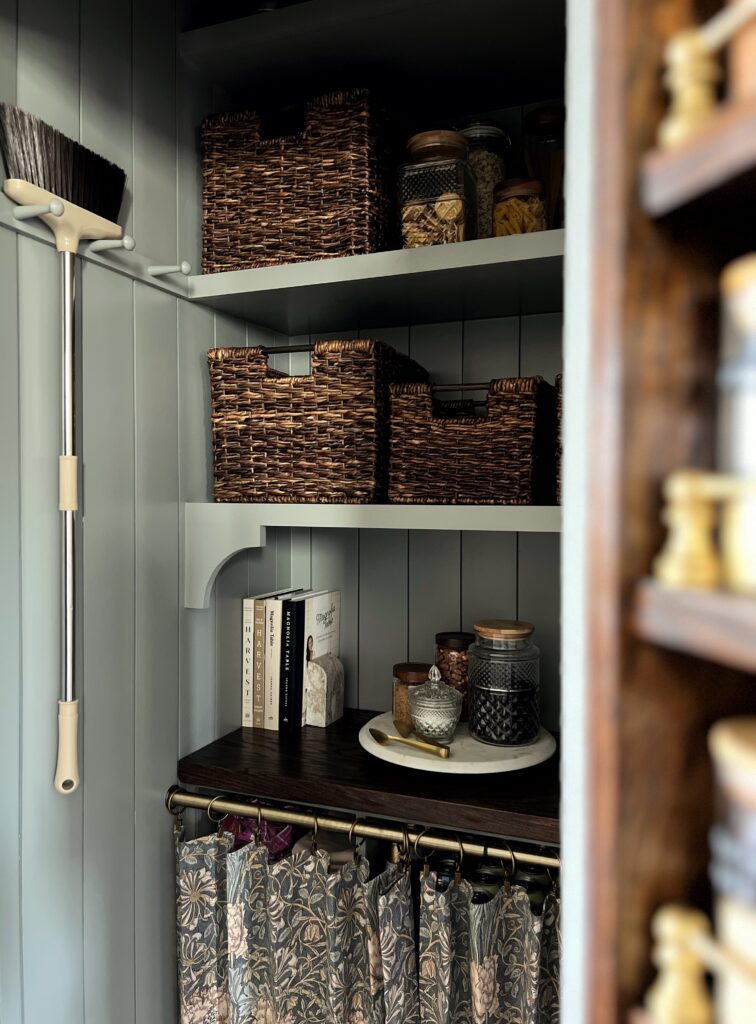
The top shelf, which you can barely see in the photo below, is fore the small appliances we don’t use often since they’re the hardest to get to! (I keep a small foldable step stool in the lower cabinets for when I do need to grab them!)
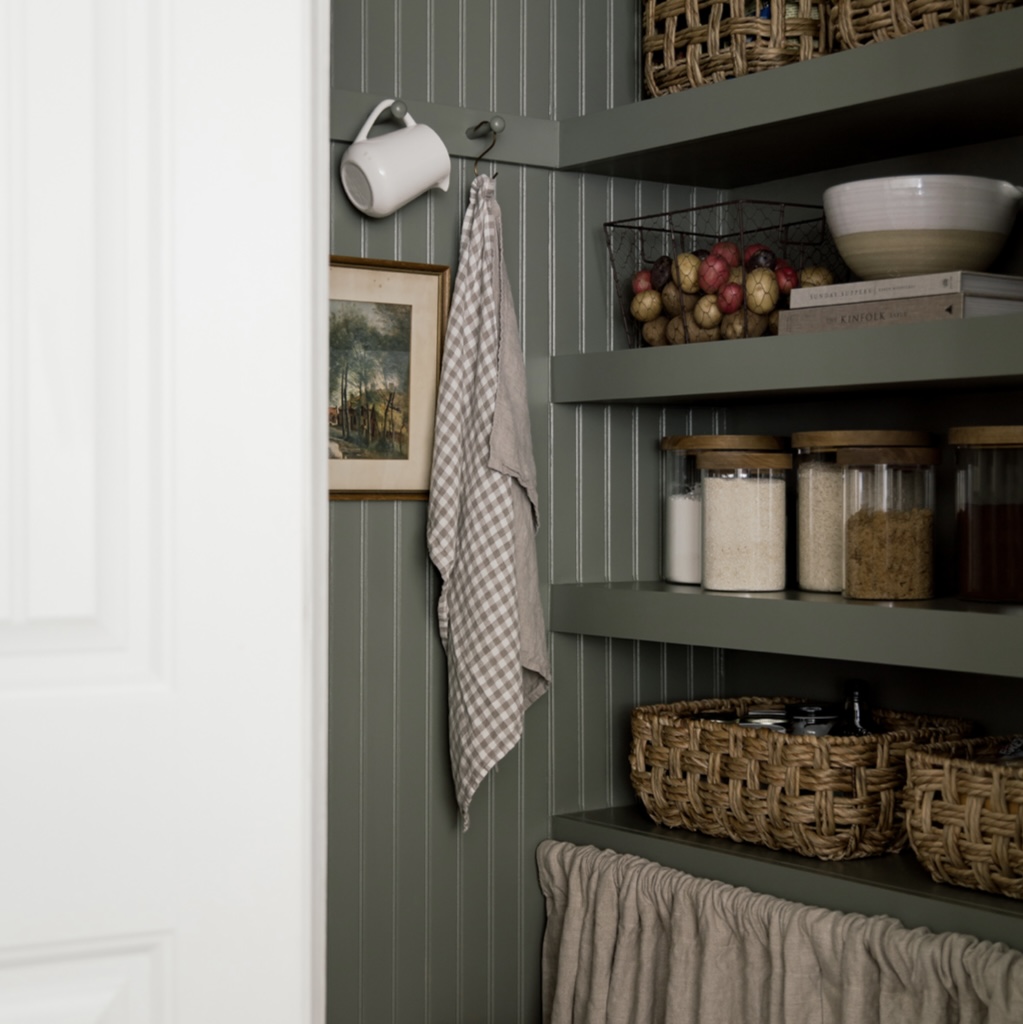
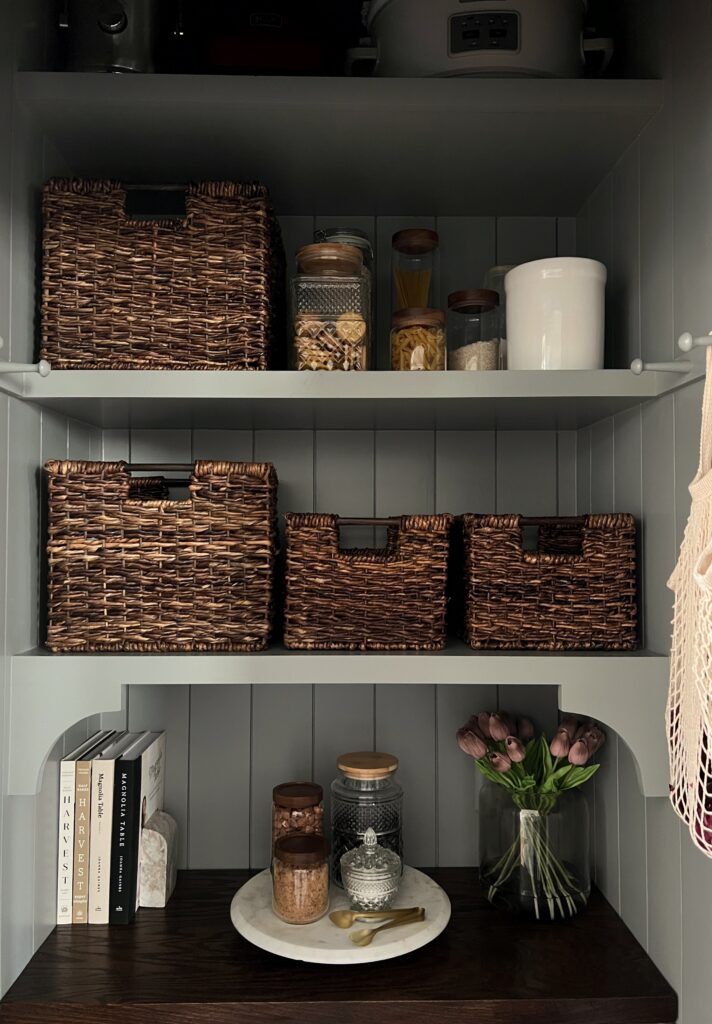
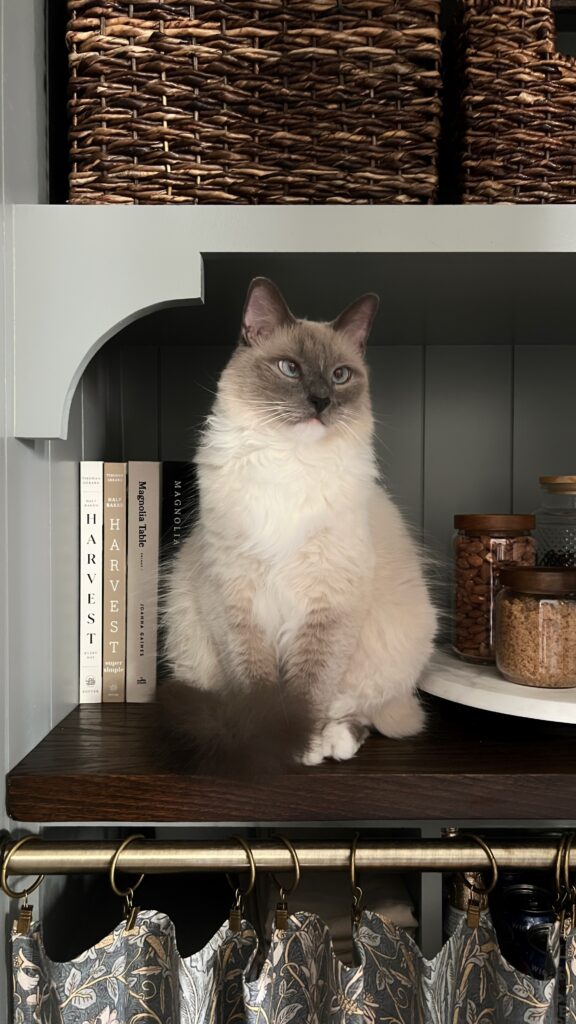
We have easy access to our food storage and dry goods which are all in these large baskets and bamboo lid jars on the 1st and 2nd upper shelves! The white crock stores our granola bars.
The side walls have peg rails which I thought was such a great idea for more storage space! We hang our onions, potatoes, and garlic in these cute little mesh bags.
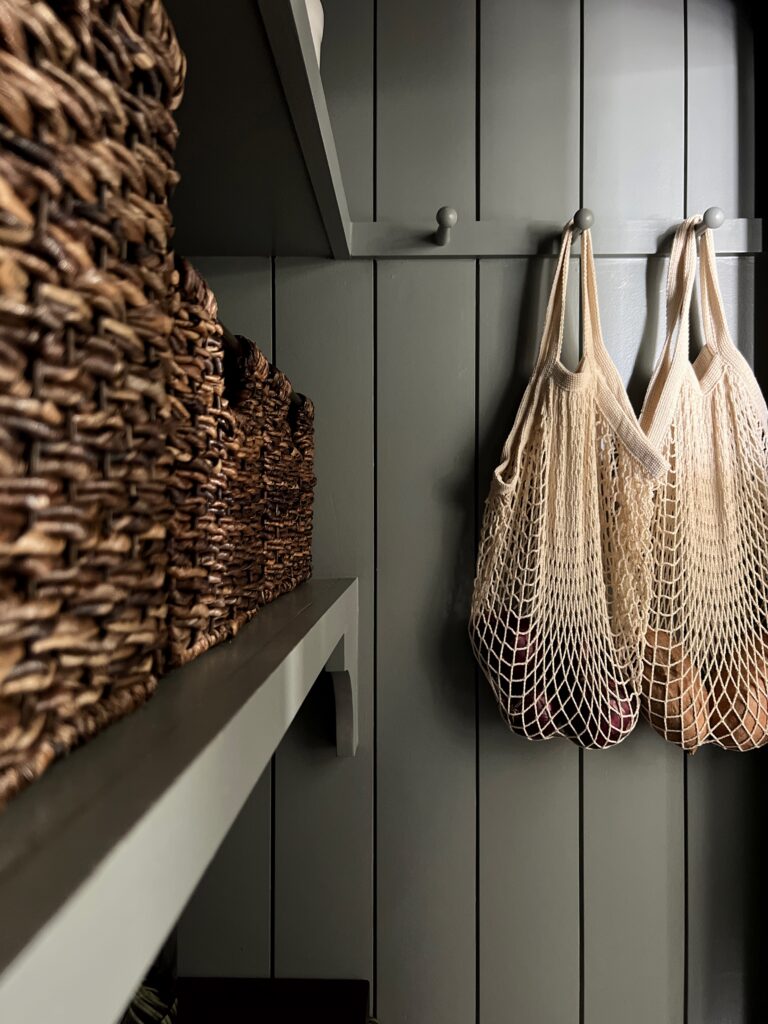
A broom hangs from the other side for now! The shaker peg hooks are a great place to hang aprons, herbs, little baskets, mugs… the options are endless!
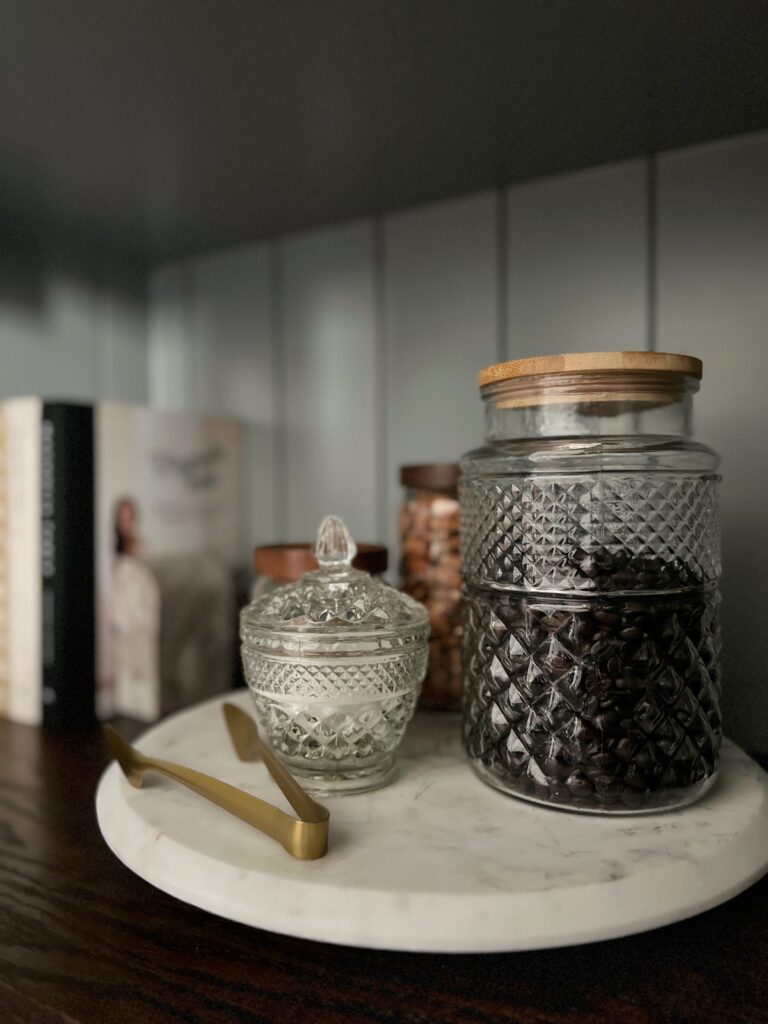
The lazy Susan has coffee beans, sugar and nuts within easy reach! How pretty are these crystal jars?!
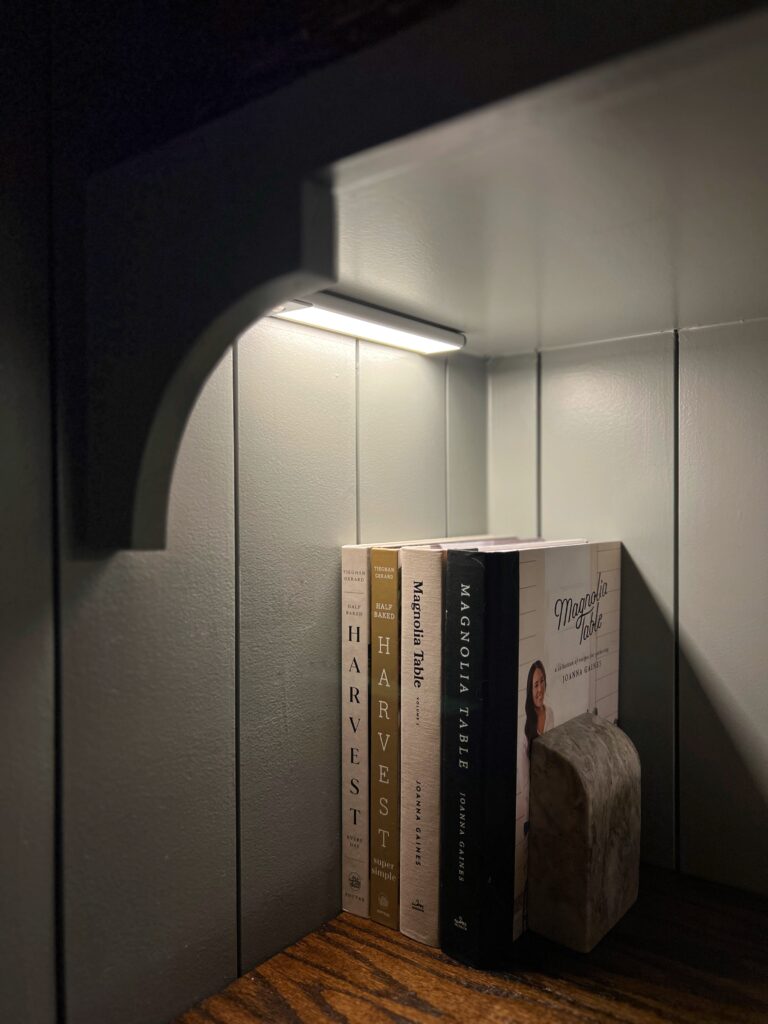
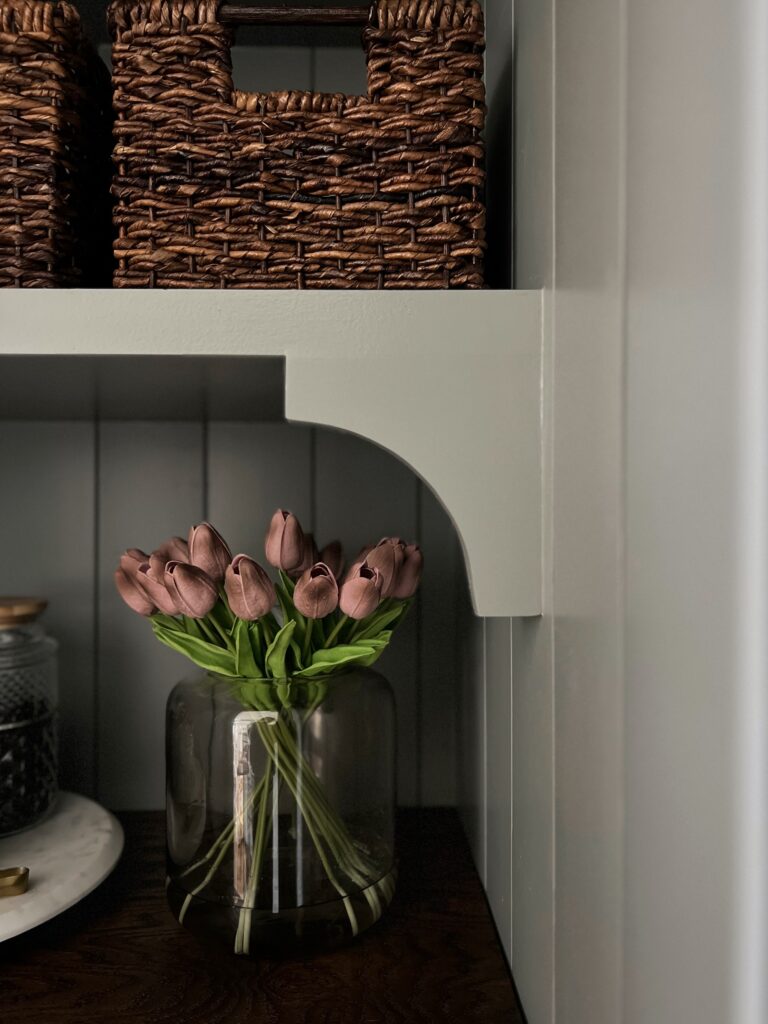
I love displaying my on the pantry countertop! They’re pretty and just a great reminder to actually to use them! We also hid these awesome rechargeable motion sensored lights behind the corbels for the perfect soft glow at night 🙂
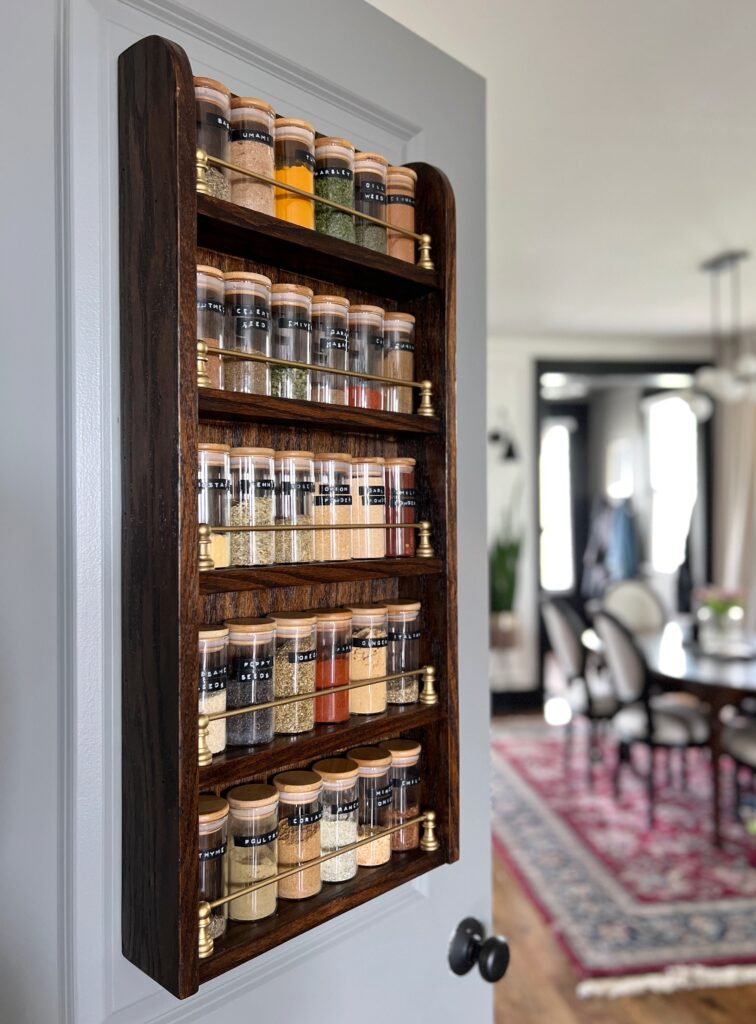
Lastly, I made this easy DIY pantry door spice rack, which saved us so much cabinet space in our kitchen! Click here for the full tutorial!
DIY Vertical Shiplap
Our very first project in our new home was installing horizontal shiplap in our living room.
After about 6 months, as my style was evolving, I realized it just wasn’t my style. I lived with it for 1.5 years before taking it down and doing this recessed wainscoting accent wall which I am absolutely in love with.
Luckily, repurposing the shiplap for this small pantry makeover was the perfect solution! When you install shiplap vertically, it can make a space appear taller!!
Get your measurements!
Your ceiling height will play a big role in the plan for your design/materials when installing vertical shiplap.
Our ceilings are 9ft height. The largest boards we had were only 8ft, and many of them were already cut even smaller since they were leftovers, so we had to get a little creative!
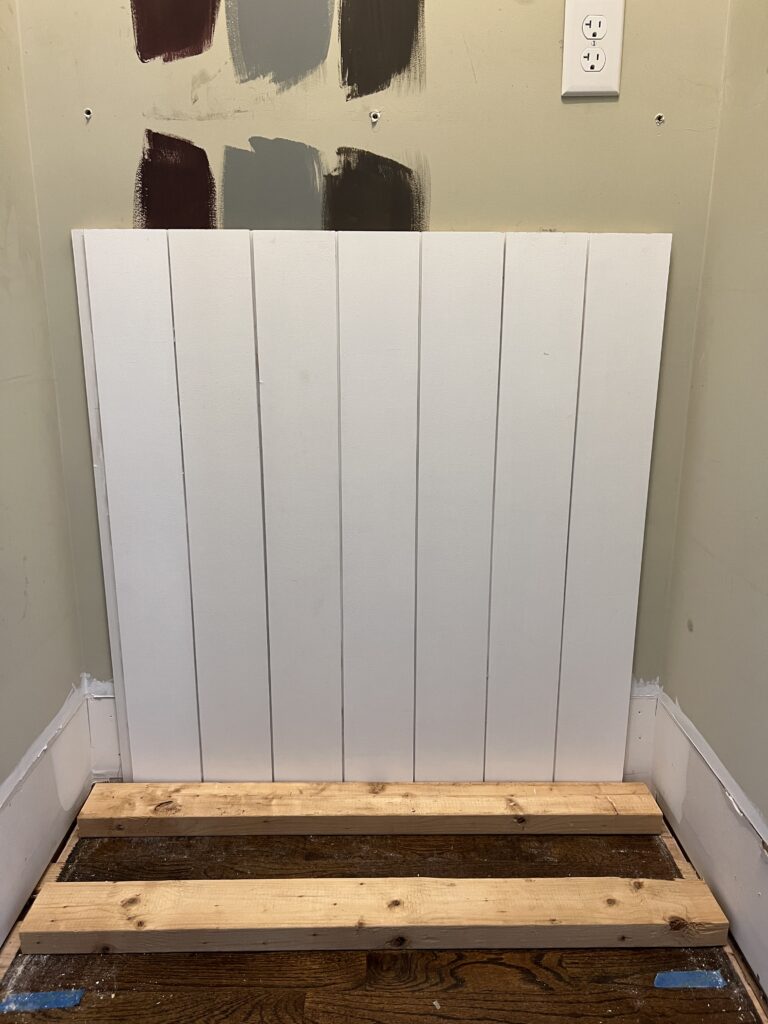
If your shiplap boards aren’t long enough for your ceiling height, see if there’s a good place to hide the seam. We were able to hide seams with the butcher block countertop and the shaker peg rails!
How do you secure vertical shiplap to the wall?
The best way to secure your vertical shiplap to the wall is by installing furring strips horizontally into the studs before installing the vertical shiplap. The shiplap boards will then be nailed into the furring strips!
We actually didn’t use this method only because we didn’t want to sacrifice even in inch of space in our small pantry. To install vertical shiplap without studs or furring strips, use two nails near each other that go in at different angles. You can see what I mean in the photos below!


By the way, nailing the shiplap in on the lip helps reduce the number of nail holes you need to fill!
Tips for installing vertical shiplap
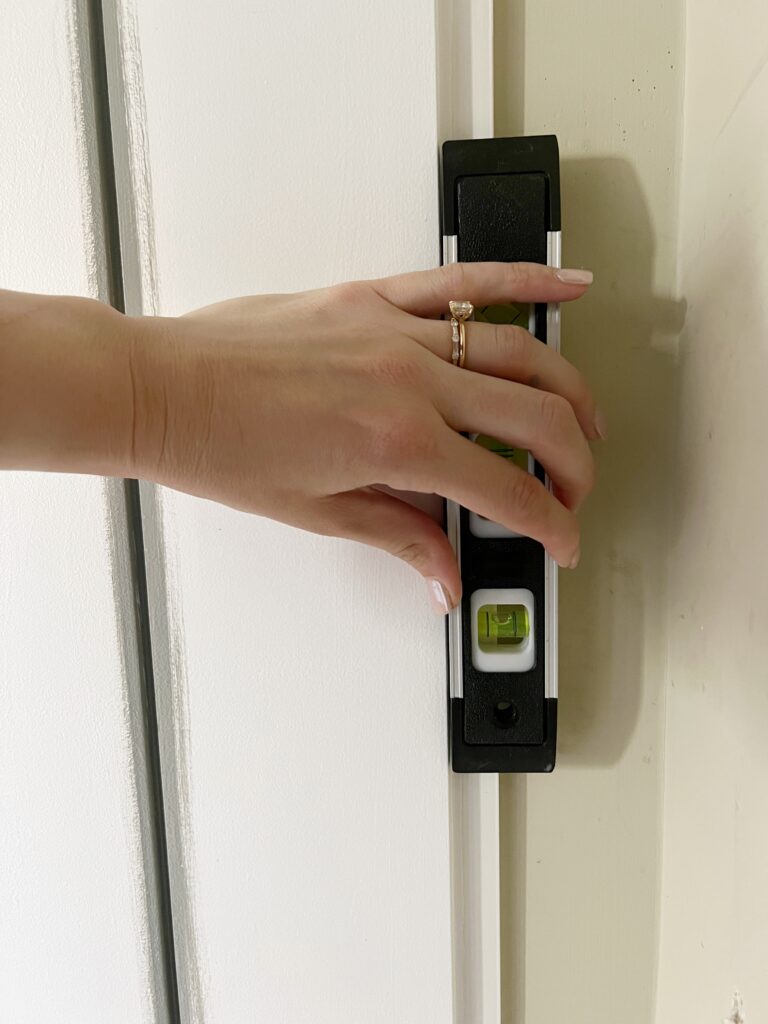
Use a laser level or level as you go! If you don’t have one, you can just use a regular level and check that each board is straight before nailing it in place.
Make sure your shiplap boards are pushed in all the way from top to bottom or you’ll end up with uneven gaps.
Paint the edges as you install the shiplap! This is SO much easier than trying to get in the gaps after it’s up, trust me!


Use trim where the shiplap meets the ceiling for a cleaner look! This was just some scrap wood I had, but you can use whatever you like!
Crown moulding would be beautiful of course, but with such a small pantry, you can’t even see the ceiling! If you decide to do crown moulding, this post may be helpful to you: How to Install Crown Molding for Beginners.


As always, don’t forget the finish work! It’s helpful to try to nail your boards in the same general areas so you can fill them much faster and you’re less likely to miss some!


DIY Thin Floating Shelves
Let’s have a moment of silence for old shelves. I don’t know about you, but I’ll take wood shelves over old wire shelving any day!
I decided to make some new shelves for this pantry makeover DIY, but if you wanted a less permanent solution for your wire shelves, try these easy DIY wire shelf covers!


For a simple look, I made some DIY thing floating shelves. Click here for the blog post tutorial! I really love how they turned out!!
Small Pantry Shelving
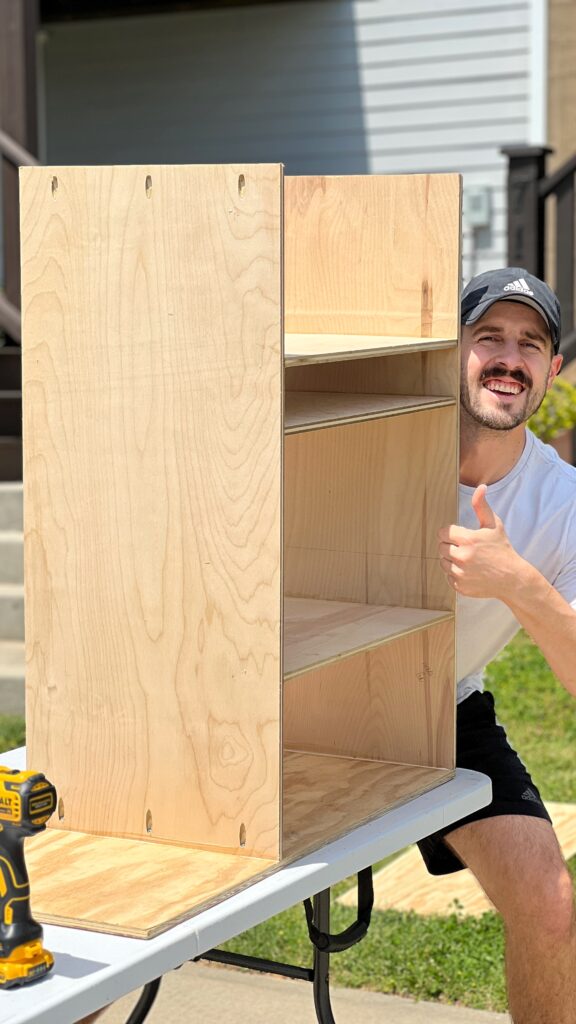
This was our first time making open shelving like this! We learned a lot and definitely made some mistakes worth sharing!
Tips for DIY plywood cabinets
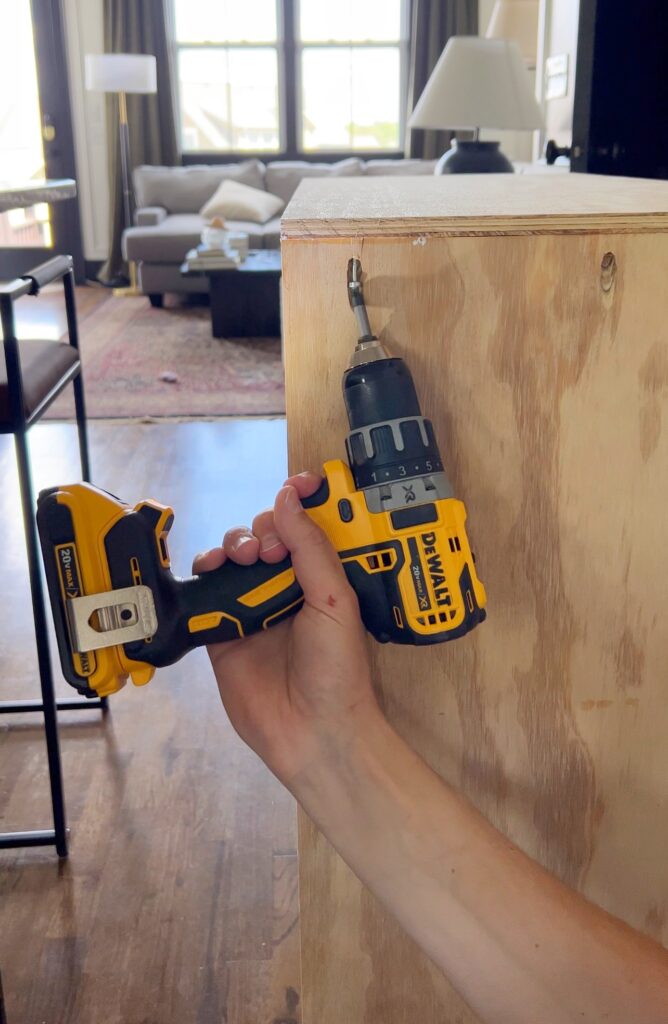
Truly, making a cabinet box wasn’t too difficult! It just involves a lot of pocket holes, wood glue, and screws!
You can use any type of kreg jig pocket hole tool- this option would work great! Also, be sure to use a square to make sure everything is… well, square! 🙂


We used 1/2″ plywood with 1″ pocket screws for these but if I were to do this again, I would definitely use 3/4″ plywood.
It’s just easier to make pocket holes in 3/4 inch plywood. With 1/2 inch plywood, there were certain areas where the screws would poke through the other side of the wood just the tiniest bit.
What NOT to do
Don’t buy cheap plywood. We were trying to save some extra money and went with a lower grade option. It wasn’t long before we were back to the store for better plywood!
You can see in this photo below the difference between the plywood on the left (better quality) and the piece I was trying to add to the right side but it was too warped.
There’s a visible difference in quality. You don’t need to get the best available plywood, but just make sure it’s smooth and straight.
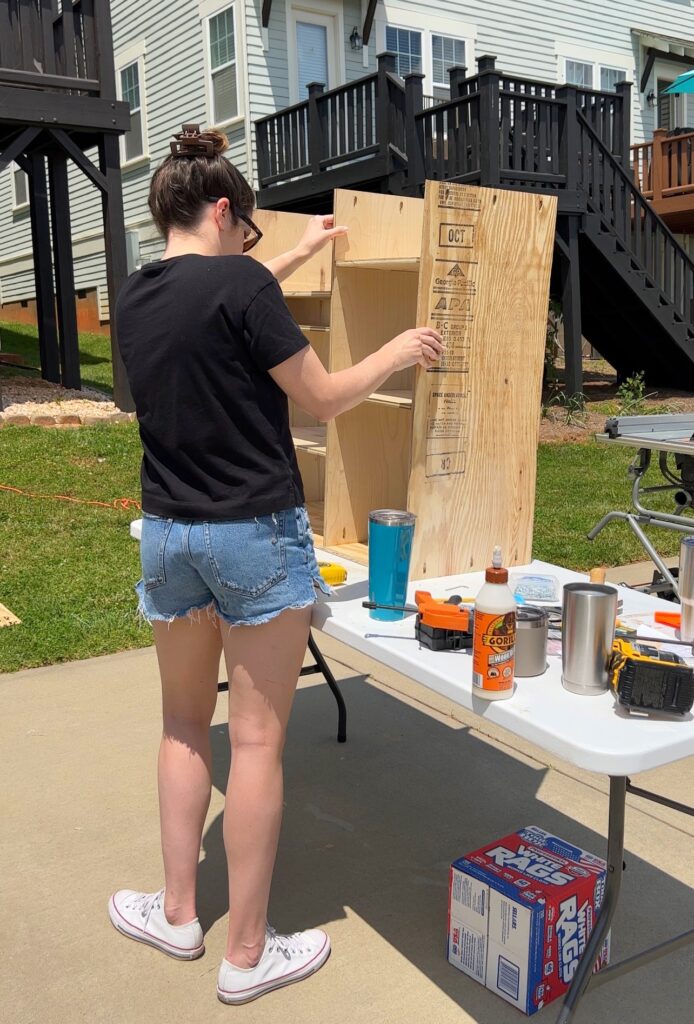
Our silliest mistake was assembling the entire cabinet box outside, not realizing there was no way we could actually fit this through our tiny pantry doorway… oopsies!

We went from feeling proud and excited to embarrassed and frustrated in a matter of minutes LOL! The good new is, we will not be making this mistake twice!
It hurt our hearts, but we had to disassemble more than half of the cabinet before we could fit it. I can now confirm that gorilla wood glue is very strong. We had to use a rubber mallet, and a lot of strength, to separate the pieces.
But truly, it was just a minor set back and we had it reassembled in the pantry in no time!!
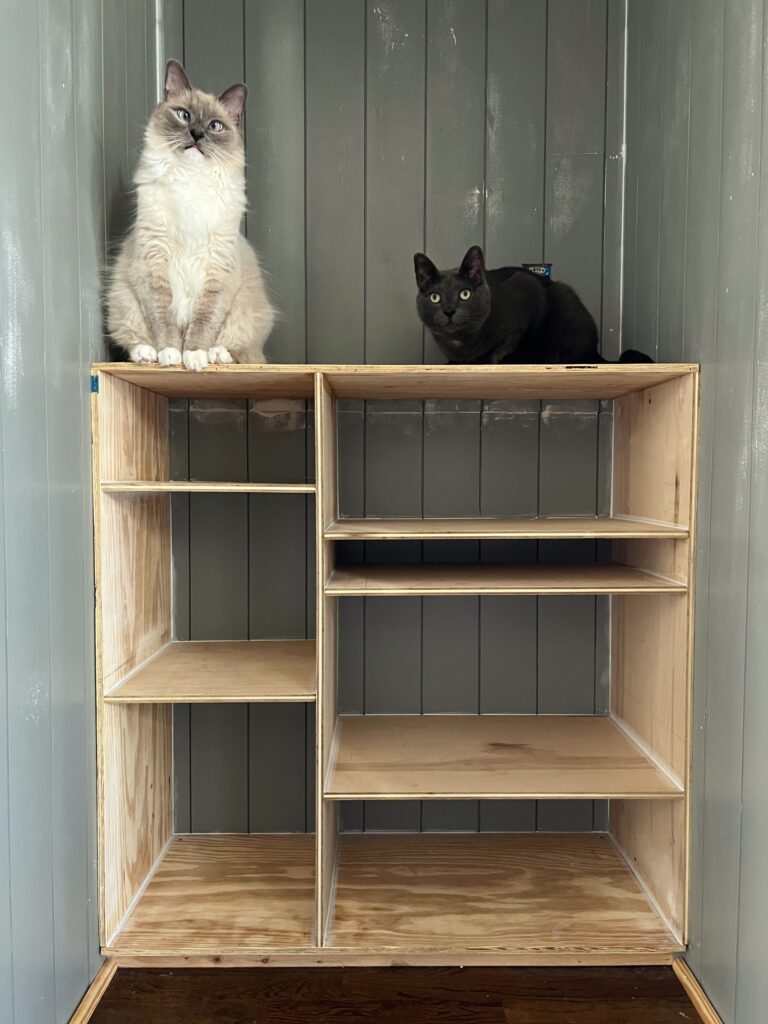
Notice we left a little space below for a toe kick area. It was just a 2×4 base that we screwed into our flooring! We then screwed the cabinet into that base.
Lastly, I caulked, added some trim to cover the plywood edges, primed and painted!
I know I breezed over this section, so if you have any questions you can always leave a comment and I’m happy to help! Also, this blog post on how to build a simple cabinet box was really helpful 🙂
DIY Plywood Countertop
There’s something about a countertop in a pantry… it just gives a cozy feel! Counter space is also a great opportunity to have a little coffee bar, a drink station, or a home for one of your most used small appliances!
Ours is storing cook books, a lazy Susan with regularly used items, and my favorite (very real looking) faux tulips for a pop of color! And of course, it’s another perch for our cats to take ownership of 😉
You’re not going to believe how easy it was to make this DIY countertop from plywood!
How to make a DIY plywood countertop
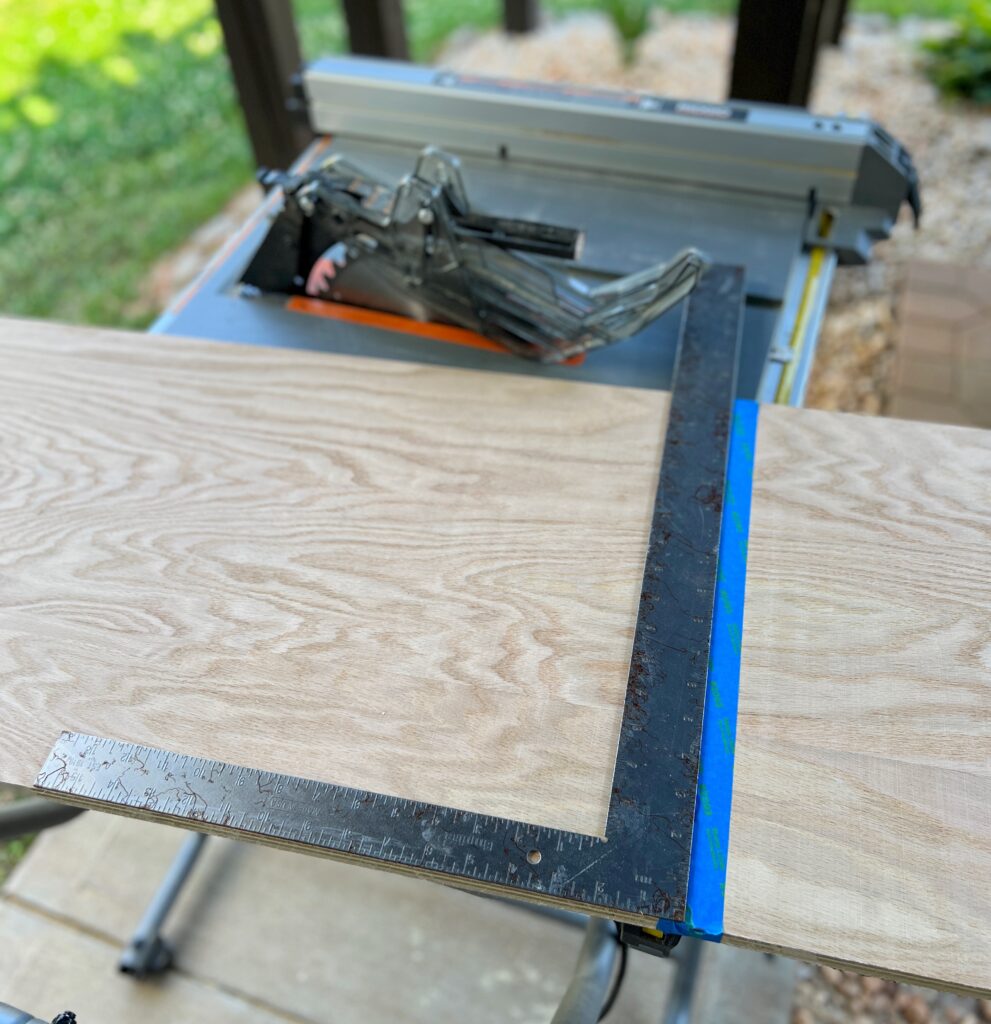
First I used a piece of cardboard to make a template! The walls weren’t even in our pantry, so it wasn’t a perfect rectangle shape!
Using my cardboard template as a guide, I then cut two pieces of plywood using my table saw! You could also use a circular saw!
TIP: When cutting plywood against the grain, use painters tape where your cut will be to prevent splitting!!
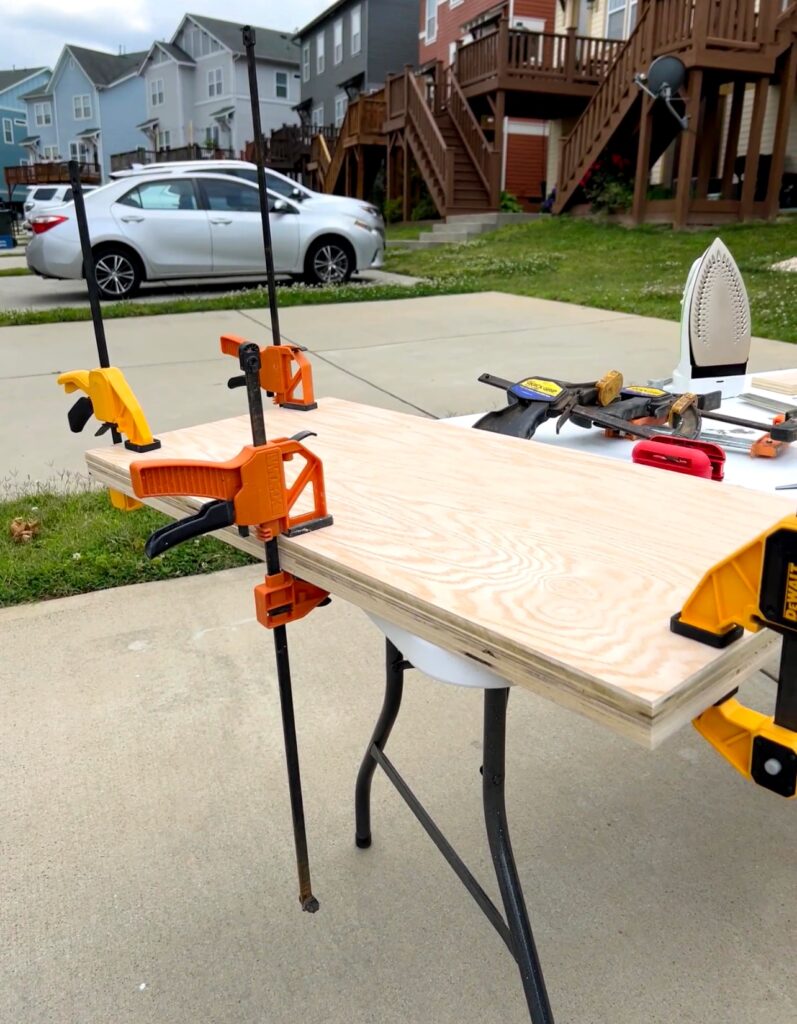
The bottom piece won’t be seen so I just used some scrap plywood we had laying around. The *chef’s kiss* is the top piece, which I made from red oak plywood! (You can order it here from Home Depot) Red oak has a beautiful grain and takes stain really nicely!!
I just used a bunch of wood glue and clamped them together!
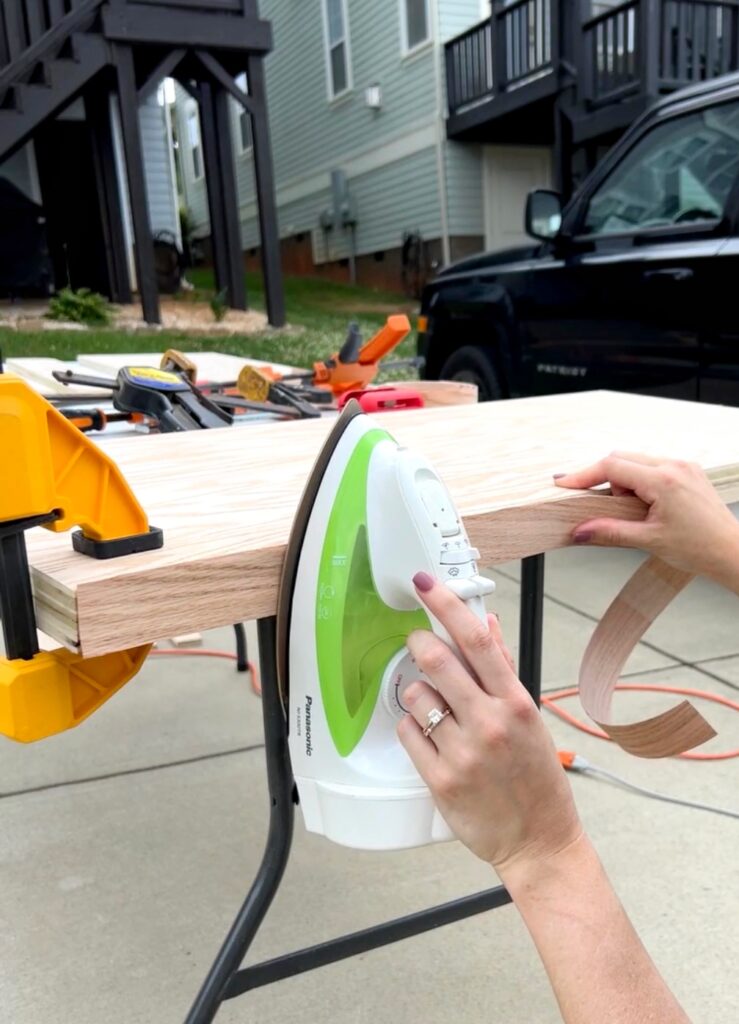
To finish the plywood edge I used this red oak edge banding.
Edge banding makes plywood look like a solid piece of wood and it’s so simple to apply! You just use and iron to activate the adhesive!
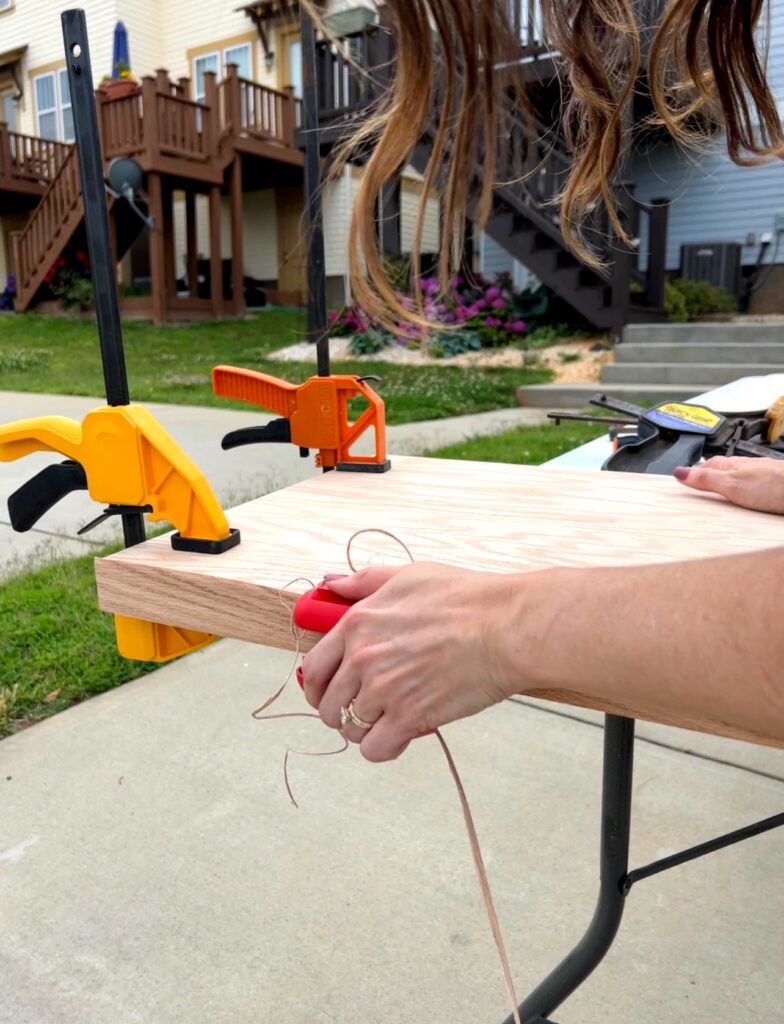
This handy tool makes trimming the excess edge banding so easy! If you don’t have it, you can carefully use a utility knife.
After this, I sanded down the whole countertop and especially where the edge banding meets the top and bottom. This is where the magic happens! You’d never guess it was plywood!
Before staining, make sure your countertop is dust free and don’t forget to use a pre-stain conditioner!
For both my DIY spice rack and this countertop, I used layered Minwax stain colors for a custom look. First, I did a layer of Espresso stain. After letting that dry, I did a second layer of English Chestnut stain to add more warmth!
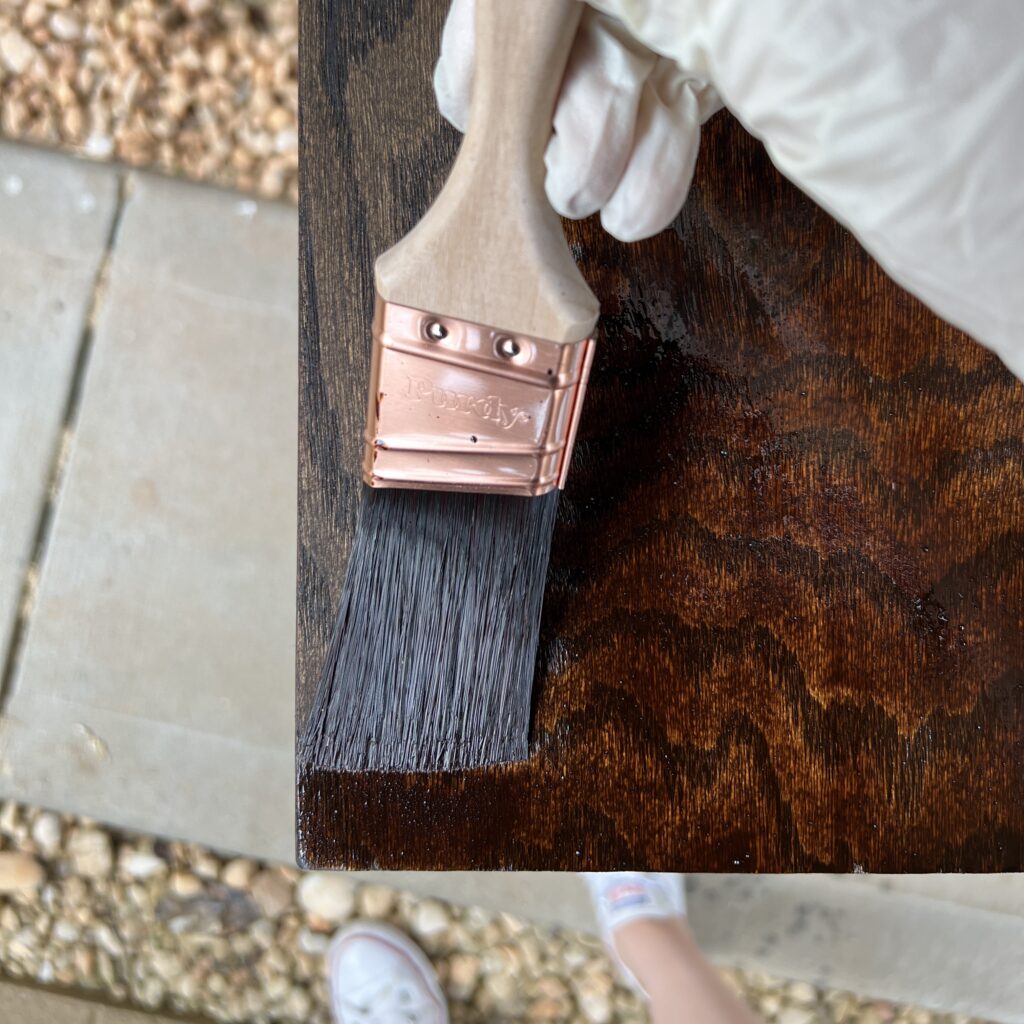
The satin polyurethane I used also plays a key role in the overall professional look of this DIY countertop. I applied 3 coats, but you could do even more depending on how much traffic yours will get!
Lots of wood glue and a few weights is all you’ll need to secure this bad boy! I had some tiny gaps around the edges but felt that caulking would make those more noticeable. I just left them! It’s very hard to tell!
Can you even believe this countertop is plywood? I personally never would have guessed. I’m so impressed by how it turned out!!
DIY Pantry Door Spice Rack
This has to be one my favorite details in our small pantry makeover! I mean, talk about utilizing space! By storing your spices on the back of your pantry door, you can free up a whole lot of space in your kitchen cabinets!
Click here for the pantry door spice rack tutorial!
Take a close look those gallery rails. Do you notice anything? Like the fact that they’re made with chess pawns?!
Whaaaat?!? I know. You’ll have to see my blog post so you can learn how to make these budget brass gallery rails!


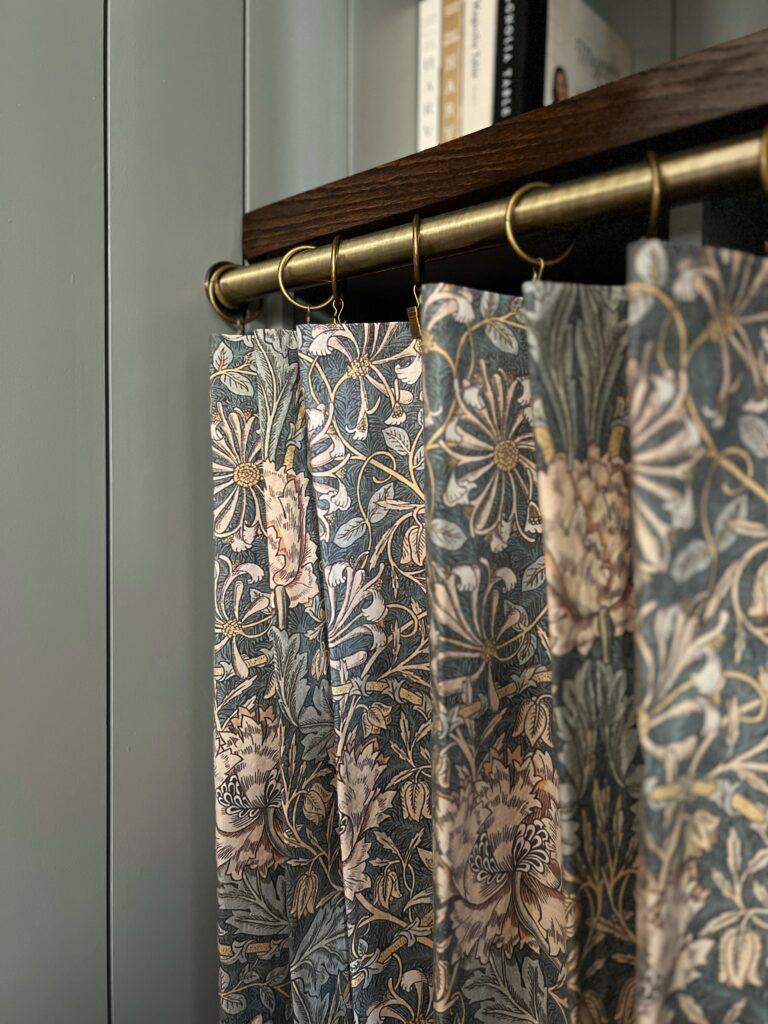
DIY Cafe Curtains
Long story short, these can barely be considered “curtains” lol if you’re looking for a real tutorial, here’s two that I recommend:
The issue was that I was trying to save a little money so I skimped when ordering the fabric.
There wasn’t enough length to even make a slot for the curtain rod. I know I technically didn’t need one since I was using curtain rings, but still… it’s a more finished look that way.


Essentially, I just did a double hem around all the edges of the fabric. My finished measurements for each panel were 40″ x 32.5″.
To make them appear more like curtains, I just spaced the rings out evenly, defined the folds and clamped them into place. I also gave a mist of water and let them sit overnight! This is also known as training your curtains! It helps them keep their shape. See how they at least sort of look like curtains now?!
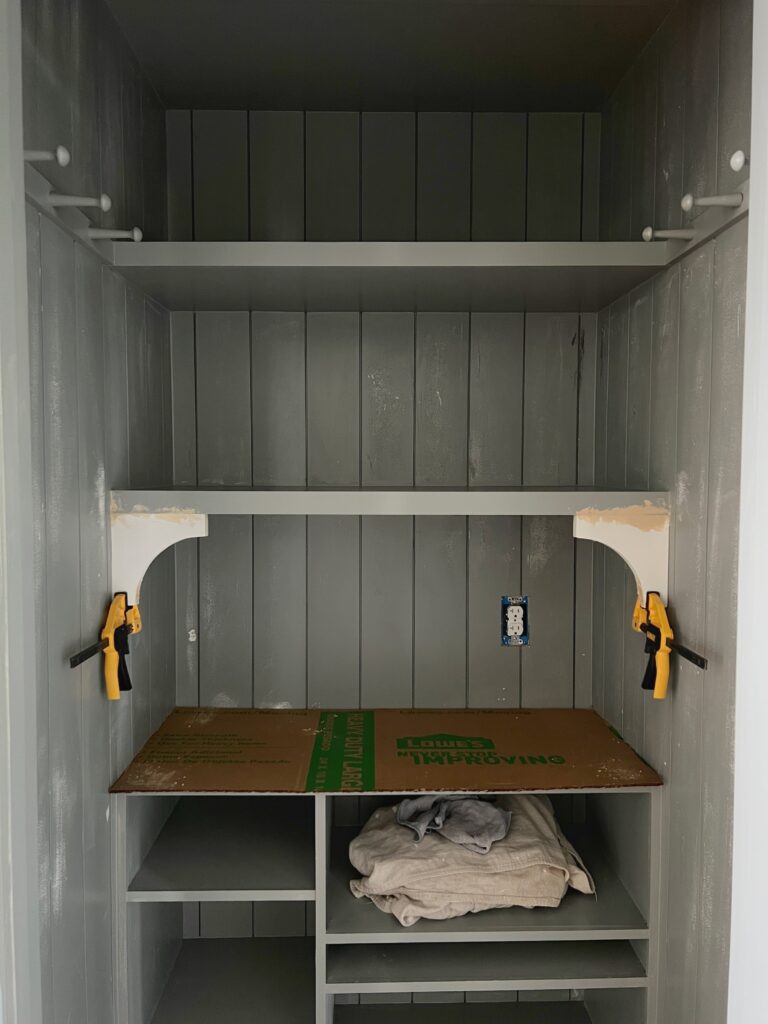
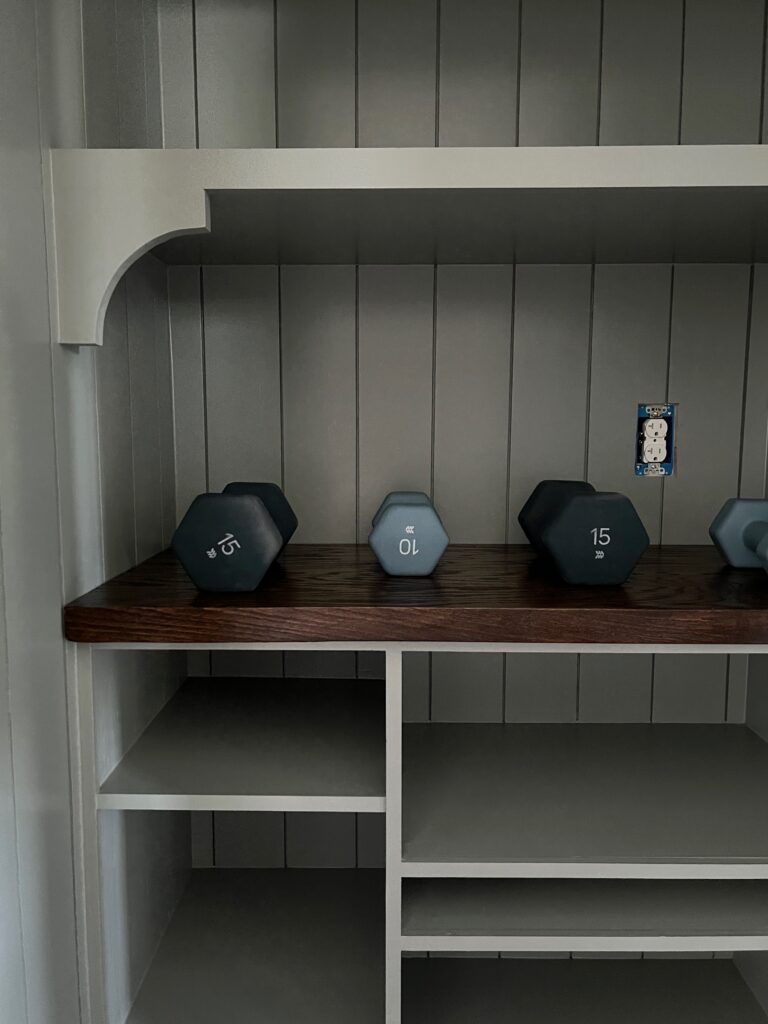
DIY Corbels
I followed my friend Erin’s tutorial for these DIY corbels out of MDF!
It was perfect because I already had scrap MDF on hand so this was a way to add more character to our small pantry at no additional cost!! Do you see how they showcase the countertop area?! Gahhh!
Simple Tutorial
The first step is to use a bowl and a ruler to trace the shape. Cut with a jigsaw, sand, and prime!


To install them I just used a nail gun going into the floating shelf and a screw going into the wall.
The screw hole and seams were filled with wood filler! You can also see this in action in my pantry highlight on Instagram.


DIY Shaker Peg Rail
Shaker peg rails are so simple to make! It was my first time trying it out but this was the Youtube video I followed!
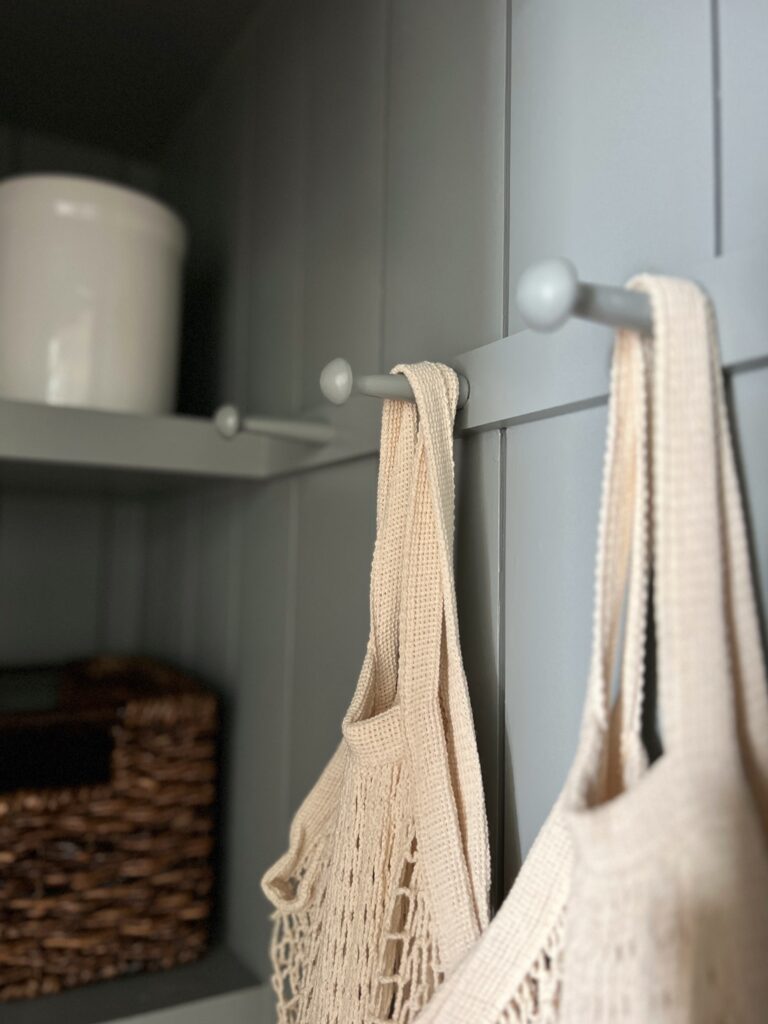
In addition to providing more function to our pantry, this peg rail also served the purpose of hiding a shiplap seam!! It’s extended right off from the second shelf.
Here’s the link to the shaker pegs I used!


Pantry Sources
- Paint Color
- William Morris Fabric
- Cookbooks
- Faux Tulips
- Lazy Susan
- Woven Baskets
- Spice Jars
- Label Maker
- Cotton Mesh Bags
- Broom
- Shaker Pegs
- Crystal Jars
- Bamboo Lid Jars
- Curtain Rod
- Curtain Rings
- Motion Sensor Lights
- Step Stool

Certainly I hope I’ve proved that a small space absolutely has the ability to turn into a functional pantry! For more pantry inspiration, check out our DIY walk in pantry makeover in our new home!
Thank you for being here!! Let me know what you think in the comments 🙂
Elisha
