

If there’s any room in your home to take risks and have fun with the design, it’s the powder room! Being such a small space, it’s actually very budget friendly to makeover. Not to mention… all of your guests will see it so you might as well show it off, right?!
Our powder room makeover is still one of my favorite DIY projects! I didn’t hold back creatively and it made me realize how much I love a bold look.
Disclaimer: This post contains affiliate links. This means, if you purchase something from a link I provided, I will receive a small commission. This is at no extra cost to you! Thank you so much for the support!
Before + After
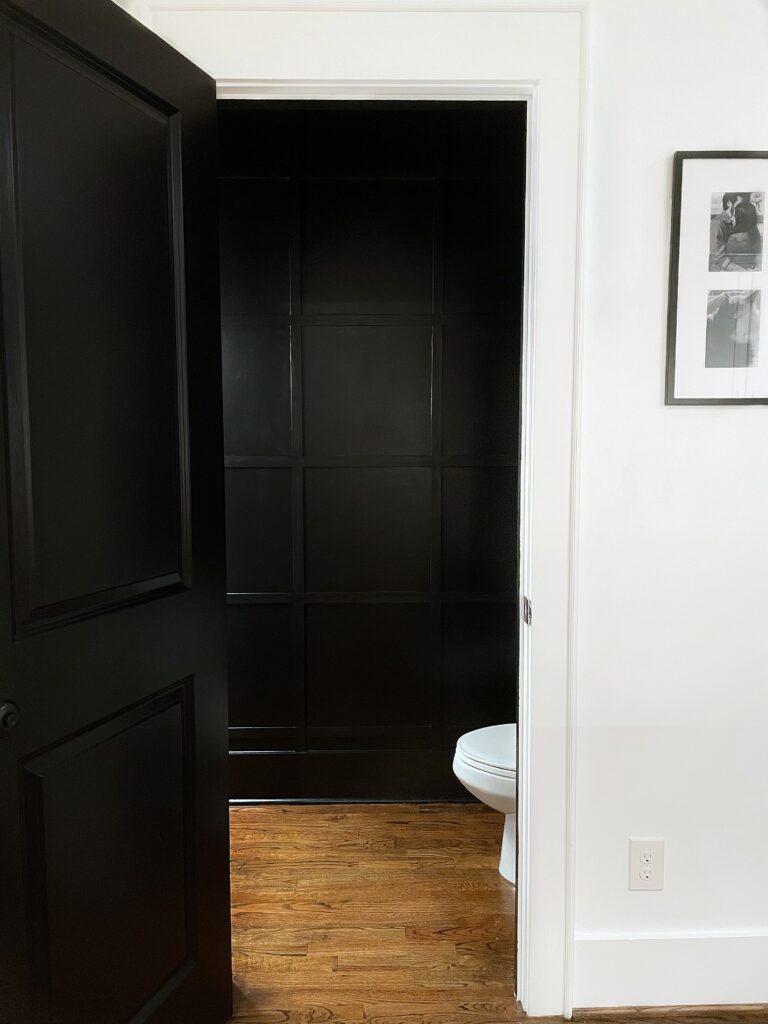
This is the bathroom when we first moved in:
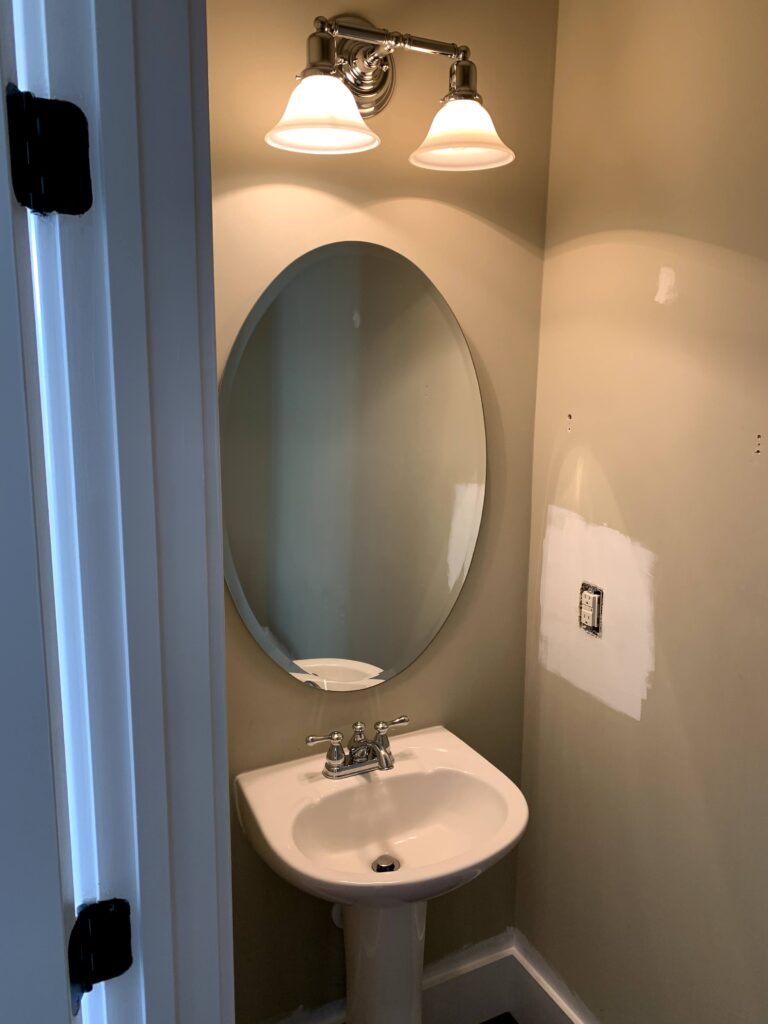
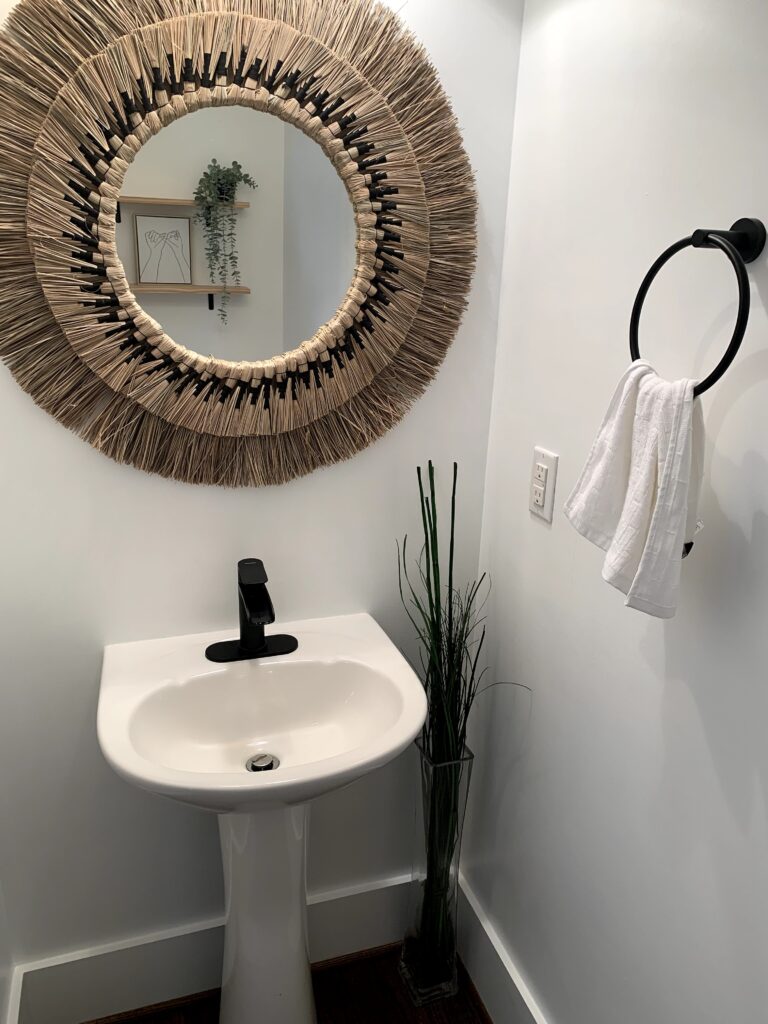
Not too long after moving in we gave this bathroom a fresh coat of paint and added black accents! We used black spray paint on our light fixture, got a new faucet, and found a fun mirror. These changes made a big impact, but eventually I wanted a fresh look that better reflected my personality.
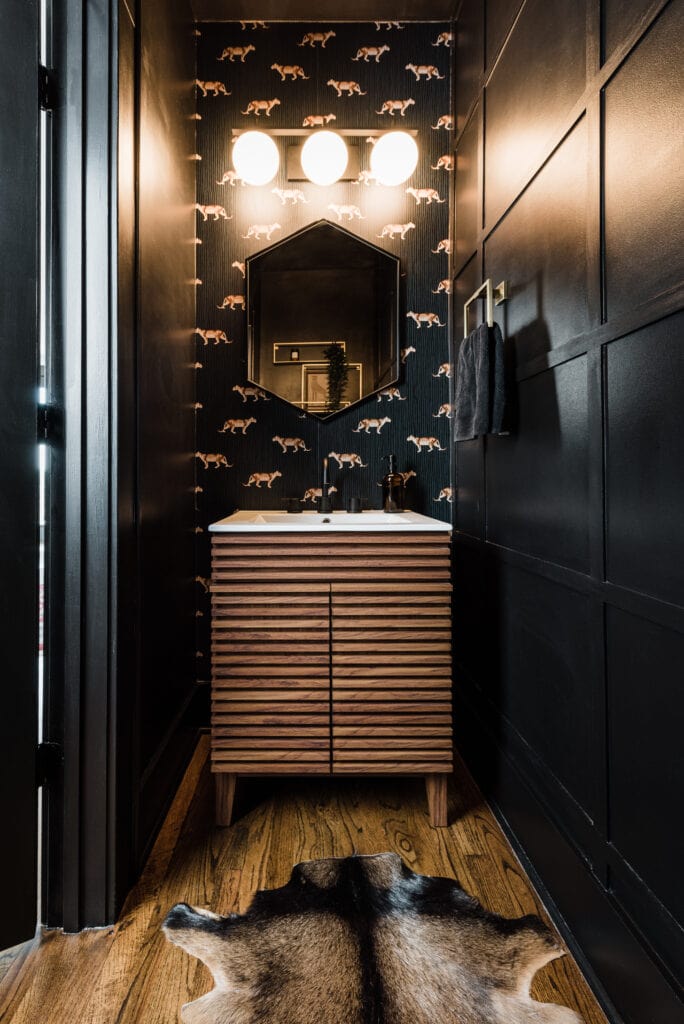
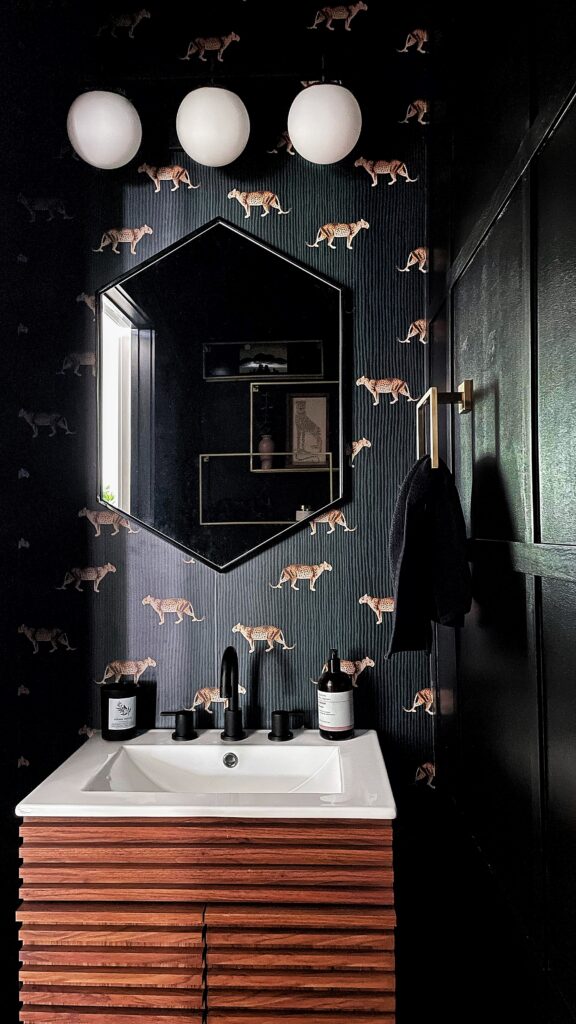
Here’s the after!! Do you have a powder bathroom that needs some love too? A little space like this is the perfect spot to go bold with the design. Plus, if you’re on a tight budget, small square footage means a lot less materials!
What is a “jewel box” room?
To put it simply, a jewel box design is a vibe. Think rich, saturated colors and a maximalist aesthetic with layered patterns, textures, and decor. Every inch of the room is considered, even the ceiling! It should feel like you’ve stepped into a little jewel box!
While a tiny powder room is the perfect place for a jewel box design, it can also be a bigger space too! Check out my French vintage style guest bedroom makeover!
Design Plan
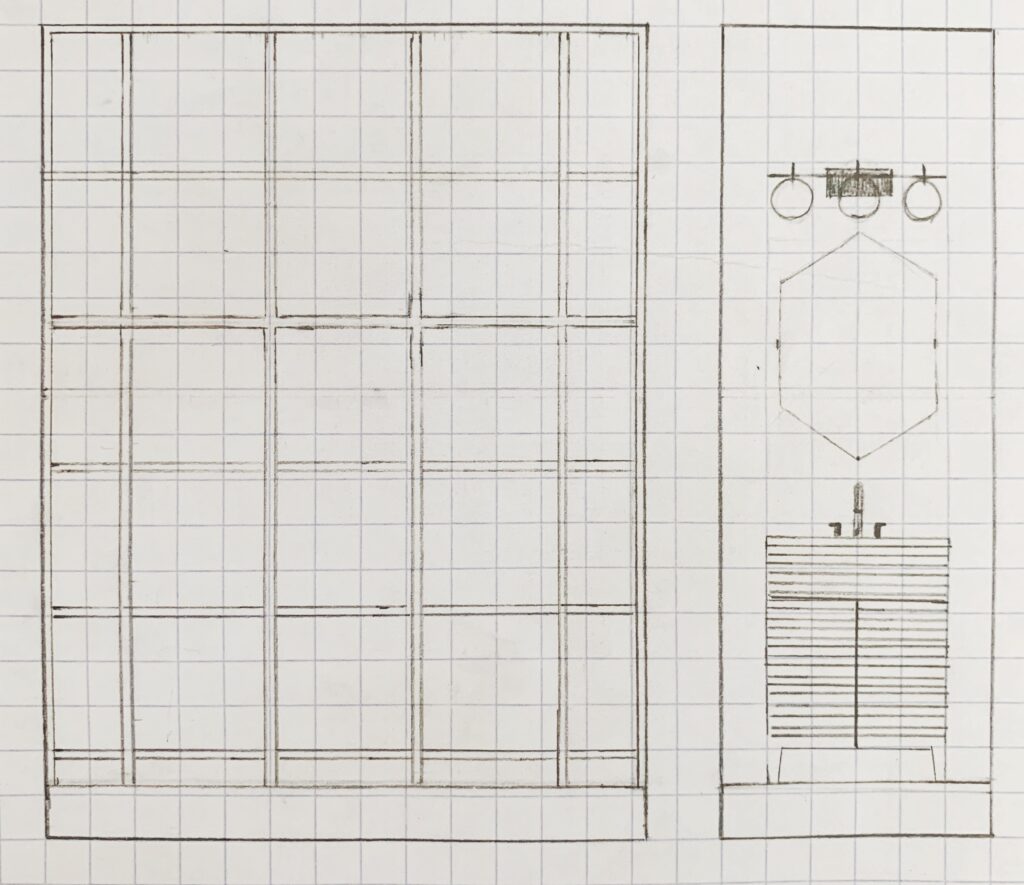
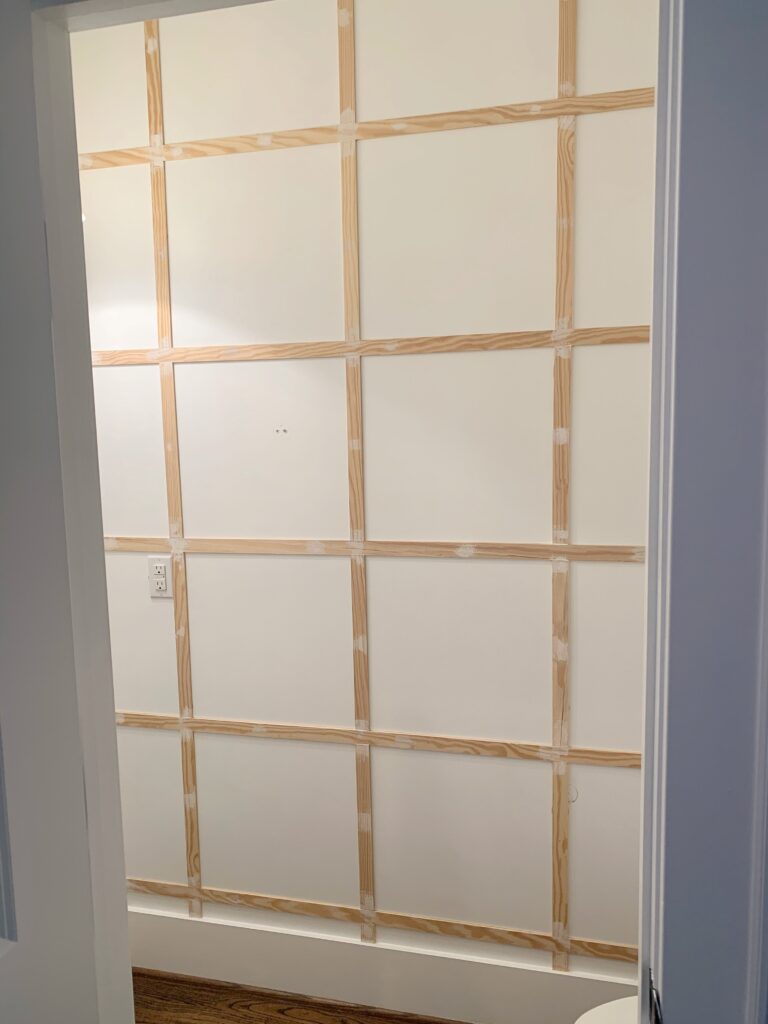
Grid Wall
The DIY grid wall is one of my favorite parts of this small bathroom makeover! Since it’s the main wall you see from the kitchen area, it really becomes a nice focal point!
If you’re new to doing trim work, this accent wall is a very beginner friendly DIY project and an inexpensive way to add character to a space.
Click here for a full tutorial and all the DIY tips for this grid wall!
Paint
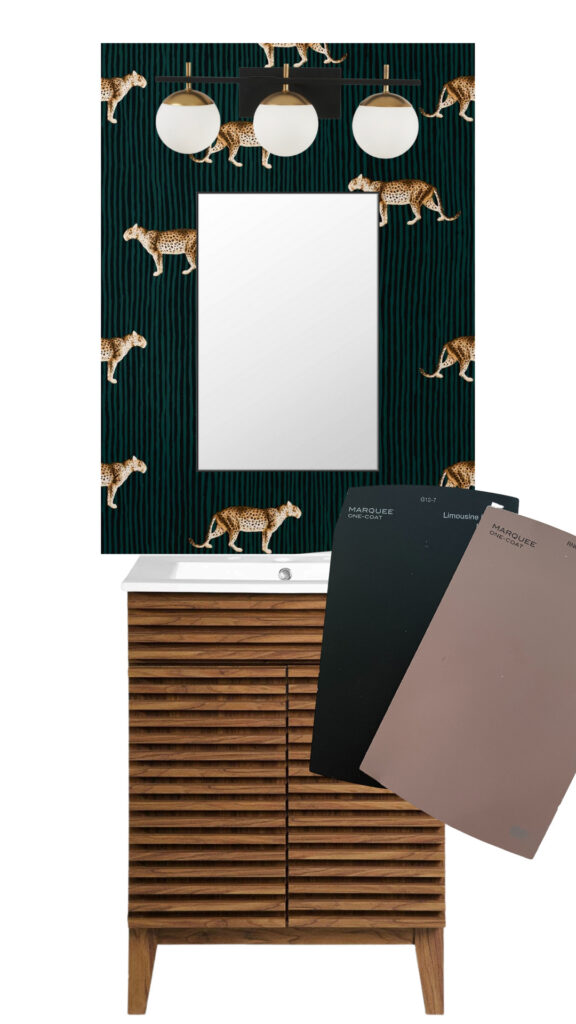
The one decision that took me a while was the paint color. I was going back and forth between two paint colors; Behr Modern Mocha or Behr Limosuine Leather.
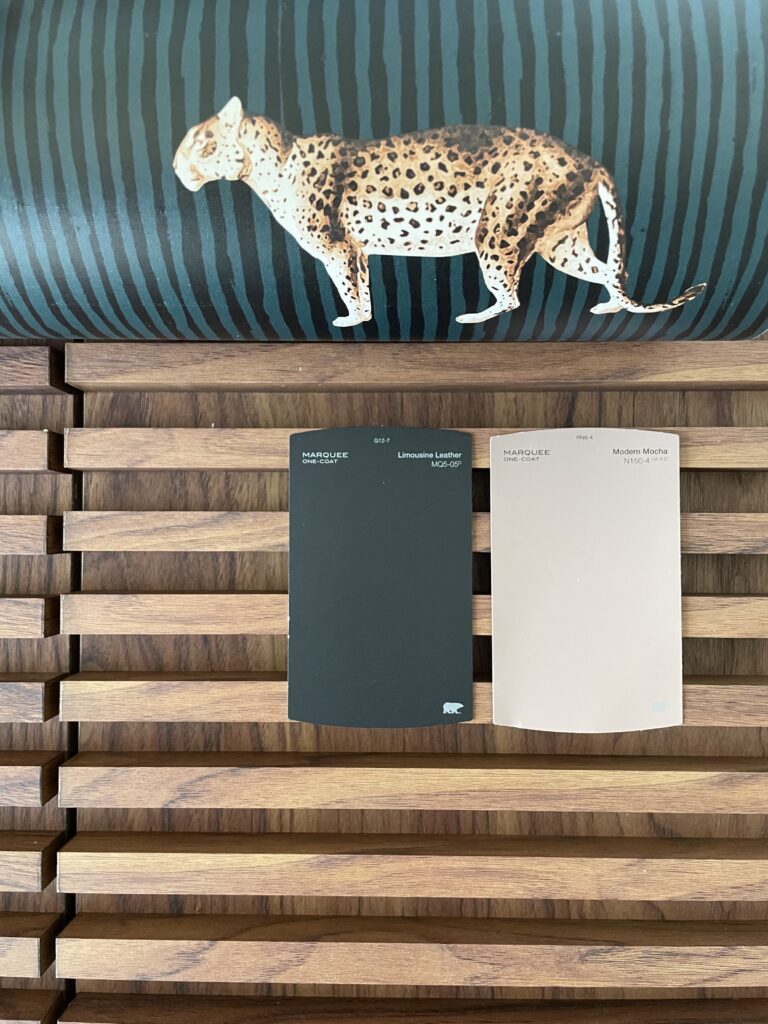
I decided to go with Limousine Leather! It complimented the wallpaper better and I thought it would be SO pretty with the wood vanity. This is the exact paint I used! I went with a satin finish since it’s a bathroom.
I’m not going to lie, I was a little nervous about painting this small room black. It doesn’t get a lot of natural light since there’s no windows and I wanted to paint the ceiling too! It seemed to go against all the interior design “rules” I was familiar with.
But guess what? Saying goodbye to our boring white walls and painting our half bathroom black was the best decision ever! It actually gave this room depth and made the space feel bigger. It’s cozy in there now… like a big hug!
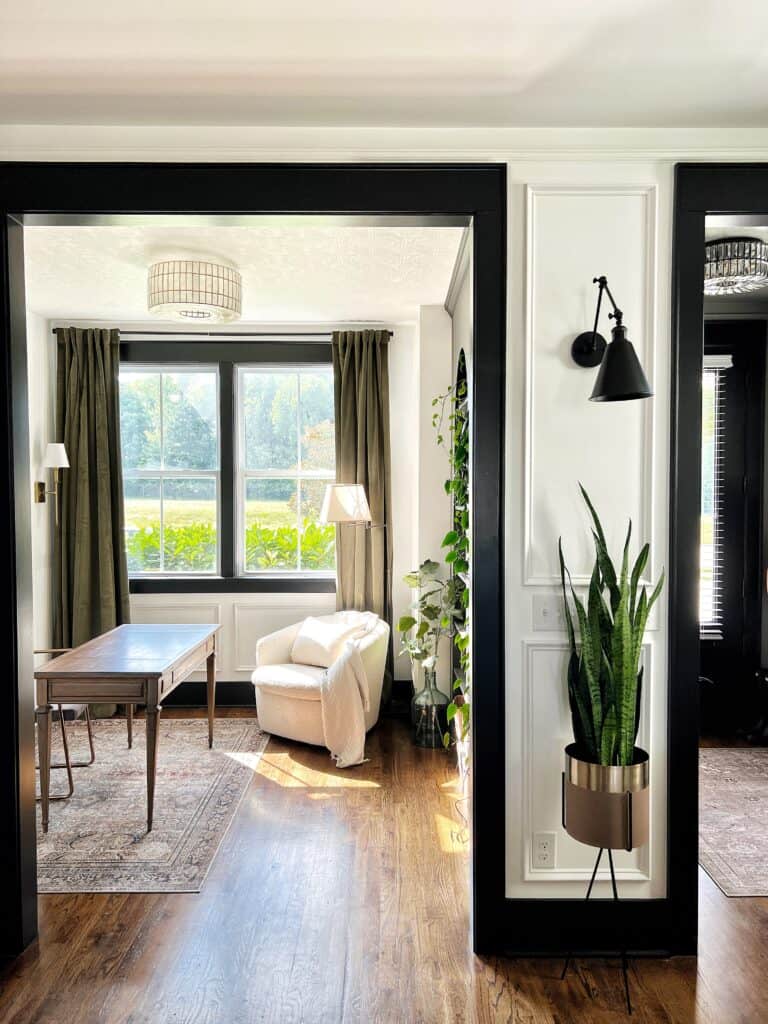
This was my first time using the color Limousine Leather. Two years later, you can find it all throughout our home… most notably on our stairs, trim, and doors! I absolutely love it.
Stair tutorial: Easy DIY Stair Remodel (Step-by-Step Tutorial)
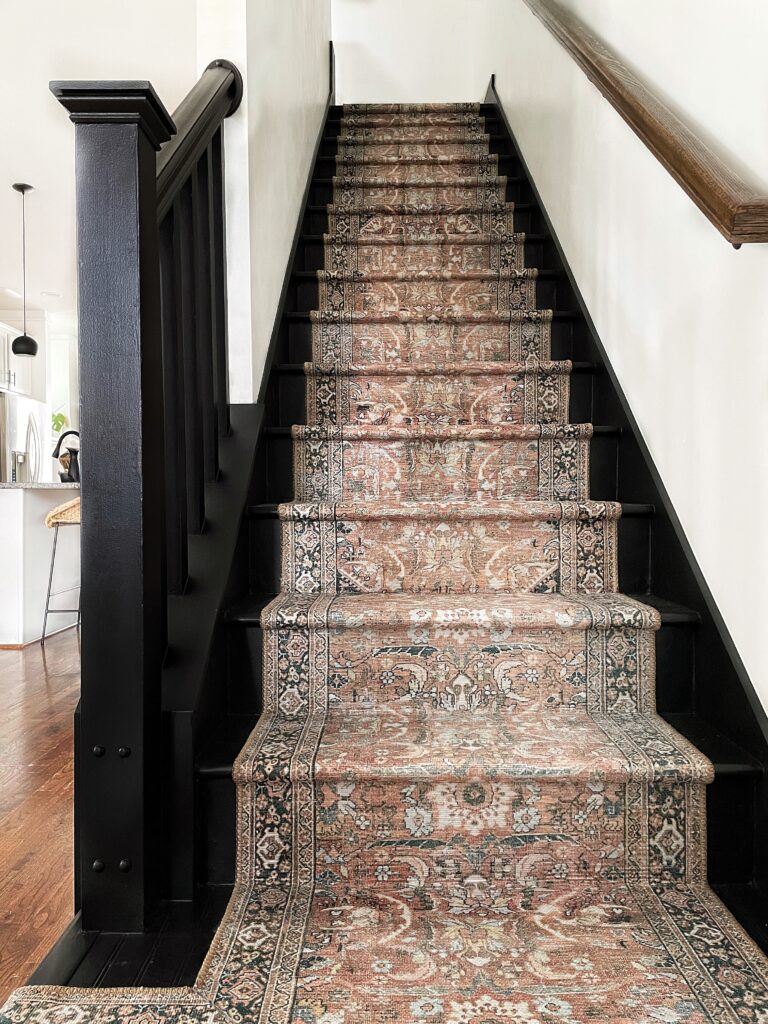
I also painted all of our downstairs trim in this color as well! I told you, I love it! Here’s a post that might be helpful to you: How to paint trim and why satin is my favorite finish!
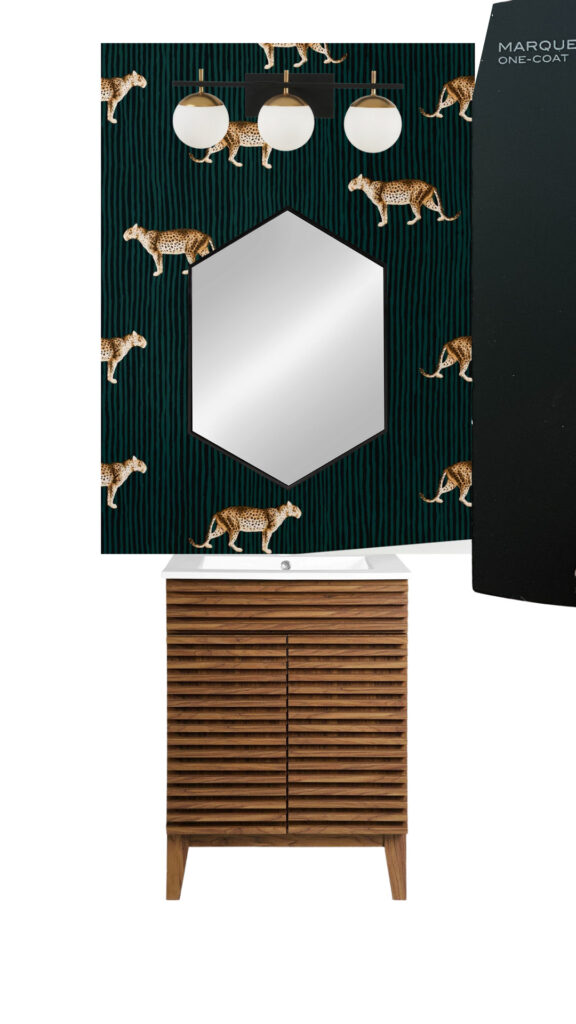
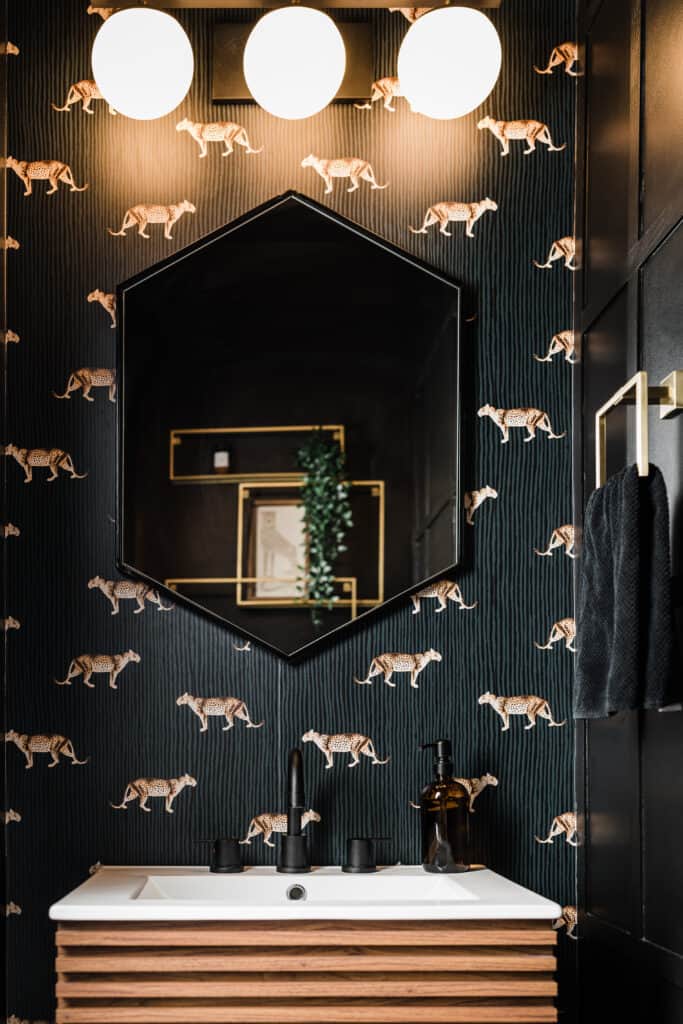
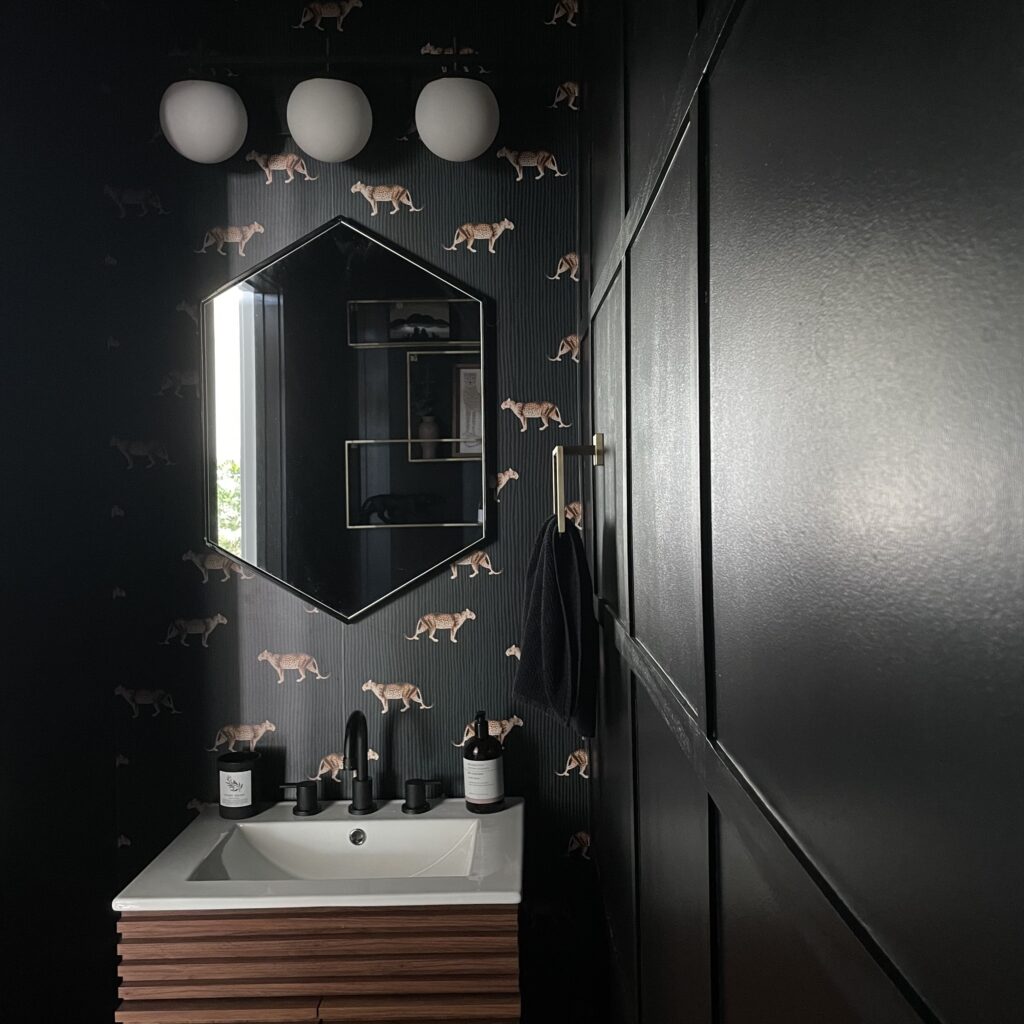
Leopard Wallpaper
What would a jewel box powder room be without a bold wallpaper?
Being mildly obsessed with cats, I was naturally drawn to this fun leopard wallpaper. I knew it would be a great way to add some personality and a little pop of color!
Leopard print can actually be hit or miss for me, but this pattern is so sophisticated. I love the green and black lines and the leopards are the perfect shape and color! (I’m very particular about my cats LOL!)
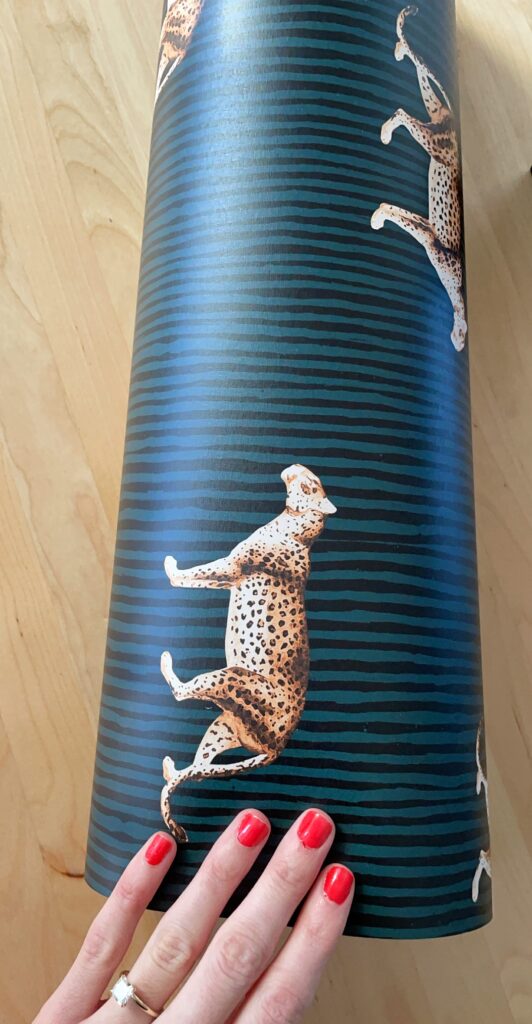
Can you tell I was excited? It was my first time partnering with a brand! I just couldn’t believe a company was willing to send me their beautiful wallpaper! Livette’s Wallpaper has a lot of good quality peel and stick wallpaper options. I was overwhelmed by all the beautiful patterns to choose from!

Peel and Stick Wallpaper FAQ
Removable wallpaper is very different from traditional wallpaper, especially when it comes to the application process. Here’s a few common questions I get:
Is peel and stick wallpaper hard to put up?
It depends who you ask haha! I will say, it’s not my favorite.
Situations I wouldn’t use peel and stick wallpaper:
- On the ceiling
- Around an entire (large) room
- In a VERY small area (where it can easy get stuck to surrounding walls)
Situations I would use peel and stick wallpaper:
- A small accent wall
- In a bathroom
- For nurseries, dorm rooms, a rental apartment, or anywhere you want temporary wallpaper
The great thing about peel and stick paper is that it’s not permanent!! If you end up hating it or change your mind after a short time, you can easily switch to a new wallpaper!
If you have a wallpaper project and you’re not sure what kind to use, check out my blog post on the 3 types of wallpaper and the best choice for beginners!
Is peel and stick wallpaper okay for a bathroom?
A solid vinyl wallpaper is a great option for a bathroom because it’s very durable and washable. Most peel and stick wallpaper is made from vinyl.
You’ll just want to double check with the manufacturer to find out the material and what they recommend. Livette’s wallpaper indicates that their wallpaper is safe for bathrooms, but to avoid areas that would be directly in contact with water.
I installed peel and stick wallpaper in the backsplash area behind the sink and it’s held up great for years now. I’m able to gently wipe any water droplets clean with a damp rag!
Can you use peel and stick wallpaper on textured walls?
You can, but I wouldn’t always recommend it. With the peel and stick wallpaper I used in this bathroom, any bumps or imperfections in the wall were very evident.
It really depends on the type of texture on your walls, the material and pattern of the wallpaper you use, and what you’re okay with looking at! A busy wallpaper pattern with a subtle wall texture might look just fine! My suggestion would be to order a sample of the wallpaper and see if you’re okay with how it looks!
Beginner’s Guide to Hanging Removable Wallpaper
This was my first peel and stick wallpaper experience and I learned a lot throughout the process! From one beginner to another, here’s my step-by-step tutorial on hanging removable wallpaper:
Step One: Prep your walls
The first thing you need to do is make sure you have a clean wall and smooth surface to work with. Trust me, I learned the hard way!
I was just so excited to get the wallpaper up, I forgot to give my wall a quick sand. Once I started applying the wallpaper, I noticed all these bumps… oopsies!
Thankfully they were only in a spot that would be hidden by our vanity. Here’s a video so you can see how not having a smooth wall could be a problem!
Important note: It’s not recommended to apply wallpaper to freshly painted walls. It should have about 30 days to cure before applying!
It definitely doesn’t hurt to use a primer before installing the wallpaper also! If you do, allow it a full day to cure. I didn’t personally use any and it’s held up great!
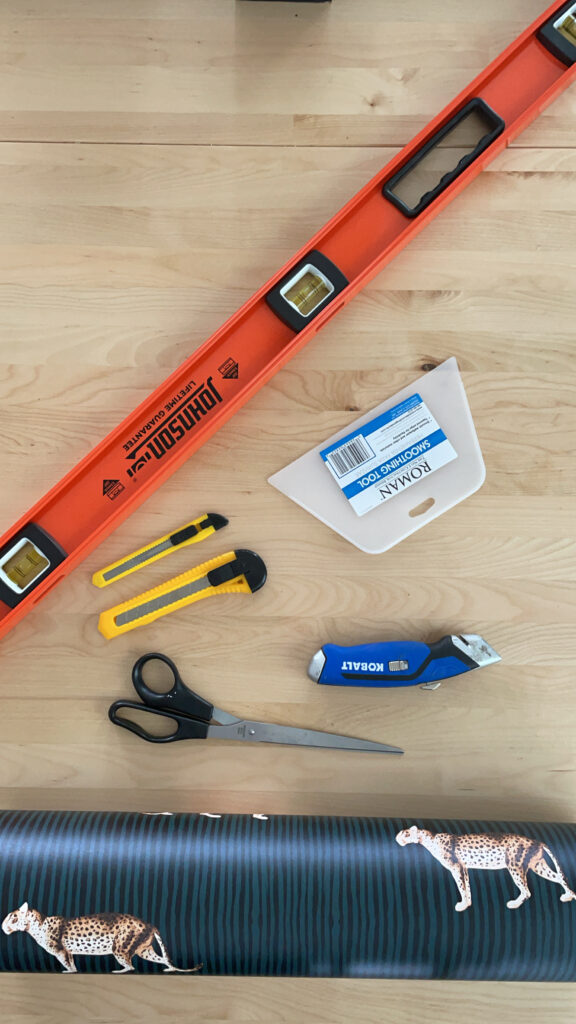
Step Two: Gather your materials
One benefit to using peel and stick wallpaper is that you don’t have to deal with any messy paste and minimal materials are required! Here’s a list of wallpaper materials I used:
Pro tip: Keep your blade sharp. You can see I have two different utility knives here but I actually preferred these cheap ones! You’ll want to break off a new blade frequently.
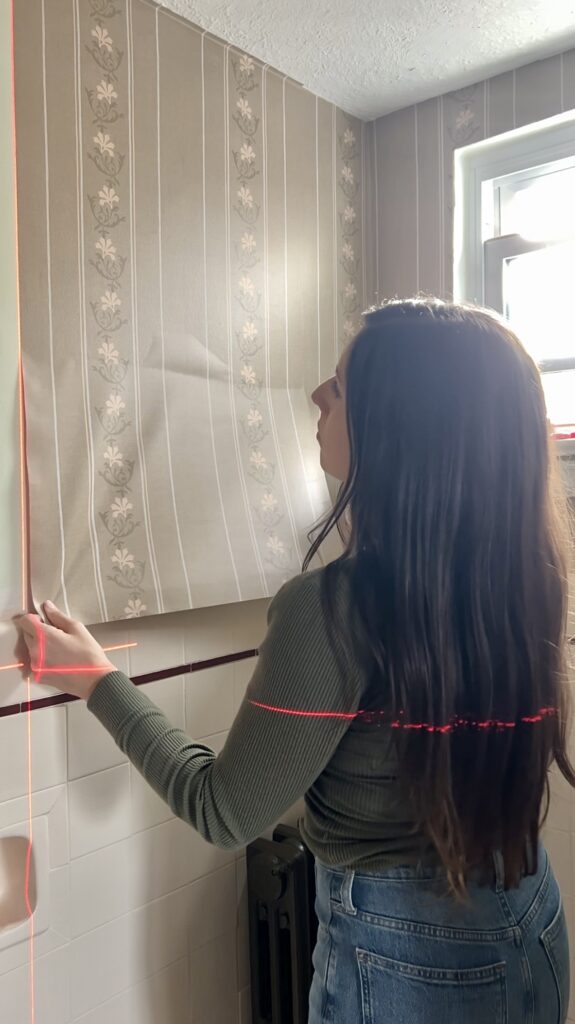
Step Three: Marking a level line
It might be tempting to just start in the corner and line your panel up with the edge of the wall, but most walls aren’t level so you don’t want to do this! Furthermore, it’s very important that your first strip of wallpaper is level. If it’s not, all subsequent panels won’t be level either.
In order to ensure that your first piece is level, you’ll want some overhang onto the adjacent wall. You can see in the video below I had about 1/4″, but if your wall is more uneven, you may need more of an overhang.
Important note: Be careful about how much overhang you do if you have a limited amount of wallpaper. My wall was 36″ and I had two 19″ panels so I only had a couple inches to spare!
Once you know how much of an overhang you’re doing, deduct that measurement from the width of your panel.
For example, my wallpaper was 19″ wide, so I measured 18 3/4″ into the wall and used my level to mark a straight line from the ceiling to the baseboard. This vertical line is what you’ll match your wallpaper up with!
A laser level would be SO much easier, and more accurate, for this! I didn’t have one at the time, but this is the one I have now!
Step Four: Cut your panel to the right length
You might need to trim the length of your wallpaper. I was able to use the entire piece because my wallpaper panels were 108″ in length and the wall I was covering was 100″.
If you’re only using it on the top half of the wall (or if your rolls of wallpaper are lengthy) you’ll want to trim it so it’s more manageable to work with. But be sure to leave an extra inch or two for the top and bottom of the wall!!
Important Note: After your first panel, be careful when cutting your wallpaper! You’ll need to match up the pattern first and make sure you’re cutting the length from the right part of the paper.
Step Five: Tips for hanging peel and stick wallpaper
Check Your Manufacturer’s Instructions
It’s important to note that wherever you bought your wallpaper likely has step-by-step instructions specific to their product. I highly recommend checking their website and reading through those before anything else because i’ve seen some alternative methods for hanging it.
Work Little by Little
Peel and stick wallpaper is almost like a big sticker so it has a backing paper that you peel off. I found it really helpful to peel back just a couple feet and then cut the backing. You can see me doing that in this video:
First I lightly pressed the top of the paper in place and then left as much as I could loose. Once I cut the backing I was able to adjust it to line up with my level line.
If you take all of the backing off at once the paper is SO sticky that it would start sticking to the bottom of the wall before you have the chance to position it properly. One of the cons of peel and stick wallpaper is that it’s hard to re-adjust so this method helps combat that issue!
Smooth Outward
Line up the edge of the wallpaper with your level line and use your finger or palm to press it down along that line. Once it’s in the right place, use your wallpaper smoothing tool to press it onto the wall.
Smooth outward towards the corner of the wall! Be sure to get any air bubbles or folds! Here’s a video of this process:
Matching Up the Pattern
Once you get to the second piece, you’ll need to start matching up the pattern for a seamless look!
Now, i’ve seen a few different ways to do this with wallpaper. Some brands might have you overlap the pattern. This particular wallpaper didn’t require any overlap and was very simple to line up!
Working Around Obstacles
It’s very possible that you run into outlet covers, light switches, or other tricky areas when installing your self-adhesive wallpaper.
For us, it was all the plumbing for the sink. One benefit to these obstacles was that I knew they would be hidden by our vanity so I didn’t have to do a perfect job. Here’s a video of me working around that area:
You can see I smoothed the wallpaper down as close as possible and then cut. It’s really important to have a nice sharp blade for these areas!
If you have an outlet or light switch to work around, you’ll do the same. Just make sure you remove the plate cover first so you can apply it close to the opening and any rough edges can be hidden by the plate cover!
Trimming the Excess
You’ll need to trim the excess wallpaper along the corners of the wall and along the top and bottom. Again, it’s important to use a sharp blade for this because if not, your wallpaper could tear and you’ll be left with a sloppy finish!
The Finishing Touches
Lighting
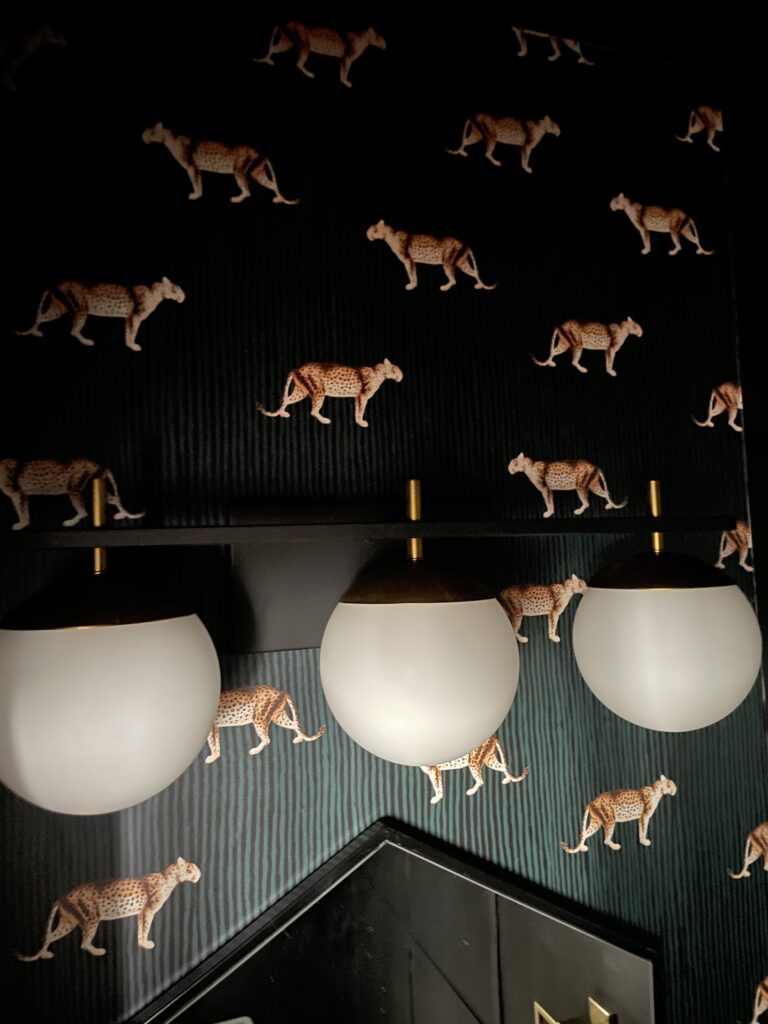
To keep a cohesive look with the rest of the house, I wanted a new light fixture with a modern aesthetic. I went with one that has three white globes which provide a beautiful contrast against the wallpaper!
My favorite part about this light fixture (other than it’s beauty) is that we were able to use dimmable lightbulbs in it! Man oh man does this have a huge impact on the vibe of this tiny room!
Vanity
I found the perfect bathroom vanity to replace our builder grade pedestal sink. The modern look and horizontal lines drew me in, but it was also the exact dimensions we needed for our tiny little room!
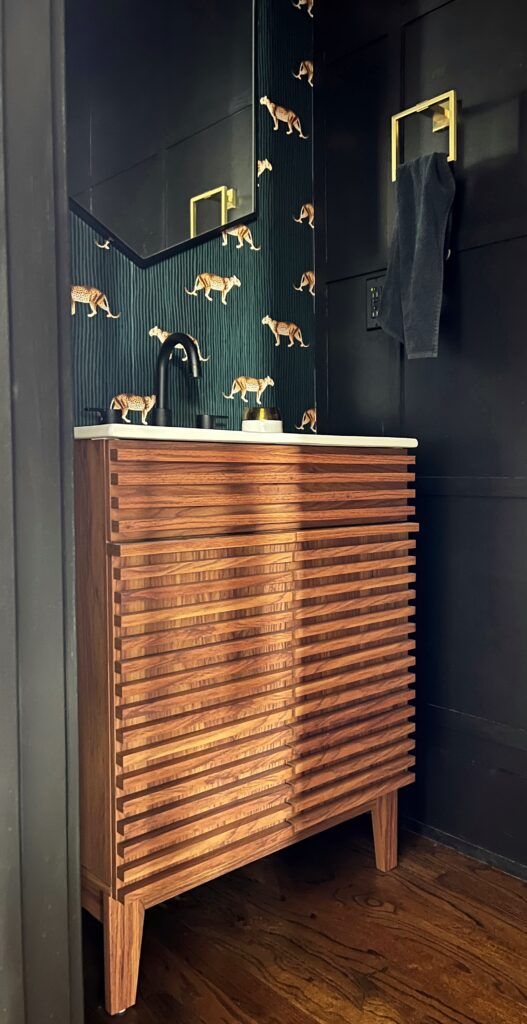
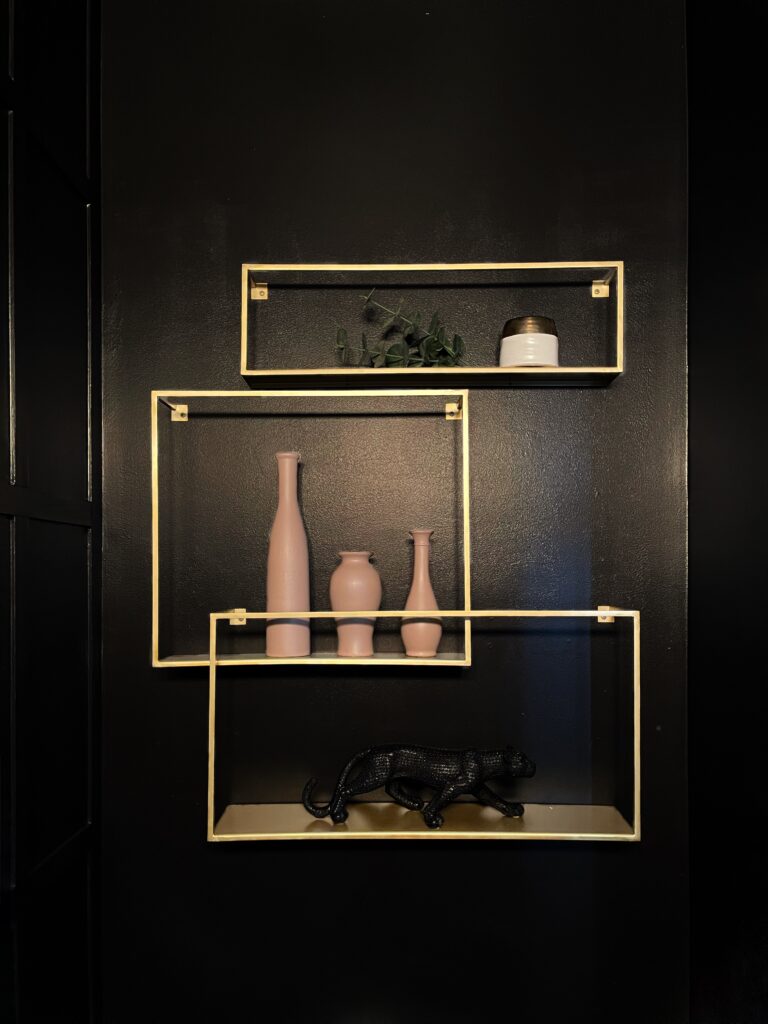
Brass Accents
For visual interest, I decided to add some gold finishes through the towel ring, toilet paper holder, and shelves. They really pop against the black wall!!
One design element I repeated throughout this entire space is clean lines. They’re in the grid wall, the vanity, the towel ring, and the open shelving.
P.S. I’ve since improved my styling skills haha! I would share but this dark powder room is insanely difficult to get good photos of. Envision a draping faux plant, a cute picture of a leopard (really leaned into the theme here) and a little crystal jar with matches!
Mirror
As a contrast to all the right angles in the room, I thought it would be fun to add some diagonal lines with this mirror! I love it!
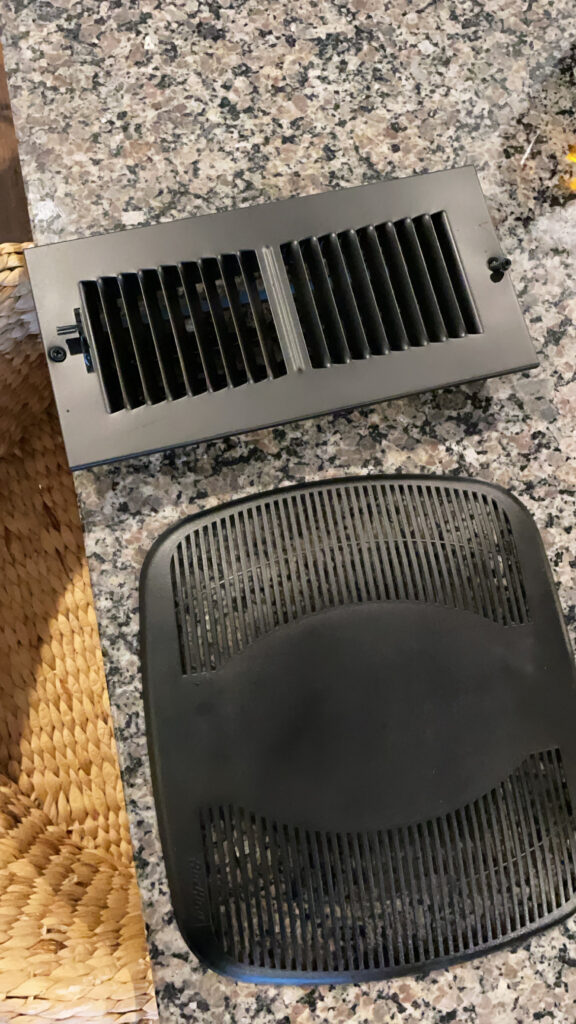
Hidden Details
Playing into the jewel box aesthetic, I definitely didn’t want any eye sores in this room. I spray painted the vent covers black and got black light switch and outlet covers!
Powder Room Sources
Cowhide Rug (thrifted, but here’s a similar one)
Cheetah sculpture (found at Home Goods, but this one is SO cute!!!)
Vases (thrifted and painted, but here’s a similar set!)
This might be the smallest room in our home, but boy does it make a big statement.
To me, the best part about this powder room remodel is that it was my first design that was 100% me. This tiny bathroom gave me the confidence to tackle big projects and step out of my comfort zone when it comes to making bold decision choices!
Would you ever wallpaper your powder room? If so, you may be interested in some of my other wallpaper posts:
- Beginner’s Guide: How to Hang Wallpaper with Paste
- Hand Painted Cottage Style Wallpaper
- How to Wallpaper Outlet Covers
Elisha

OMG It’s like you’re in my head! I literally want to do the exact same thing to mine! Thank you! It’s a stunner!
Yay!! I love hearing that! It’s seriously my favorite room 🙂
Hi! Looks amazing!! What is the exact color of this wallpaper? I need it! Haha. The one on the website is green. Please help 🙂
Thanks!
York
Hi York! Thank you so much!! It actually is green!!! The one on the website looks more green than it does in my bathroom but that is the one I used!!
Hi, absolutely love the remodel! I was wondering how the vanity has held up over the years. We are making a powder bath with small dimensions so are limited by vanity options that are both attractive and would fit in our space. Would love to hear your experience as it is such a good looking vanity! Thanks!
Hi Margaret! Awe, thank you so much! We actually moved out of that home, but it held up awesome for the 3+ years we had it in there! It looked like it was still brand new when we moved out. It’s great quality for sure 🙂 Hope that helps!!