

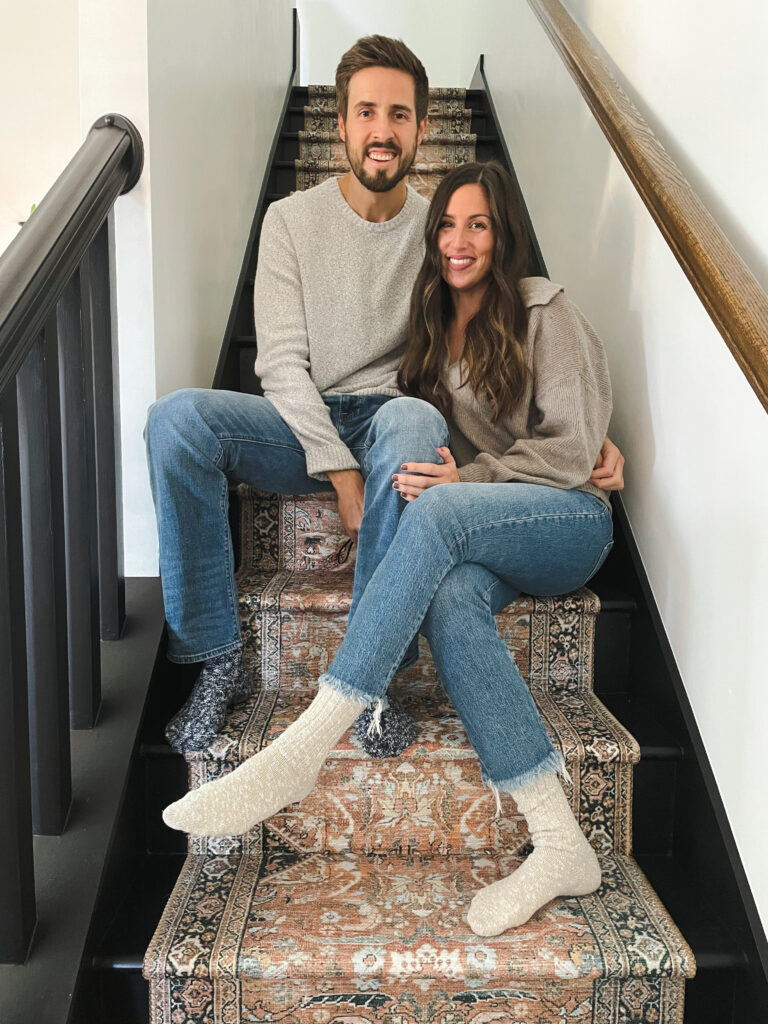
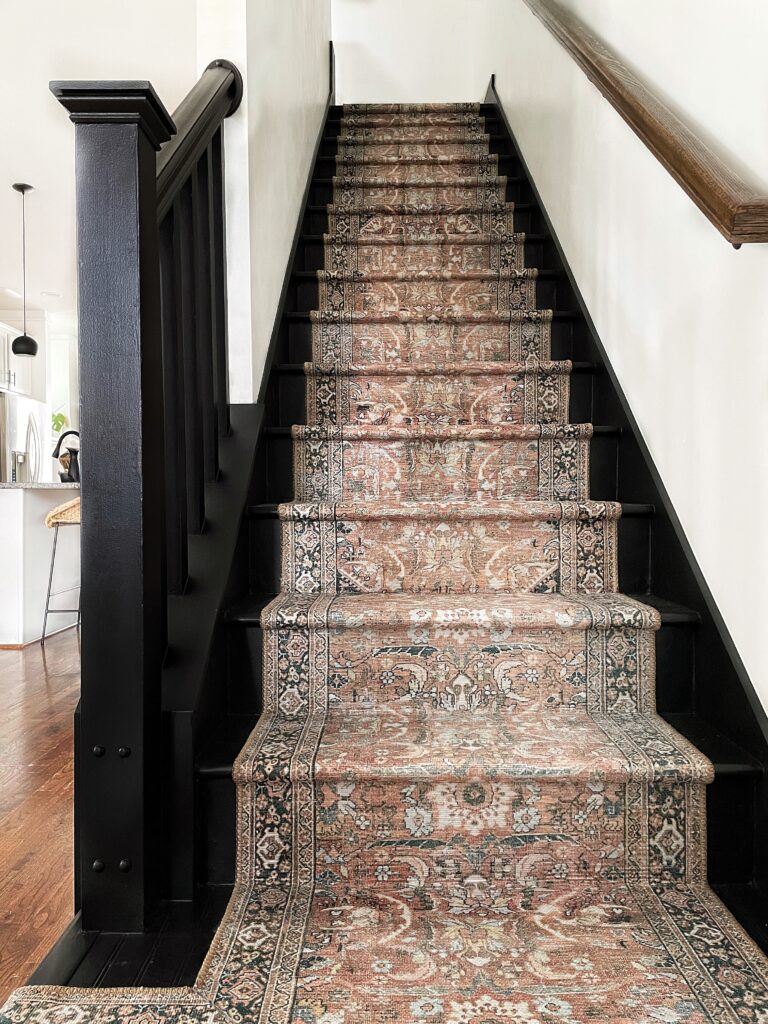
There’s just something about a stair runner that adds a touch of elegance to a home! I’ve always wanted one, but never thought it was something I could do on my own. Well, I thought wrong… this really is an easy DIY project! Let me walk you through my step-by-step guide on how to install a stair runner.
By the way, this is part II of my DIY stair remodel. To find out all the details on removing the carpet and painting the stairs, check out part I.
Disclaimer: This post contains affiliate links. This means, if you purchase something from a link I provided, I will receive a small commission. This is at no extra cost to you! Thank you for your support!
Materials:
tools:
How to Install a Stair Runner YouTube Video
Long story short, I installed a stair runner twice within a couple years. Both looks were different! This YouTube video is the second time and doesn’t include installing a stair runner with a landing! If you’re more of a visual person, you could watch this first and come back here for any unanswered questions 🙂
Step One: Measure Your Stairs
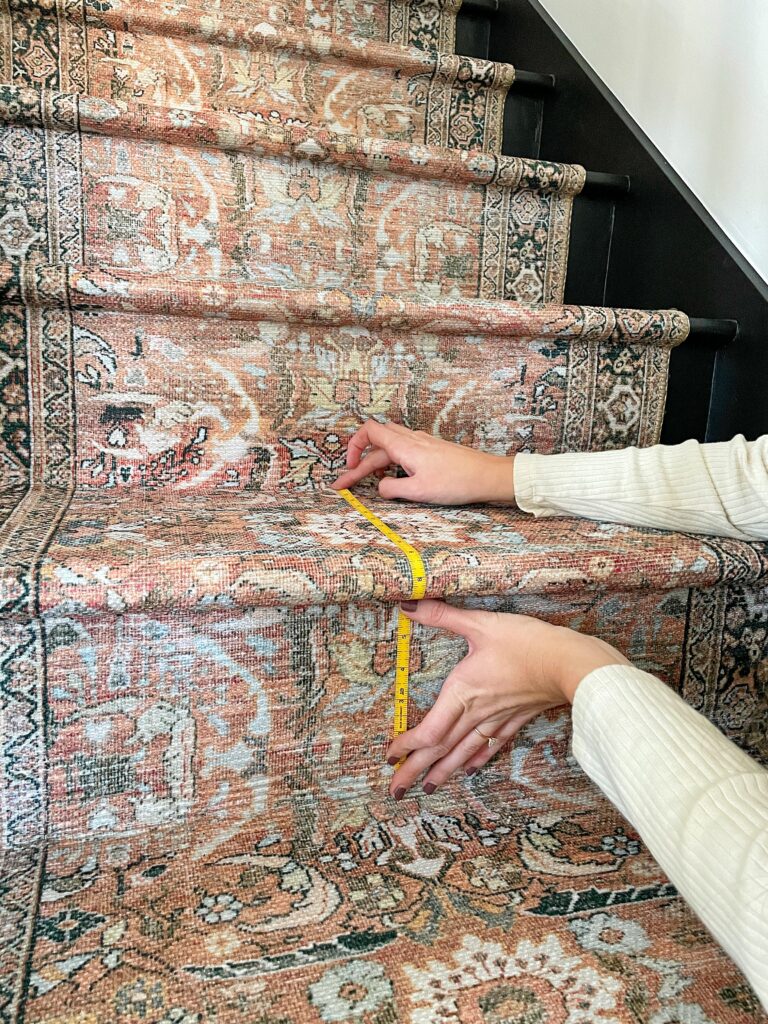
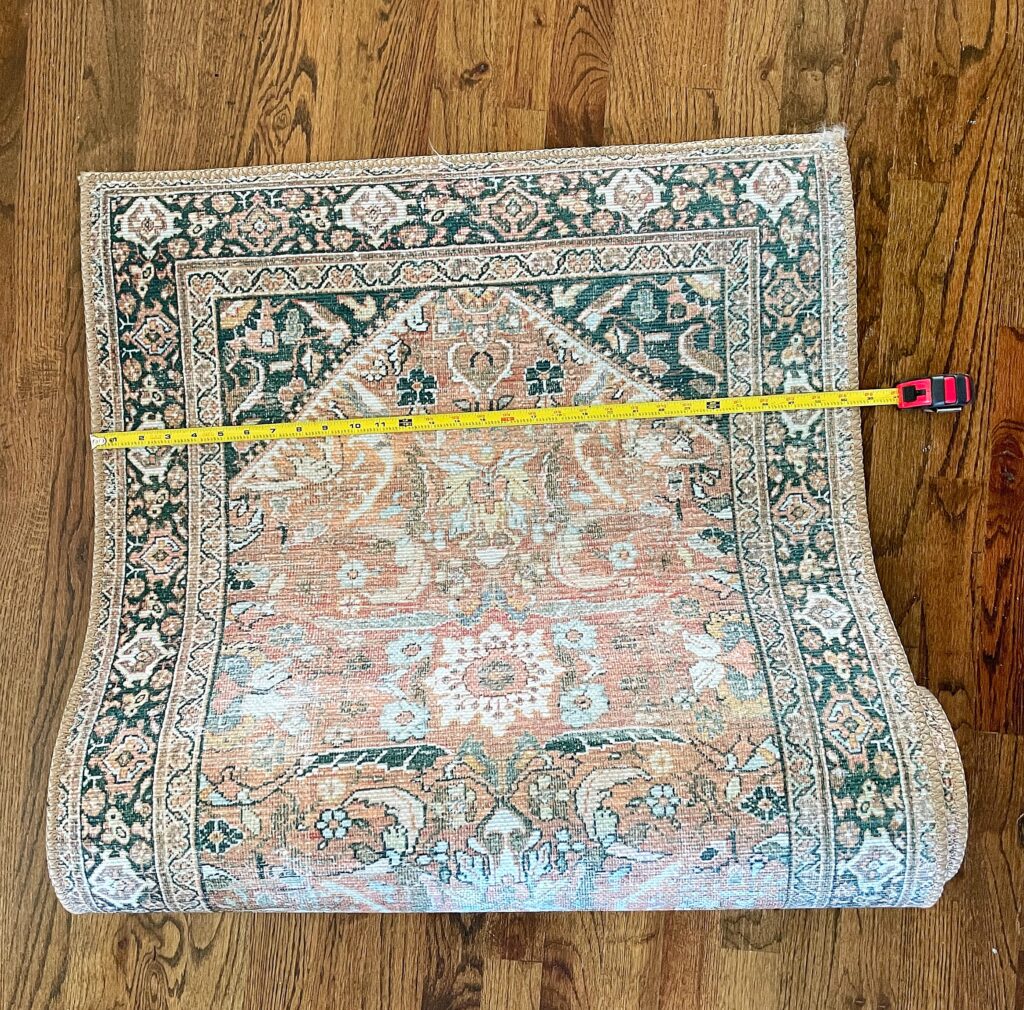
The first thing you’ll need to do is measure your stairs! You’ll want to do this even before you choose a carpet runner so you know how many feet you’ll need.
The best way to measure your stairs is to use flexible measuring tape and mold it around one of your steps. Start at the base of the riser, come around the tread nose, and across to the back of the tread.
Multiply that measurement by the number of stairs you have. My measurement was 19” and we have 14 stairs so that is 266” or a total length of over 22 ft.
We have a landing on the top and bottom of the stairs, so I just decided to get three of these 12 foot runners and that was just enough… I got lucky!
I wish I had an exact strategy for measuring the landings, but since the runner has to be cut at an angle and turned, I honestly wasn’t sure.
My advice: get a little more than you need!
Step Two: Choose a Runner
Man, you would think choosing a new stair runner would be the easy part. Not for me. I spent months searching for the perfect runner that would compliment my newly painted black stairs.
There are just SO many options out there. Not to mention, many things to consider!
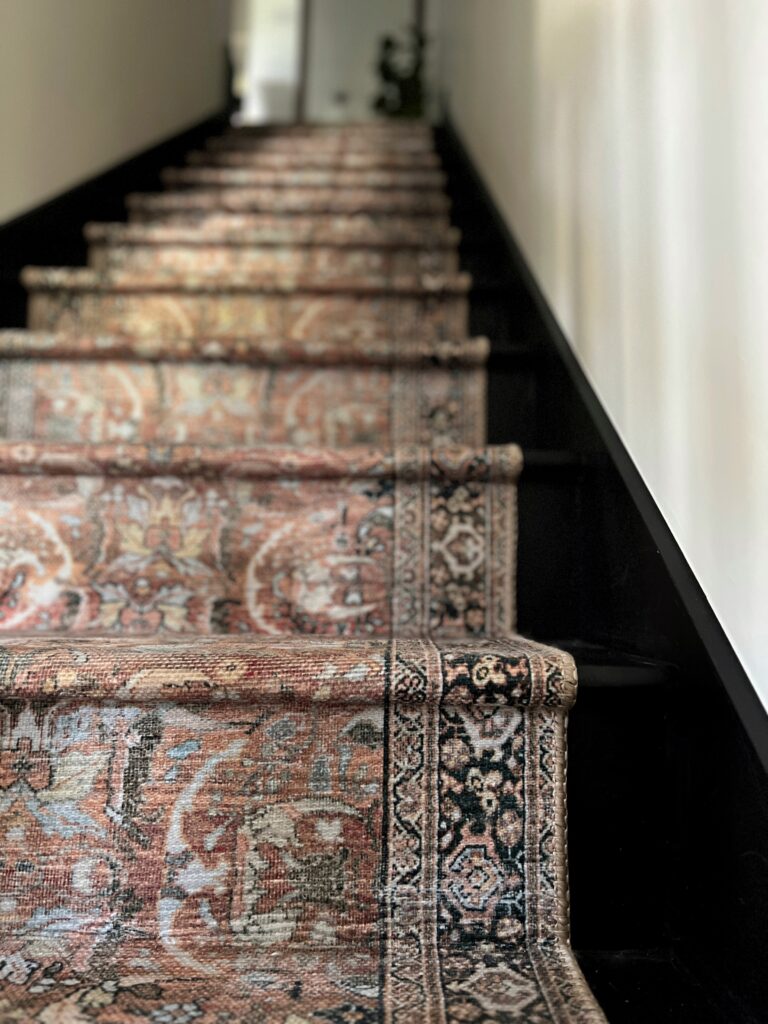
I knew I wanted something with a vintage pattern and I ended up going with a Loloi runner-they have some great affordable options. This is the one I chose! It’s both beautiful and affordable.
What is the best material for a stair runner?
For natural fibers, sisal rugs are a popular choice. Wool is also a great choice, but of course more expensive. For synthetic fibers, Nylon is a great option for a stair runner due to its durability. Flatweave or low pile runners would be best!
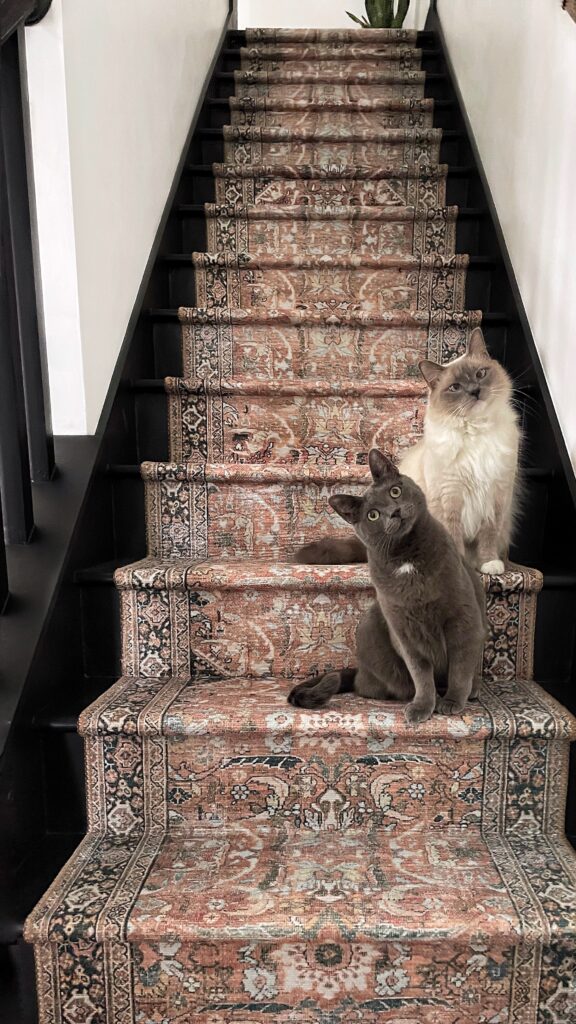
The one I chose is a synthetic fiber printed rug. It’s definitely a great budget friendly option but after 2 years of installing ours, we noticed wear on the landing specifically. This also has everything to do with our cats- definitely go see my 2023 update at the bottom of this post.
Just keep in mind that stairs get a lot of traffic so you have to be prepared for your runner to eventually wear… it’s inevitable! I ended up replacing this runner after 2 years. (See the 2023 update for more info!)
Here’s a roundup of stair runners I think would be great for a DIY stair remodel:
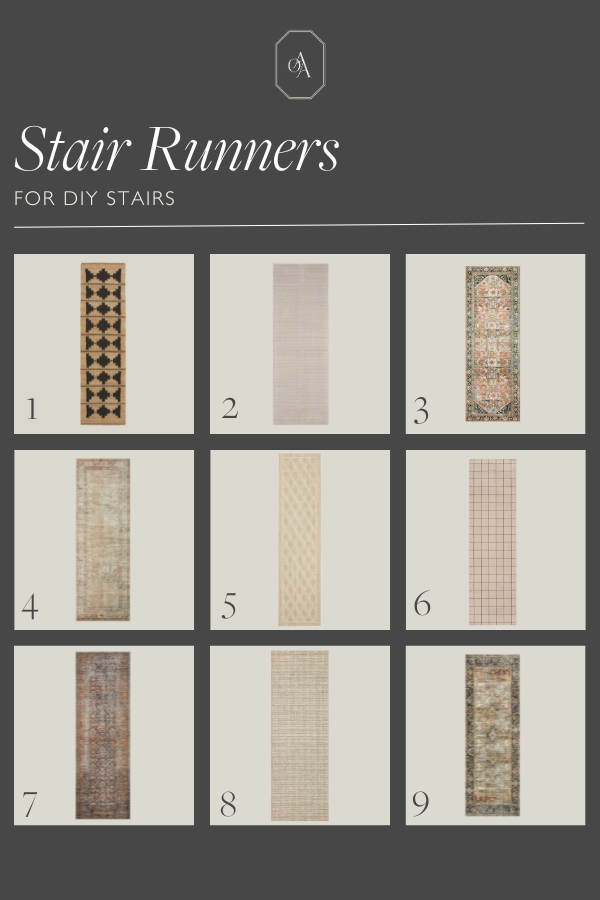
- Jute and wool flatweave rug
- Herringbone runner
- Our affordable stair runner!
- Antique cloudpile runner (what I used the 2nd time!)
- Flatweave jute and sisal runner
- Plaid handwoven runner
- Amber Lewis runner
- Chris Loves Julia runner
- Charcoal/olive runner
How wide should a stair runner be?
It is recommended to have about 3-7″ of space on the outer edges of the runner.
You’ll want to measure the width of your stair treads and make note of that when choosing a runner. Stair runners come in multiple widths and you don’t want it to be too small or too large.
I personally like the look of 3-4″ of space on each side.
Does the pattern matter?
If you’re using a patterned carpet, it does matter.
Unless your stairs are small enough to have just one continuous runner, that is. If you have to cut, connect, and/or turn your runner on the landing, the pattern will matter.
For example, the runner I chose had a beautiful pattern around the border. In order it made it look like one continuous runner rug, I could only use the middle part of a couple of the runners so there was more waste.
If you’re using a geometric pattern such as stripes or plaid, you’ll have to be really careful to line everything up straight and even!
Stair runner by the foot
Did you know you can buy carpet stair runners by the foot?! This is something I learned more recently and would definitely consider for a future DIY stair runner!
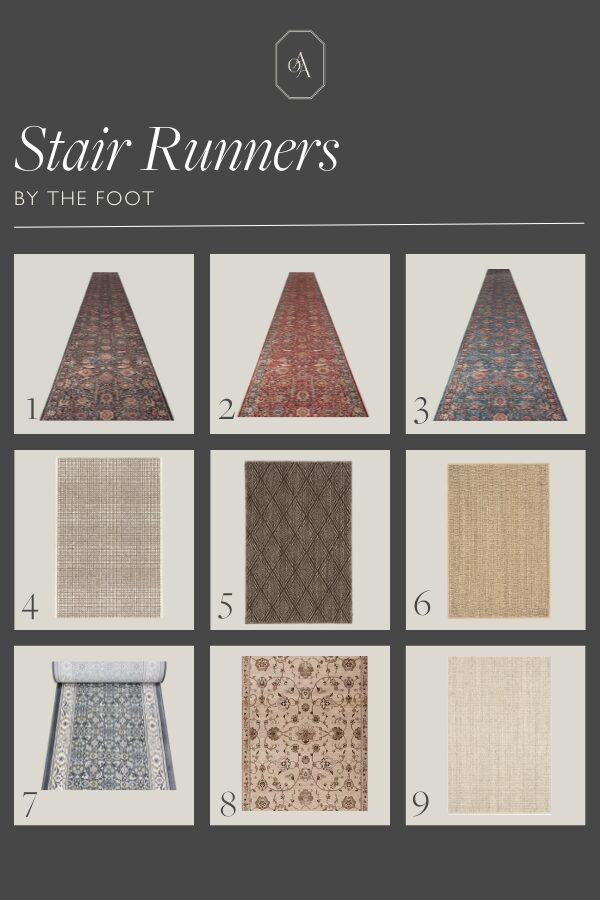
- Oriental charcoal gray runner
- Oriental red runner
- Oriental teal runner
- Checkered woven rug
- Diamond greige sisal rug
- Wicker natural sisal rug
- Gray traditional runner
- Pearl woven runner
- Light gray woven sisal runner
Do you need padding under stair runners?
This is totally personal preference!
I will say, the printed runner I have is on the thinner side, so some might feel the need to add padding for extra comfort. We considered it and decided not to because it felt comfortable enough to us without it.
If you do choose to, you would simply cut up a rug pad for each tread (at least an inch smaller than the width of your runner) and staple them to your stair treads before installing the runner.
Rug pads might also help with the longevity of the runner too!
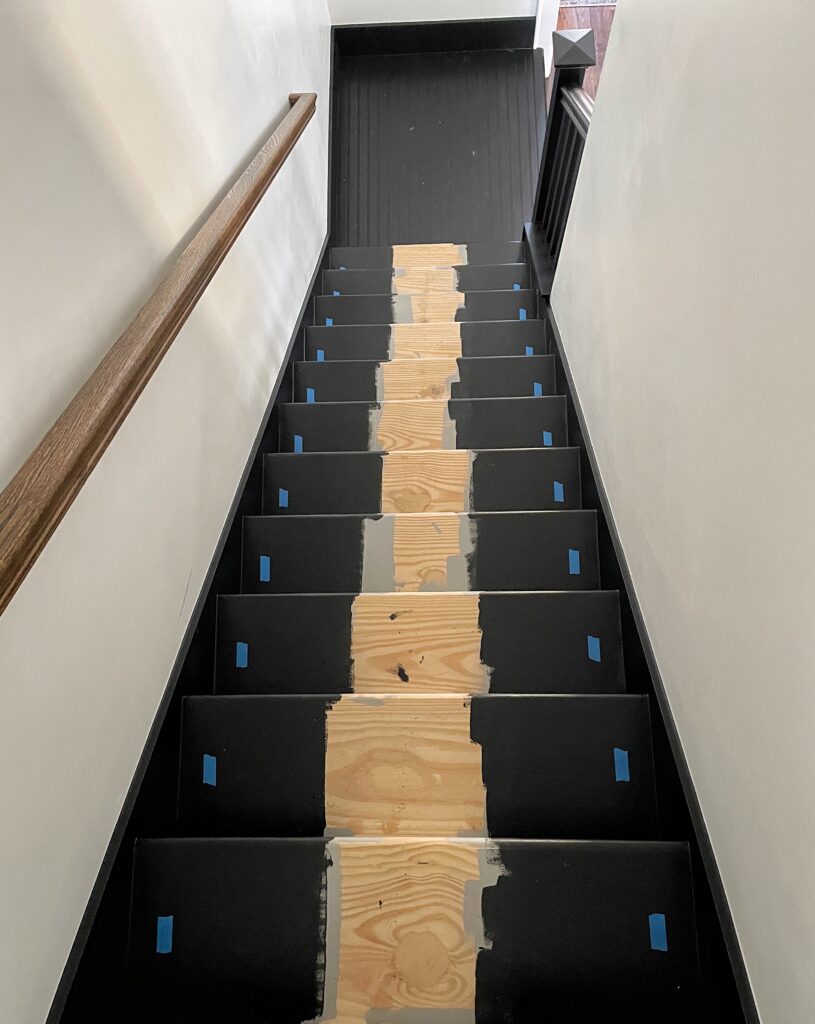
Step Three: Mark the Runner Placement
Before the installing the new runner, you’ll want to measure and mark where the edges of the runner should hit on each stair tread.
This will ensure that your runner is placed nice and straight on the center of the stair.
Measure the width of the stair tread, deduct the width of the runner, and divide by two. This will tell you the amount of space you should have on each side of the runner.
For example, if your stair tread is 36” wide, and your runner is 30” wide, you would subtract 30 from 36 which is 6 and then divide by 2 so there would be 3” of space on each side of the runner.
Just assume that all of your stair treads are different widths. I measured each of mine individually and marked where the runner would hit with painter’s tape. This helped me keep the runner in the center of the stair.
Step Four: How to Install a Stair Runner with a Landing
The dreaded landing. I’d say this was the most challenging part of installing a stair runner. It’s also the part I get questions about the most so I’m going to try my absolute best to explain exactly how I did it.
For this step, you’ll need fabric scissors (or strong scissors), a level, a lighter (I’ll explain!), carpet tape, a staple gun, and a little patience!
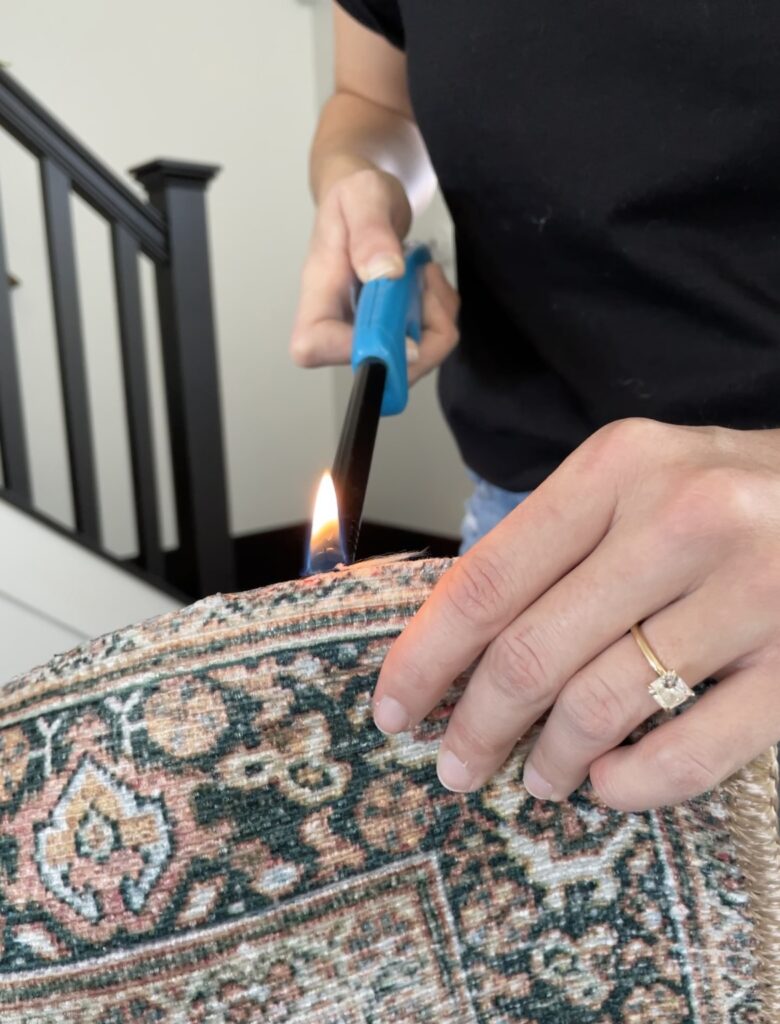
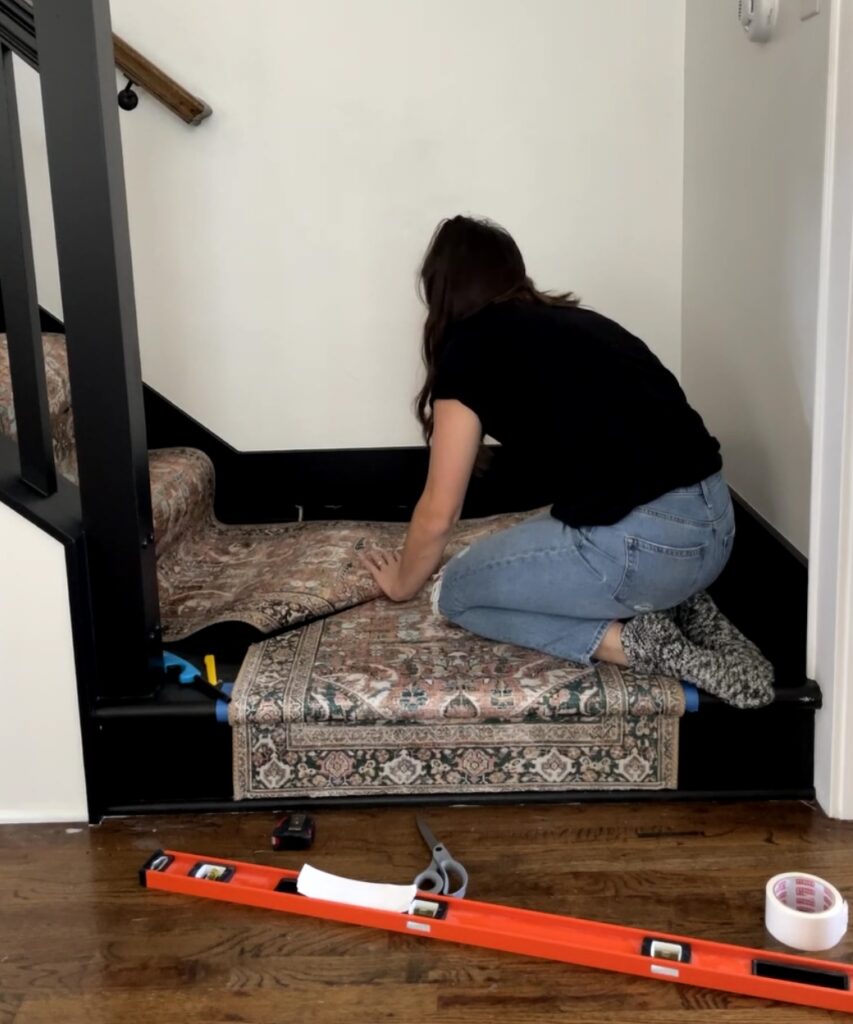
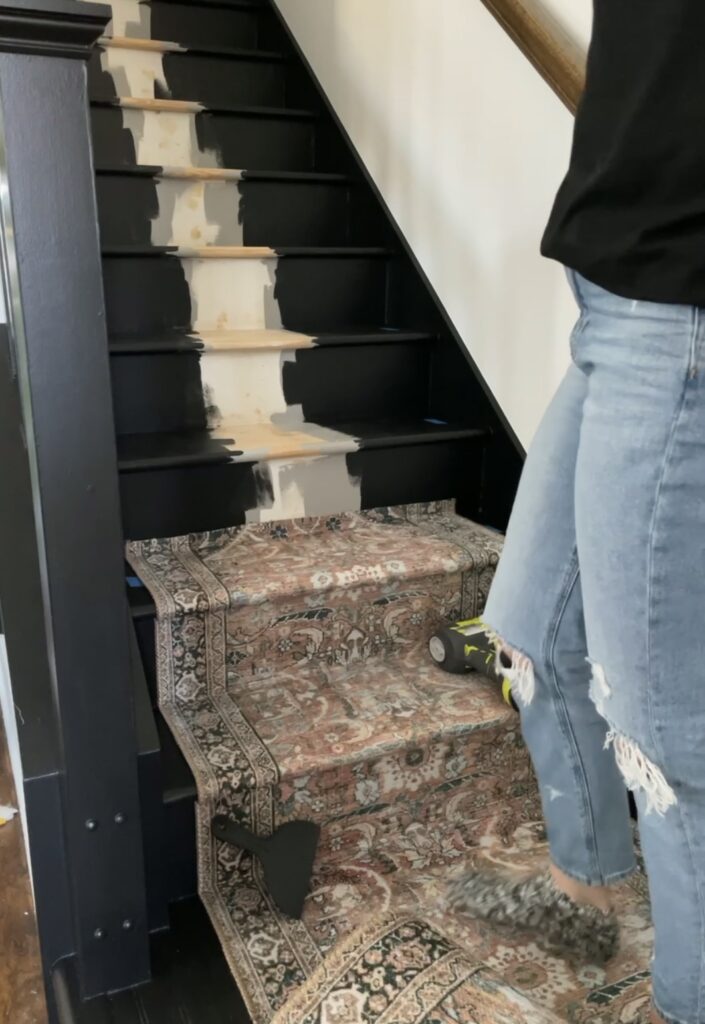
The very first thing I did was cut off the finished edge of the runner:
This is where the lighter comes into play.
In order to prevent the rug from unraveling, you need to burn the raw edge.
Make sure you hold the flame long enough to singe the fabric otherwise this won’t work. I didn’t do a great job of this… you’ll see what I mean at the end of this post!
Don’t forget to grab your carpet tape– it is actually very important and don’t be shy with it! I recommend getting at least 30 yards. If you have leftover, carpet tape always comes in handy for area rugs!
Looking back, I wish I had used a little more… I would have put a long piece right at the edge of the rug (along the quarter round) instead of just up the riser.
All I did here was press the runner down onto the carpet tape and stapled along the bottom, top, and sides!
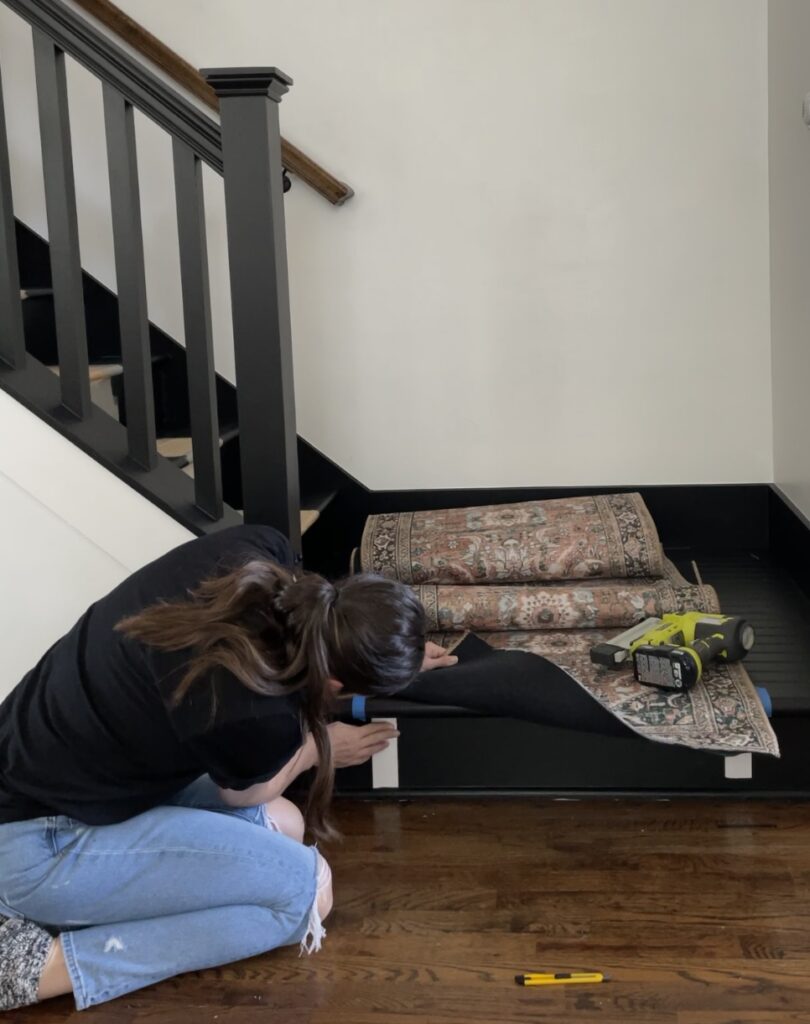
Phew! It felt so good to get started. But now for the angle…
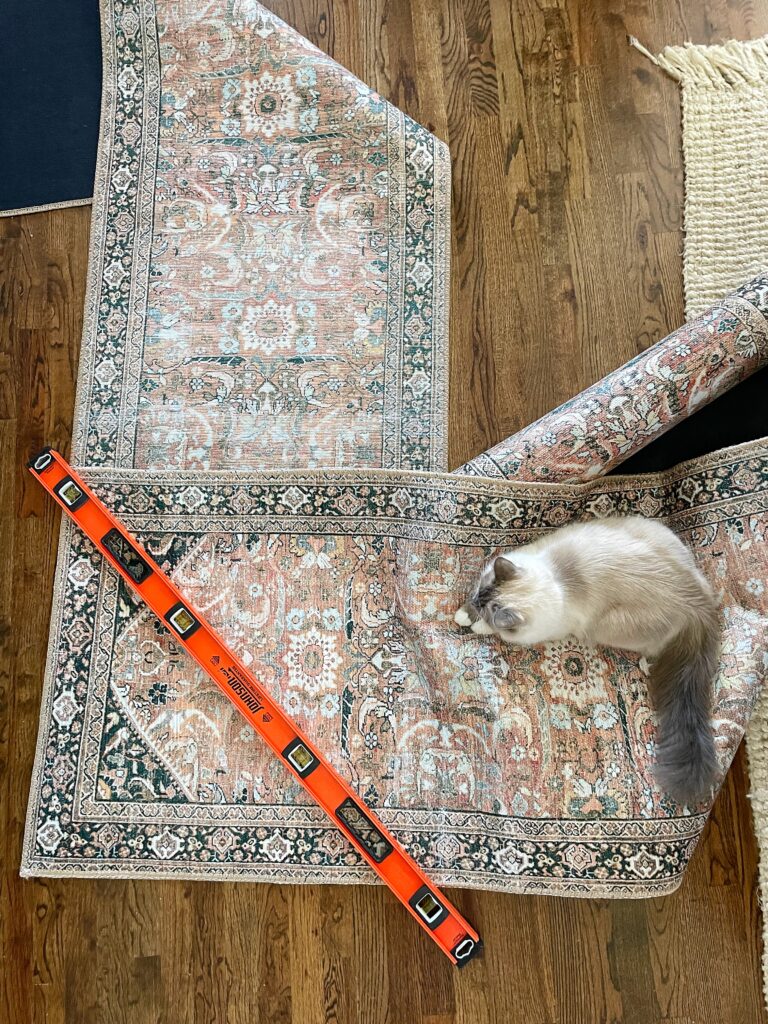
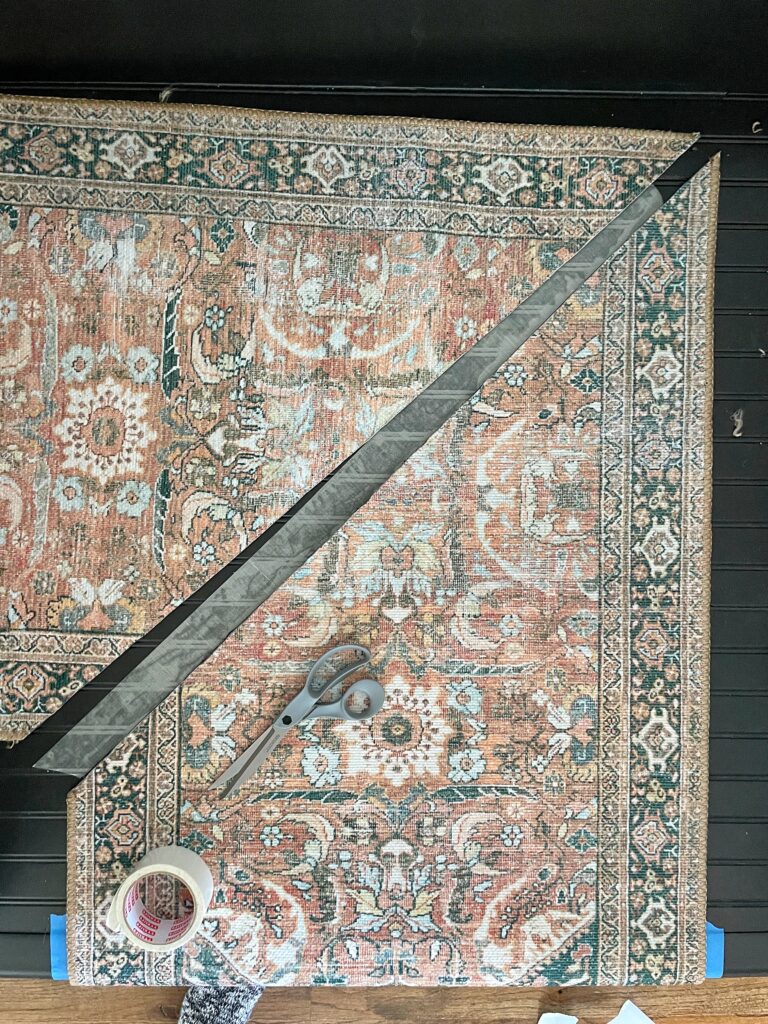
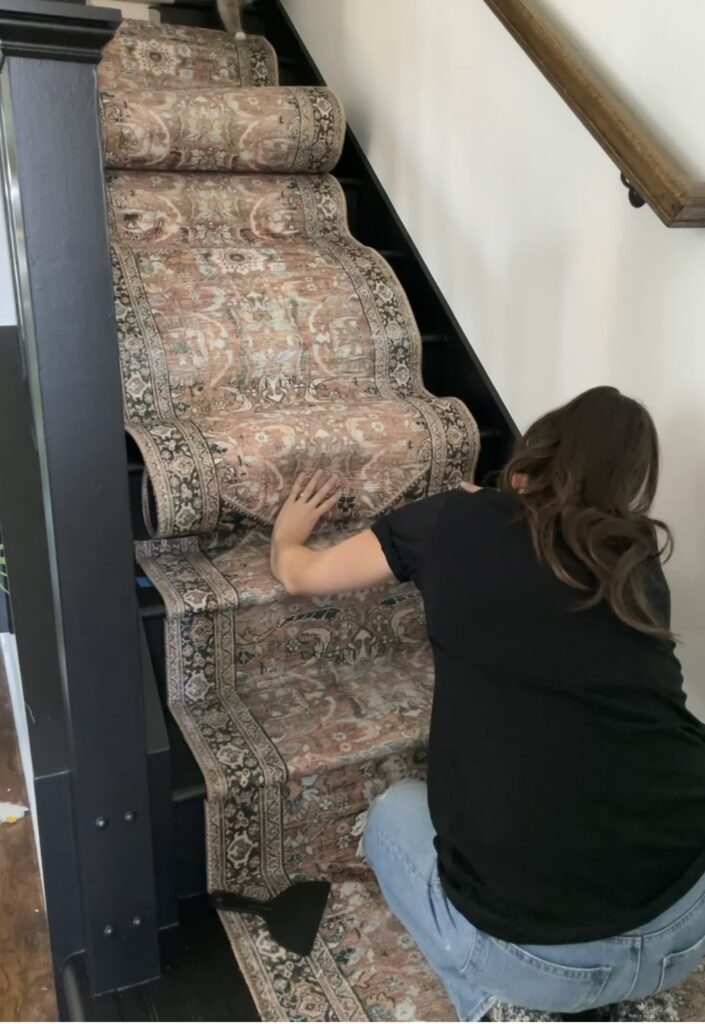
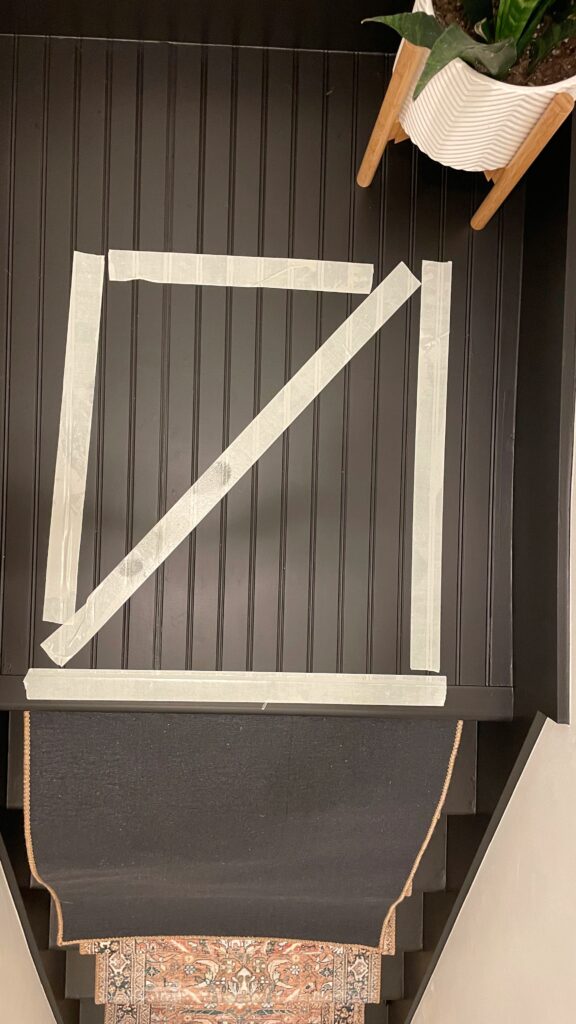
Here’s a visual for how I tackled the angle to turn and go up the stairs.
I got two of my runners out and lined them up perpendicular to each other (as shown above). I placed my level from corner to corner and drew a cut line with a black sharpie.
Then I just used fabric scissors to cut along the line! After this I folded the second runner and tried to find a spot where the pattern lined up as best as it could.
It was impossible to match it up exactly since I was switching direction, but as long as I matched up the borders nicely you can barely tell.
Here’s a tip: before cutting that second runner, measure the length of the angle of the first cut. Let’s say it’s 42″ long… make sure that your angle for the second runner is also 42″. I hope that makes sense!
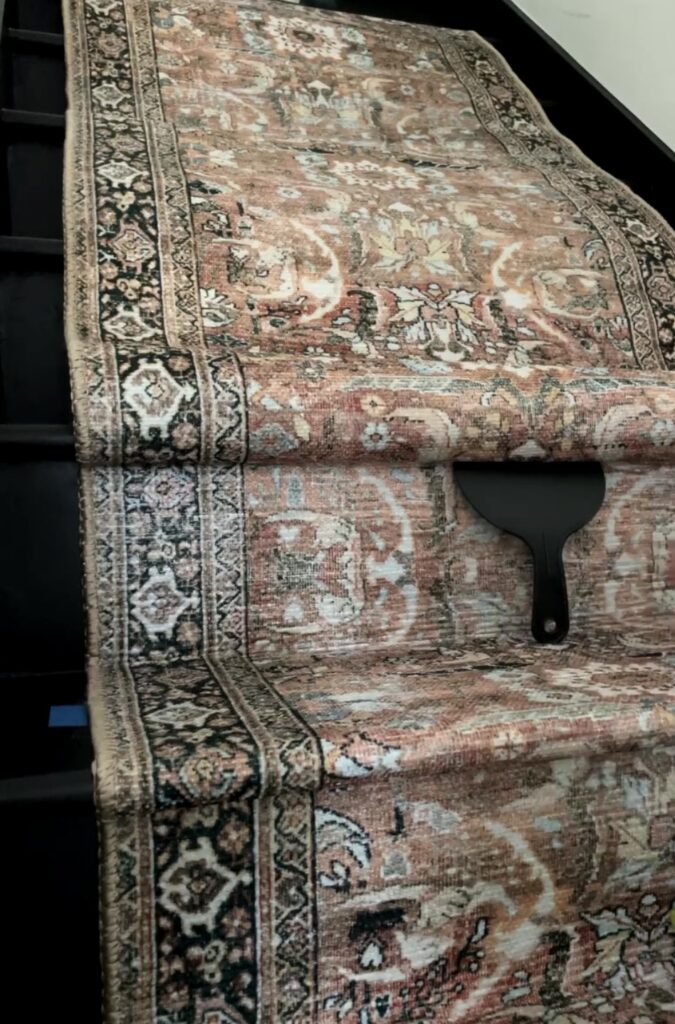
Not too shabby, eh? Before you start stapling these down, let’s remember a couple things…
Don’t be shy with the carpet tape! Especially on the landing. Use it all around the edges, in the middle, and most definitely where the two cuts join together.
Also, don’t forget to burn BOTH of the edges where you cut!
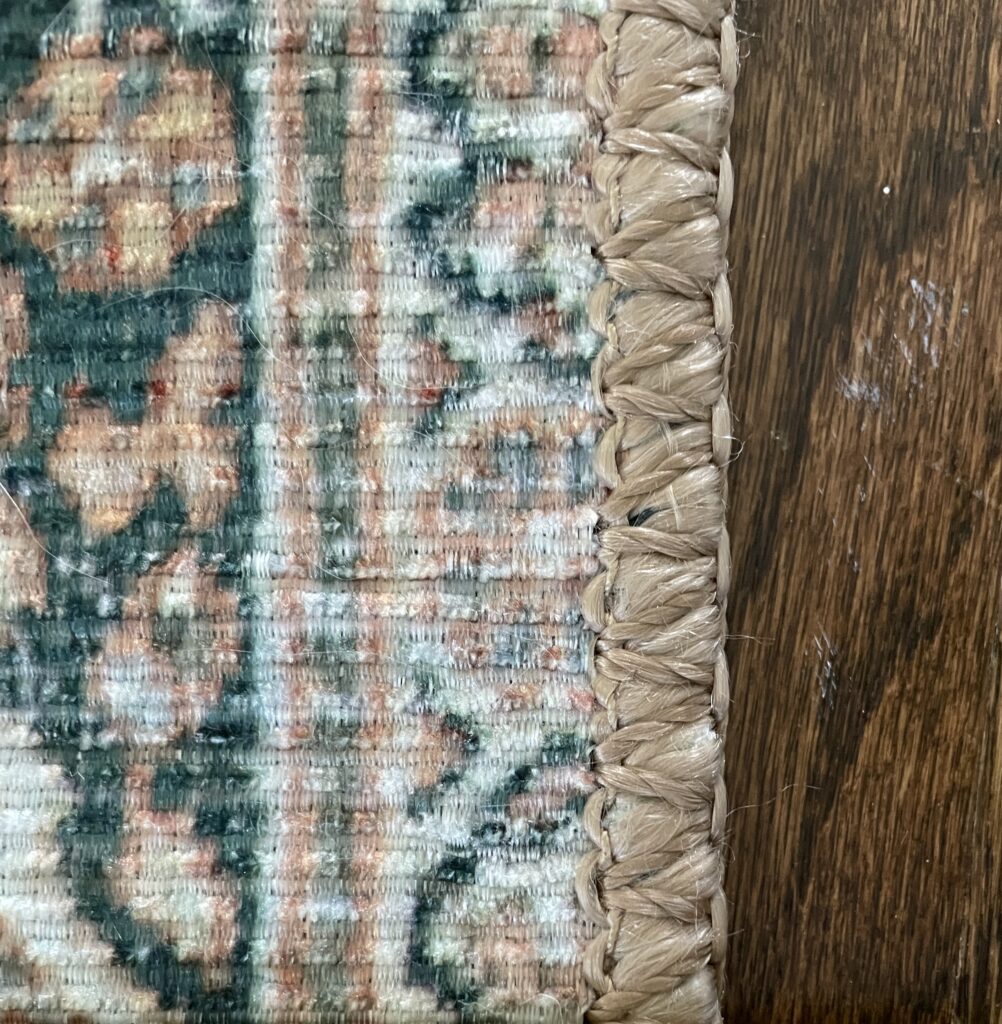
Learn from my mistake: I was so eager to move on from this step that I didn’t take the necessary time to REALLY singe the edges and the runner eventually did start to unravel at the seam. Check out the end of this post to see!
Lastly, you’ll staple it all down! I used staples around the edges, along the seam, and a few in the middle of the runner. Be generous!
UPDATE:
Here’s a photo from my second time installing a stair runner. I learned from my mistake the first time and made sure to really melt the edge a little like you see in the photo below!

Step Five: Installing the Stair Runner
Finally… the fun part!
The stair runner installation was actually very simple and enjoyable. If you’re a visual person, check out my youtube video of how to install a stair runner at the bottom of this post!
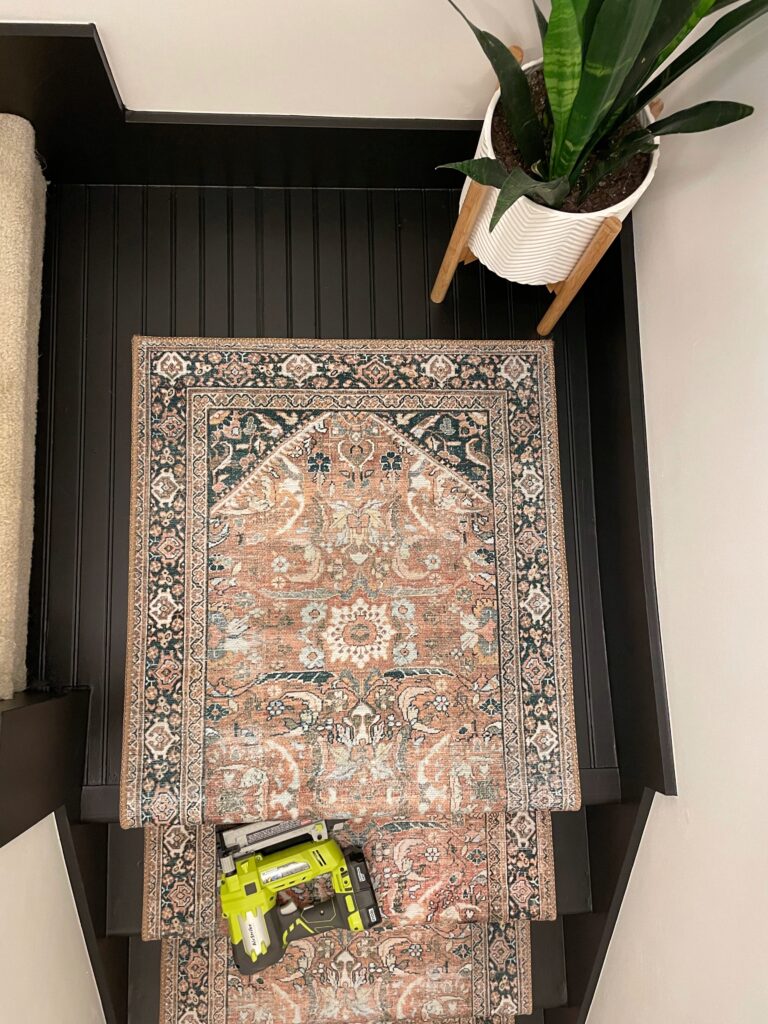
Unfortunately I only had the pleasure of doing the bottom step before I ran out of runner and had to do more cutting. I guess it’s best to get all of the tricky parts out of the way first…
I’m cutting off the border so I can continue the pattern that’s in the middle of the runner.
I cut it about an inch longer than where it hits the base of the riser.
I’m folding the next runner to try and line up the pattern before cutting.
Important note: Whenever I needed to join two runners together, I made sure to do it in a crease. So, either the bottom of the riser (like I did here) or right under the stair nosing.
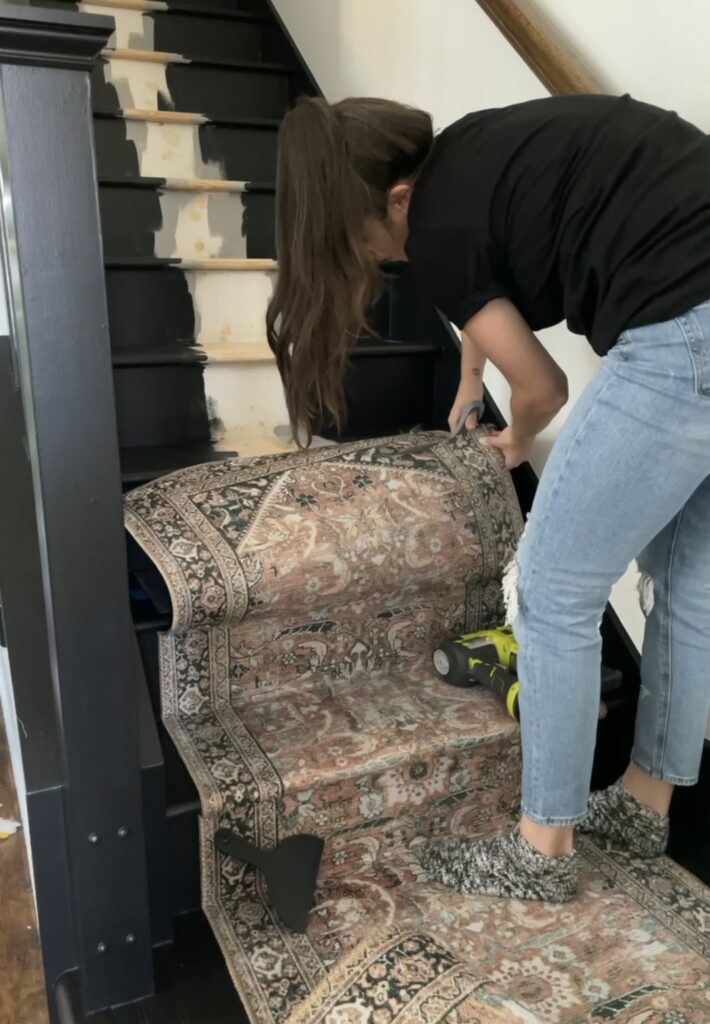
Installing the runner on the stairs
This part was smooth sailing and went much faster than the landing or any of the areas that needed to be joined together.
You just want to make sure you stay nice and even (use your painter’s tape for guidance) and continue to pull the carpet nice and taut (without stretching) throughout the process.
I used a plastic putty knife to push the runner up under the stair nosing as I was stapling, but I recommend one of these carpet tuckers because they’re sturdier!
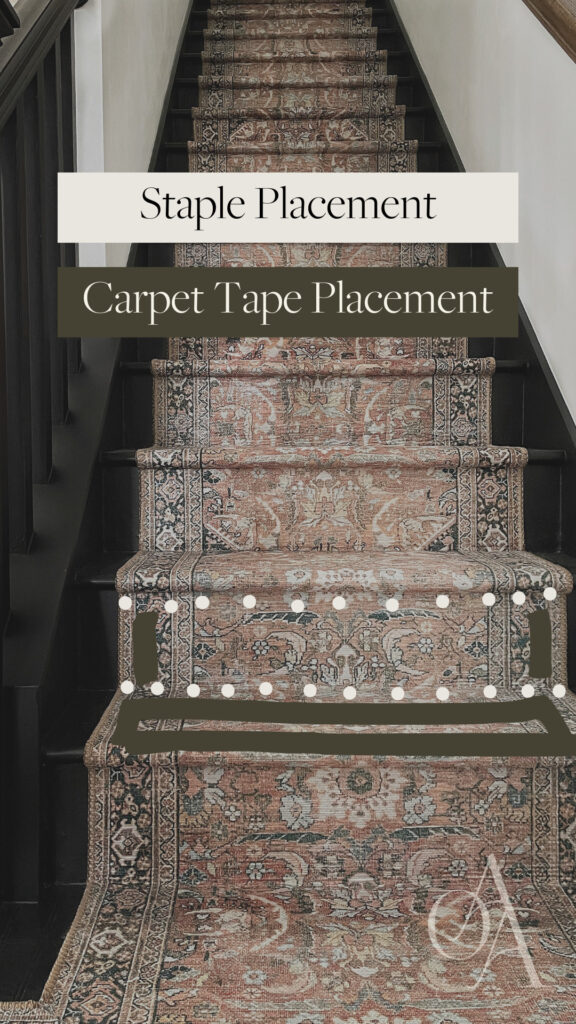
Where do I need to staple when installing a stair runner?
Here’s a little diagram to show you the placement of the staples and carpet tape!
Staples: You’ll want to do a row of staples at the bottom and top of the riser. Make sure you staple close to the edges of the runner!
Carpet tape: The carpet tape should go all along the edges of the treads and also up the risers.
What are the different options for a staple gun?
I did a lot of research on this and here’s what I found for options:
Hand Staple Gun
Can you use one? In short, yes. You can.
I didn’t personally try this, but I have seen others do so. From my understanding, it’s more tiring on your hands (makes sense) and the staples are much wider and therefore more visible.
My hand staple gun is always acting up so I wouldn’t have felt comfortable using it for this project. If you do end up using a hand stapler, make sure you use longer staples for install.
Narrow Crown Stapler
As a passionate DIYer with no plans of stopping anytime soon, I invested in a narrow crown stapler. It looks and feels just like my brad nailer and I’m able to use narrow (tiny) staples which blend right in with this runner. I know I’ll continue to find uses for this tool in the future!
Cordless Crown Stapler
There’s also the option of a crown stapler, which I initially bought and then returned. (Luckily I have a Home Depot nearby!)
It’s less expensive than the narrow crown stapler, more comfortable for your hands than a hand stapler, but it doesn’t fit the narrow staples.
Pneumatic Stapler
This is if you have an air compressor! I don’t, so I don’t know a ton about them, but you can get a narrow crown stapler that attaches to your air compressor.
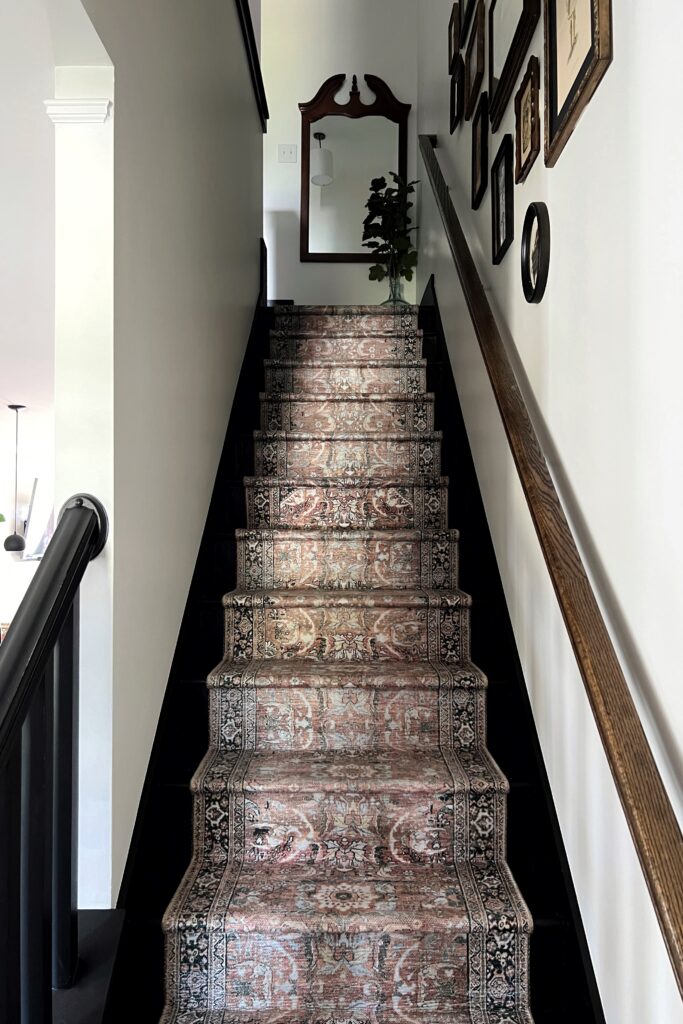
Step Six: The Upstairs Landing
Originally, I was planning to turn the runner at the top of the stairs just like I did on the bottom landing.
I didn’t up up doing that. For one, I didn’t have enough runner left. But also, I really just liked the way it looked without turning.
Honestly, I feel like I just got lucky with this part because the end of the runner was the perfect amount to cover the landing.
This part was very simple- I just pressed it down onto the carpet tape, stapled the border, and scattered a few more staples throughout the middle of the runner.
That’s really it! It ended up taking me about 6 or 7 hours to do the entire staircase. I even took a couple short breaks in between! Not bad at all.
Would you do anything differently?
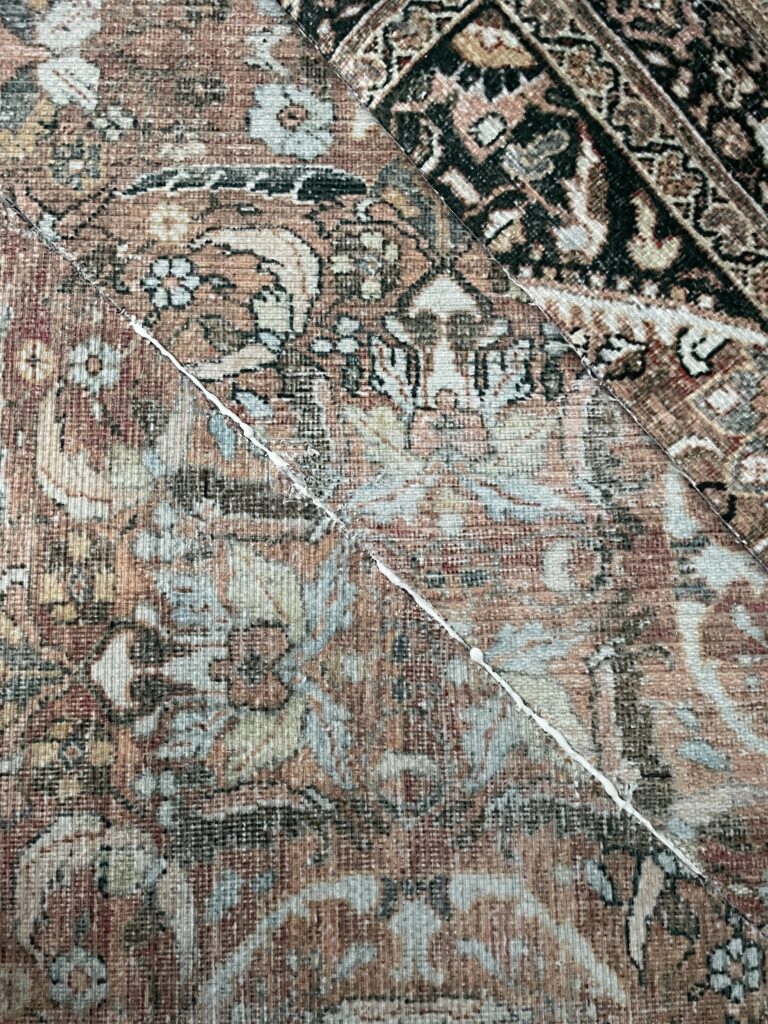
Yes. I mentioned this briefly earlier, but I would have taken my time when burning the cut edges of the rug.
The flame needs to make contact long enough to actually singe fibers. As a result, the diagonal seam at the landing started to unravel.
Initially, I was thinking I might have to purchase another runner (a smaller size) and simply re-do the landing.
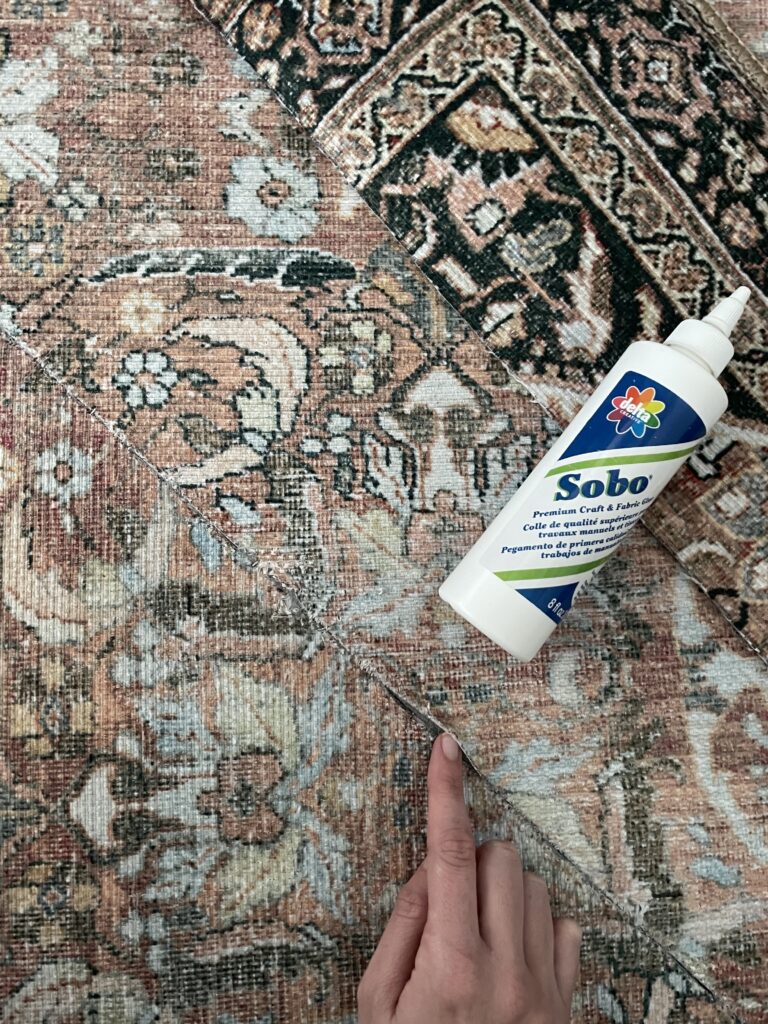
But then I figured I could at least try and save it before going to that extreme. I had some fabric glue in my craft bin and decided to give that a try.
This glue dries clear, but I did test it out on a piece of scrap runner first to be safe! I applied generously and used a plastic putty knife to kind of pat it down into the seam. It held up great!
2023 Update: Runner Replacement
Hi friends! It’s Oct 30th which is oddly enough, exactly 2 years from the day I started this diy stairs makeover.
Over the past couple years, our two sweet kitties have been slowly tearing up the runner on the landing… you can see what I mean in the photo below!
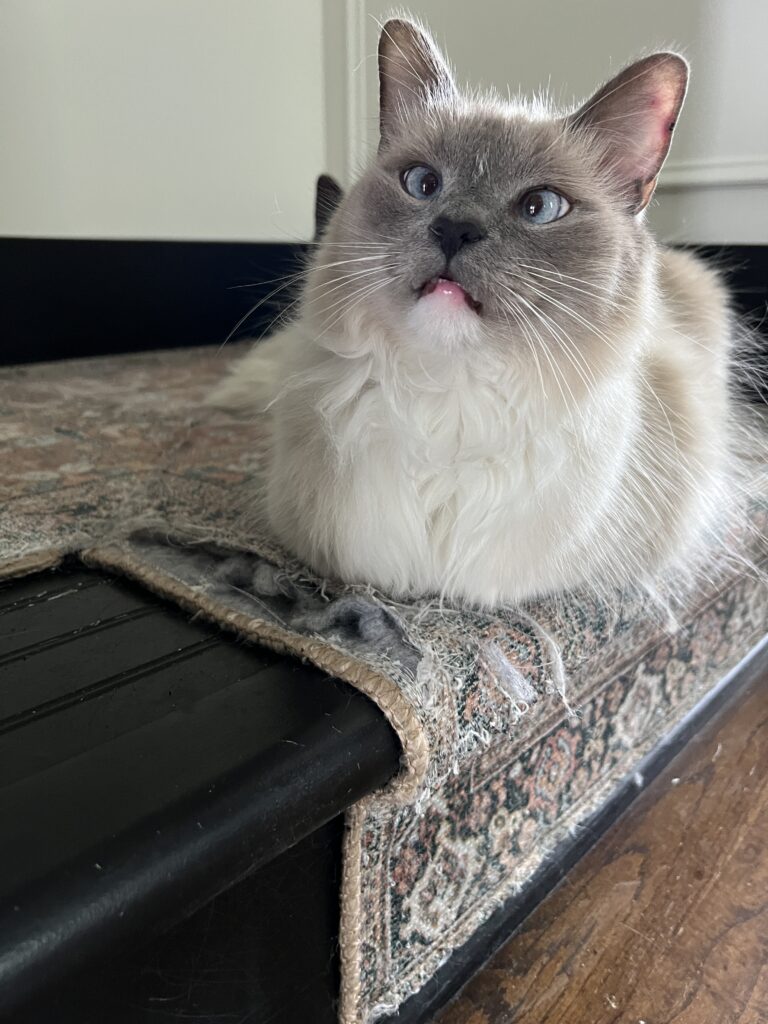
The rest of the stairs held up just fine, they did fade a little, but I ultimately just decided to replace the runner!
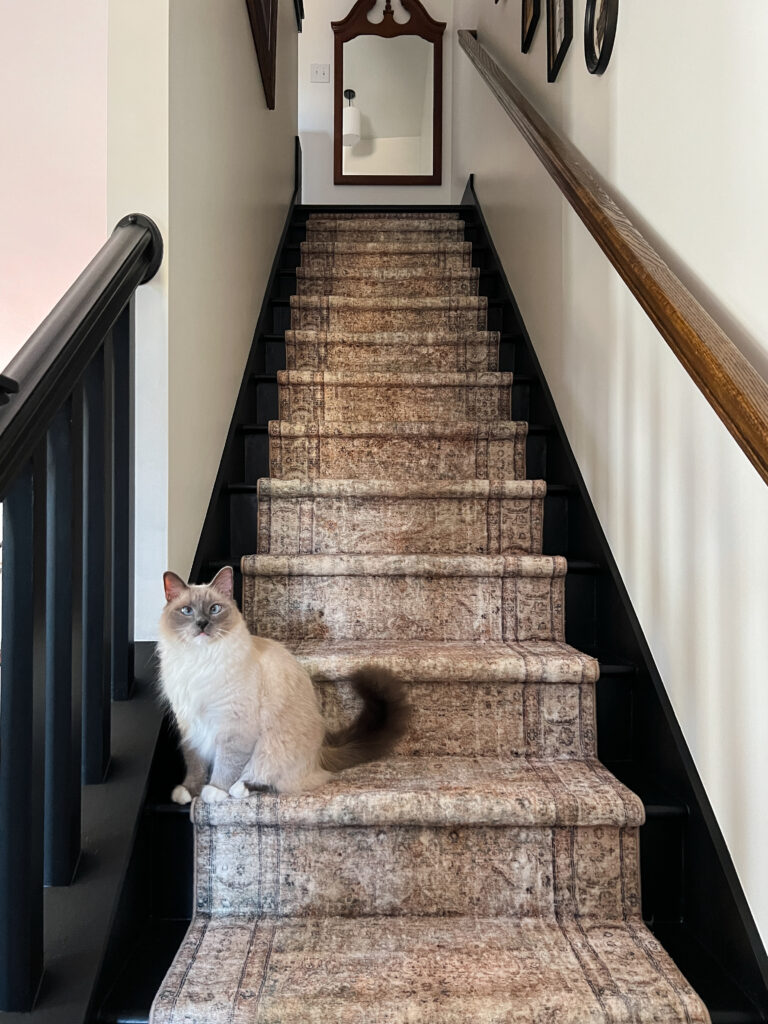
The runner install was the easiest part so it wasn’t a huge deal, honestly! This second time around, I decided to install the runner on just the stairs since the landing was the only place the cats damaged.
Video tutorial
You can watch in all unfold in my first ever youtube video! It’s also a video version of how to install a stair runner so it should definitely be helpful to you!
By the way… this new runner is SO soft and beautiful. You can see a closeup of it at the end of my youtube video!!
Please let me know if you have any other questions! I’m always happy to help! As always, thank you for being here!

This is one of the most well thought out, easy to understand, step by step pictures and instructions, I’ve ever read on Pinterest. Actually think I could do this with this tutorial. Thank you so much.
Hi Shelli! Oh my gosh that is the biggest compliment EVER! Thank you so much and you’ve totally got this 🙂
How is the landing seam holding up? Can you feel the glue seam on the landing?
Your instructions are one of the best I have found!
Hi Brooke! Yay, thank you! The seam has held up well! If you step directly on it with no shoes/socks, it definitely has a more “crusty texture”, but it’s not anything that’s bothered me.
I’ve got pretty well the exact same situation –9 stairs to a landing then left turn and 2 more stairs to floor.
The issue of the landing/left turn has me pondering two solutions: 1)doing as you did (with the added fear of not making an exact cut, having the ‘seam’ separate over time, etc) or this method 2) two totally separate runners and NOT joined as you did–one going the 9 stairs ending at the bottom riser and the second covering the 2 lower stairs and extending to cover the landing. The 2nd method leaves a similar border (3″ on each side on the landing–wall and riser) whereas solution 1 leaves no border. Hope that’s clear.
I’m leaning towards solution 2 (two separate runners with no seam on the landing).
Thoughts?
Hi Len! Landings are so tough! I LOVE this 2nd idea of yours. Honestly, if you can avoid the seam I think that would be the best option so my vote is for option 2!! I wish you the best of luck 🙂
Where did you purchase your rug? I am looking for a new rug runner for my stairs that looks old.
Hi Jen! Here’s the link to the rug I used: https://amzn.to/3IkluEB
Elisha, Thank you so much for this excellent tutorial! I even ordered the runner! I have been planning to paint my entire staircase black but struggled finding a complimentary runner…you nailed it!! Literally ???? Can’t wait to get to this project! Thanks again!
Yay! That makes me so happy to hear!! Thank you so much Jen and yay for a beautiful stair makeover!
Hi, love your project. I’m thinking of trying this idea. I’m wondering how the type of runner you chose is holding up on the leading edges of the steps?
Hi Mary! Thank you so much! The runner I used isn’t holding up well on the landing due to our cats, so I am planning to replace it in the next couple months and this time i’ll have the runner only on the stairs. As for the edges of the steps, it’s holding up okay, but I’m definitely starting to see fading in color 1.5 years later. If you’re looking for a runner that will last longer, I wouldn’t recommend this one. It was budget friendly for me, but ultimately with how much traffic the stairs get it it’s no surprise I have to replace it. (Luckily that won’t be difficult to do!) But if you’re looking for something that will hold up better I would recommend a flat weave rug. As far as material, wool and sisal would both be great options. I’ll be sure to update this post when I re-do the runner! Hope this helps!
How many runners did you have to buy?
Hi Chelsea! I got three 12ft runners!
What did you use on your top landing? Is that beadboard? If so how did you do that?
Hi Chelsea! Yes, that’s beadboard! I share about that in this blog post: https://ouraestheticabode.com/diy-staircase-makeover/
You did an amazing job on this they look great. Too bad your having to redo it. But like you said high traffic will do it every time. I’m thinking of doing a runner down my basement steps with left over carpet only problem is the fraying can I singe carpet? Do you think it will help with the fraying.?? Let me know what you think about it. Thanks and again great job!!!
Hi Robyn! Thank you so much! <3 I would think you could definitely singe it! Plus, if it's carpet you already have, it wouldn't hurt to try!! Worse comes to worse it doesn't last over time and you're out some staples a day's worth of work! I say go for it 🙂
question i am going to use the same runner is it better to get multiple shorter rugs and try to line them up since they have a smaller width? or should I get two longer rugs that are wider and just cut them down? Thank you
Hi Elyse! Definitely get the longer ones because of the pattern on it! So if you get multiple smaller ones you’ll end up wasting more because you’ll have to cut off the border if that makes sense! Best of luck!! <3
It looks wonderful!! The old stair runner in my home was installed by my Dad in 1956. When he installed the stair runner, he used black metal rods a bit longer than the width of the runner at the back of each stair tread (eye hooks on the ends of the rods). He cut the runner longer than necessary. Up until about 1975, Dad would “move” the whole runner down the stairs an inch or so every 2-3 years. Any frayed edges were now on the riser. After he passed away, I never found time to move the stair runner. I’m pushing 65 years of age, but I might try my hand at putting in a new stair runner. I’d rather do that instead of just painting the stairs and forgo putting in a new stair runner.
Hi David! Oh wow that’s so cool- I’ve never heard of such a thing but it make total sense! What a smart guy. Absolutely- you could definitely do it 🙂
Lovely! About to do this in my home. What is the black paint color? Thanks!!
Yay, i’m so excited for you! It’s Behr Limousine Leather 🙂