

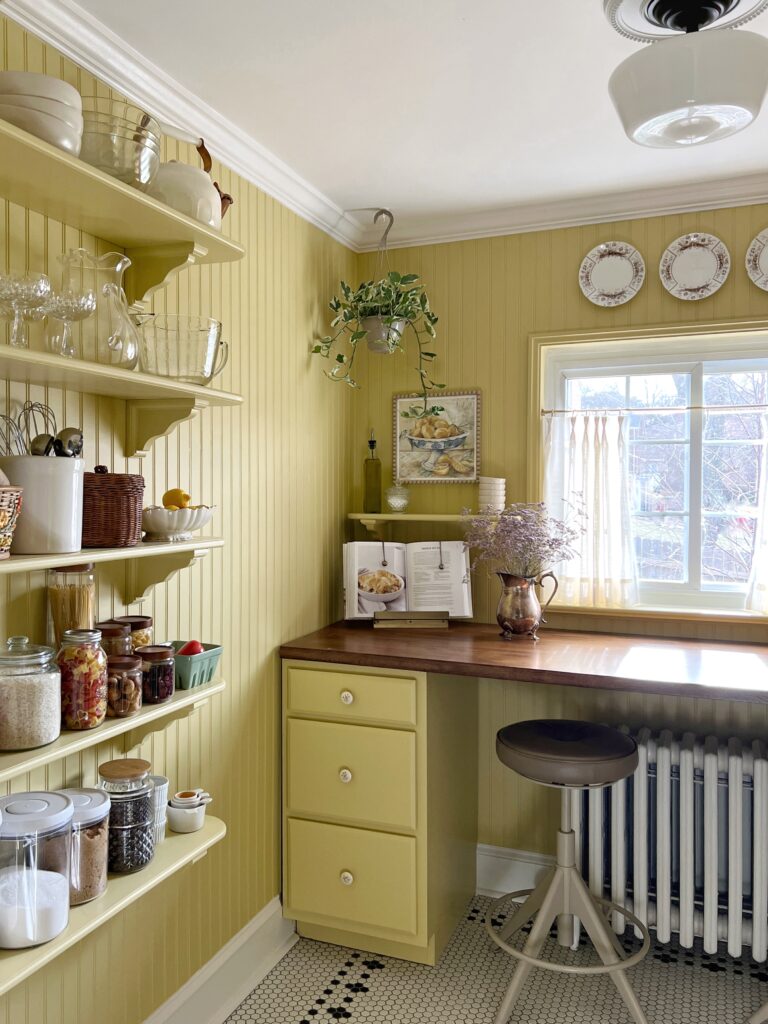
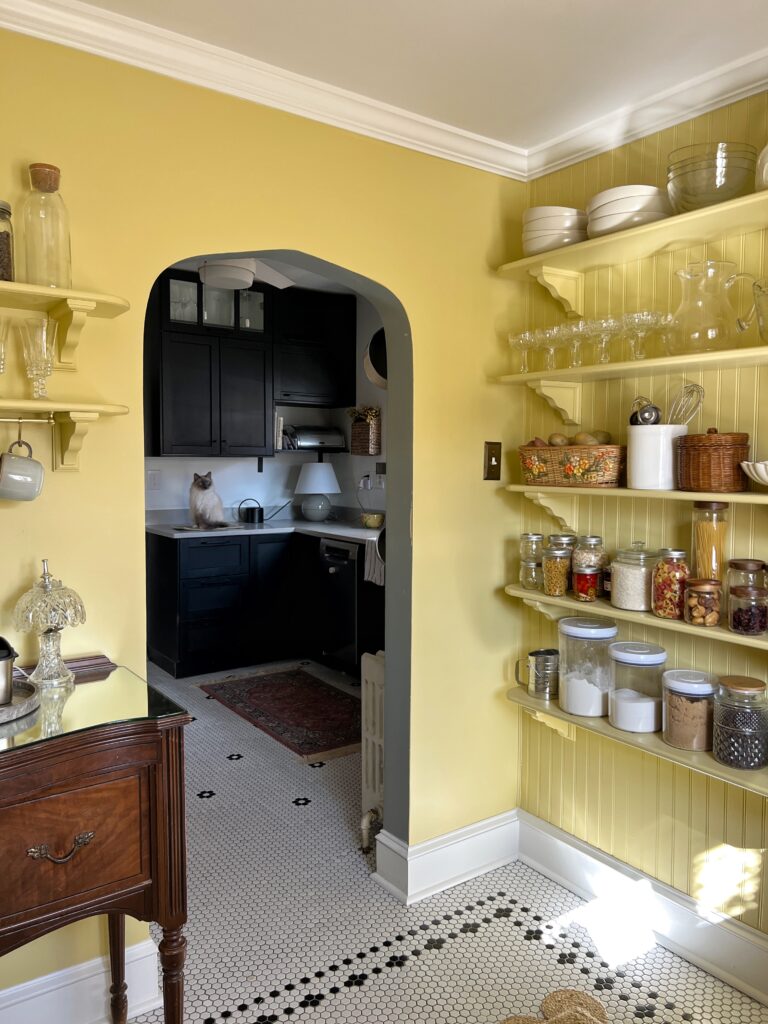
Our 1930 home has this adorable little nook off of our kitchen. It’s such a multi-purpose space for us that we never know what to call it! Most of the time we refer to it as our breakfast nook, but it also acts as a walk in pantry, or even a butler’s pantry!
Regardless of the name, we use this space for food prep, to eat meals, and to store food items! Our kitchen has limited storage and countertop space so we’re incredibly lucky to have this bonus walk in pantry – breakfast nook – butler’s pantry – whatever you want to call it, space 😉 This room is one of my favorites, but aesthetically… it was lacking the vintage charm it deserves! I’m SO excited to share all the details on this DIY walk in pantry makeover with you!!
Disclaimer: This post contains affiliate links. This means, if you purchase something from a link I provided, I will receive a small commission. This is at no extra cost to you! Thank you so much for the support!
Walk In Pantry Makeover Video
If you’re more of a visual person, we also have a YouTube video of this DIY walk in pantry makeover! I always recommend watching it first to see everything and then you can come back to this post for more of the nitty gritty 🙂
DIY Walk In Pantry Plan and Inspiration
Let’s talk about functionality first. There’s truly so much potential for this space. I have big dreams to one day have a built-in pantry complete with a pantry cabinet and a wine fridge 😉 but for now, I just wanted a DIY walk in pantry on a budget.
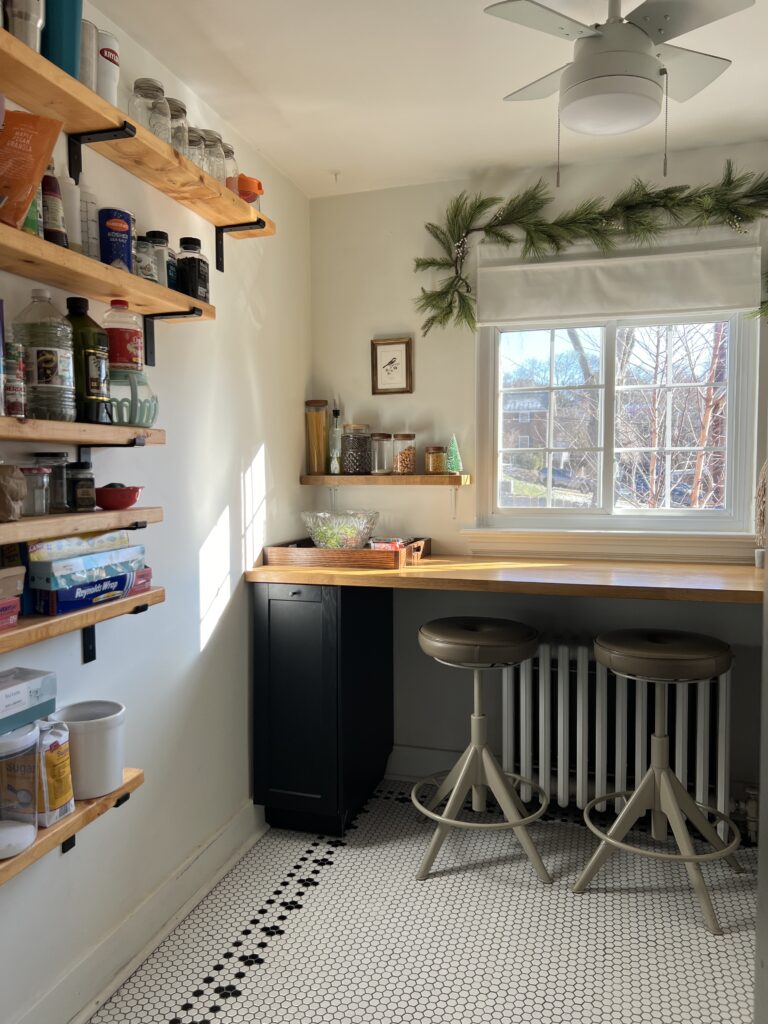
The Pain Points
The first step for this pantry makeover was identifying our pain points and coming up with a new pantry design. Overall, the room worked pretty well for us. I absolutely love having the butcher block countertop and two bar stools! We sit there often for meals and sometimes i’ll even bring my laptop in there. It’s a really and nice and cozy spot to sit with the heat from the radiator keeping my feet warm 🙂
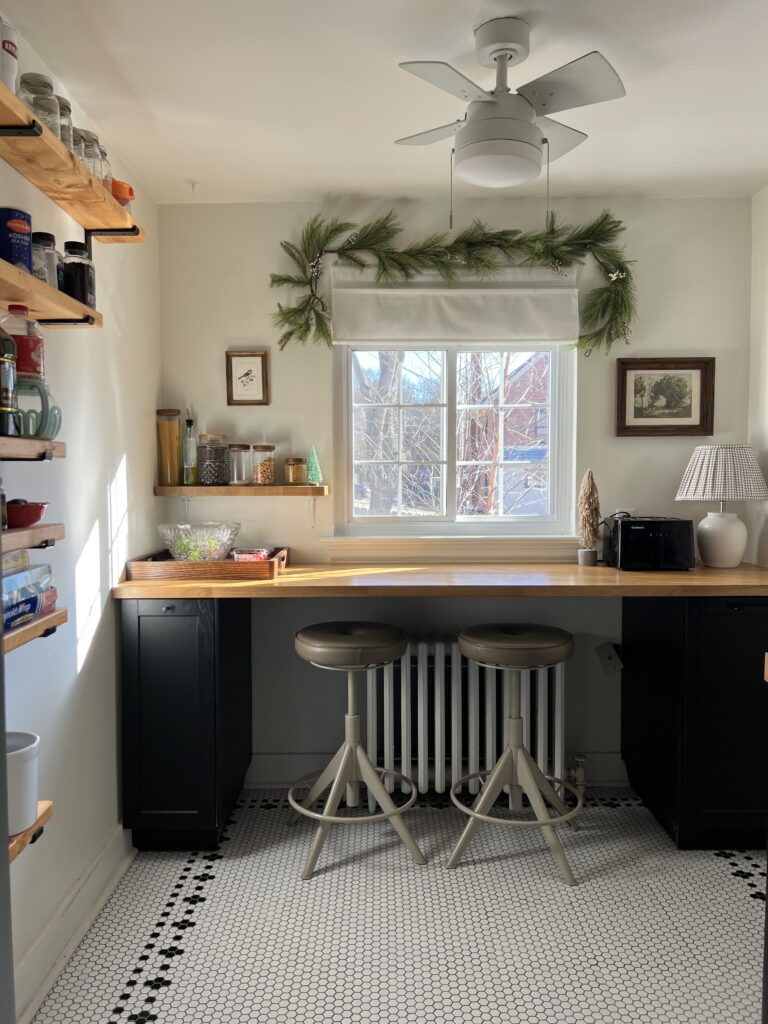
A few things I didn’t love:
- The open shelving- I actually enjoyed having open shelves, but I didn’t like the way the shelves looked and they didn’t have enough depth to them.
- The cabinets- The original IKEA cabinets are great but it really bothered me that they weren’t the same width and I felt that drawers would be more useful for us.
- The awkward corner table- The square shape wasn’t the best use the available space and I didn’t like how you could see everything we were storing on there!

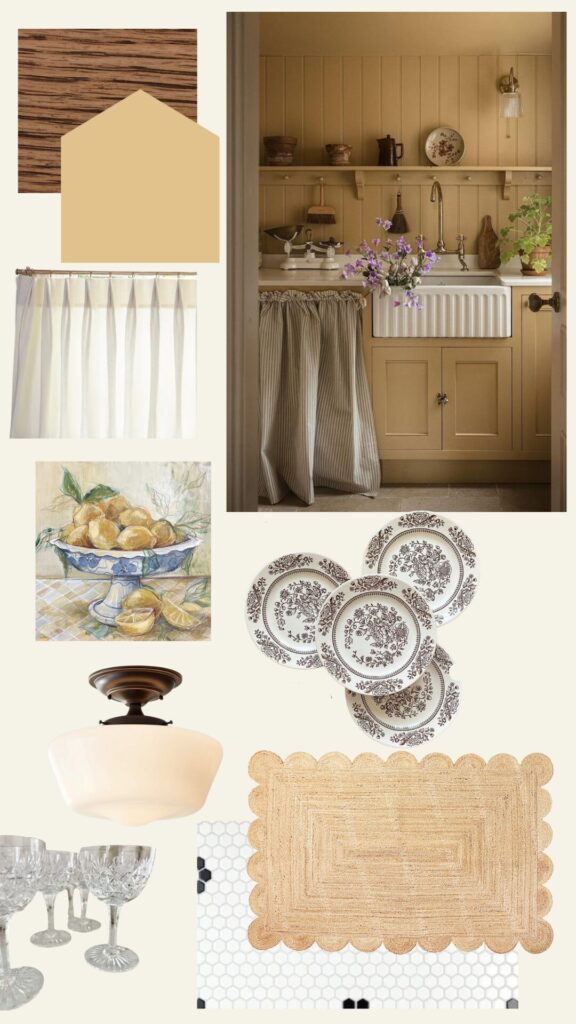
Walk In Pantry Ideas
The image on the top right of my mood board is of Nicola Huthwaite’s gorgeous laundry room. While this may not be a walk-in pantry, it was still my biggest inspiration in terms of design. I just adore her use of color, the trimwork, and the styling!
Another huge inspiration was this butler’s pantry design by Sincerely Marie Home- definitely one of the most beautiful walk-in pantries i’ve ever seen!
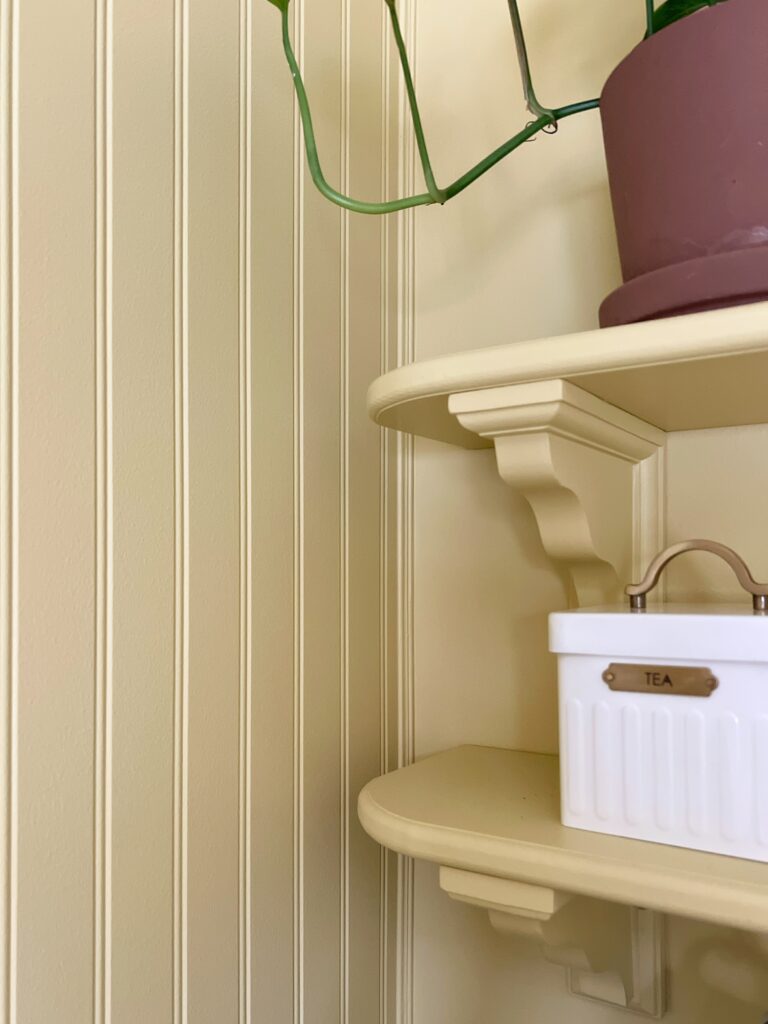
Walk In Pantry Shelving
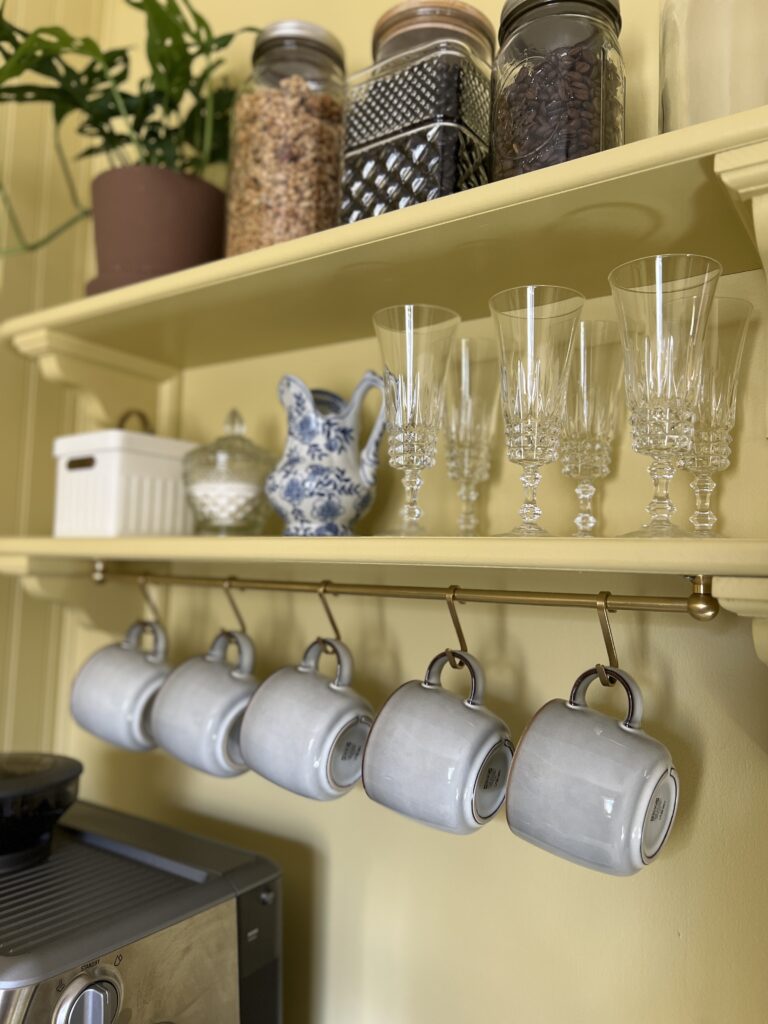
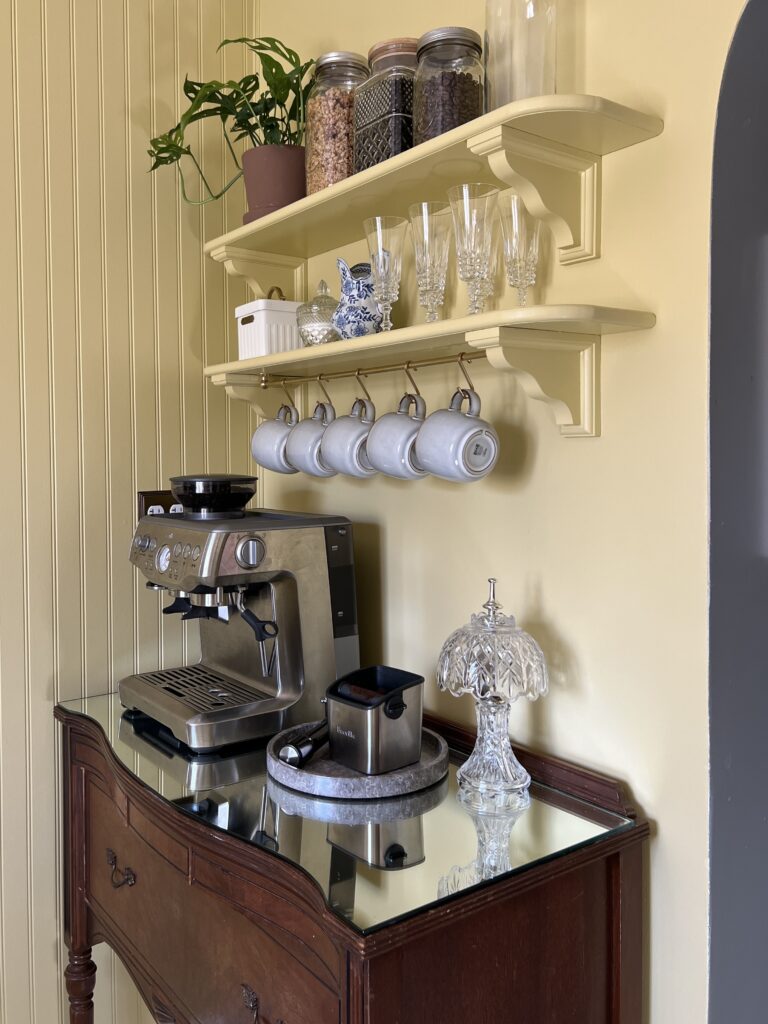
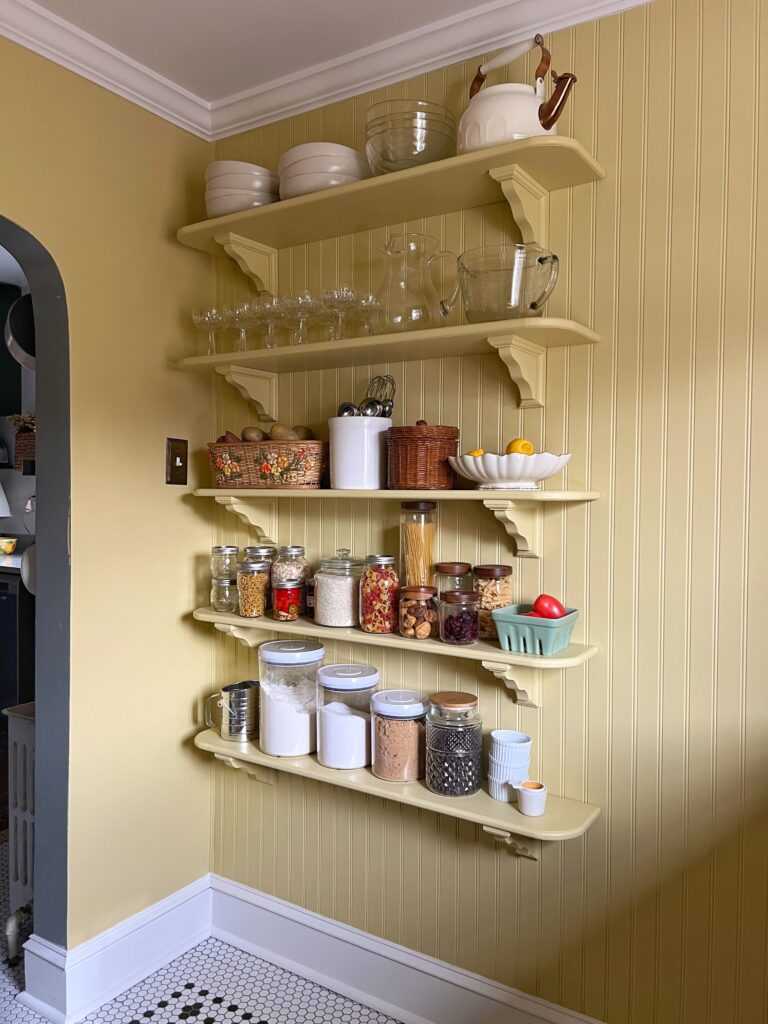
First let me just say that i’m team open shelving!! I love that I have easy access to everything and it’s also the perfect opportunity to show off some functional-but-pretty pieces like our crystal stemware! This also helped with freeing up space in our kitchen cupboards!
I wanted deep shelves for the two upper shelves so I could store bigger bowls, dishes, and even small appliances if necessary! These were made with 1×10 pine boards, while the three lower shelves are made from 1×8 poplar boards.
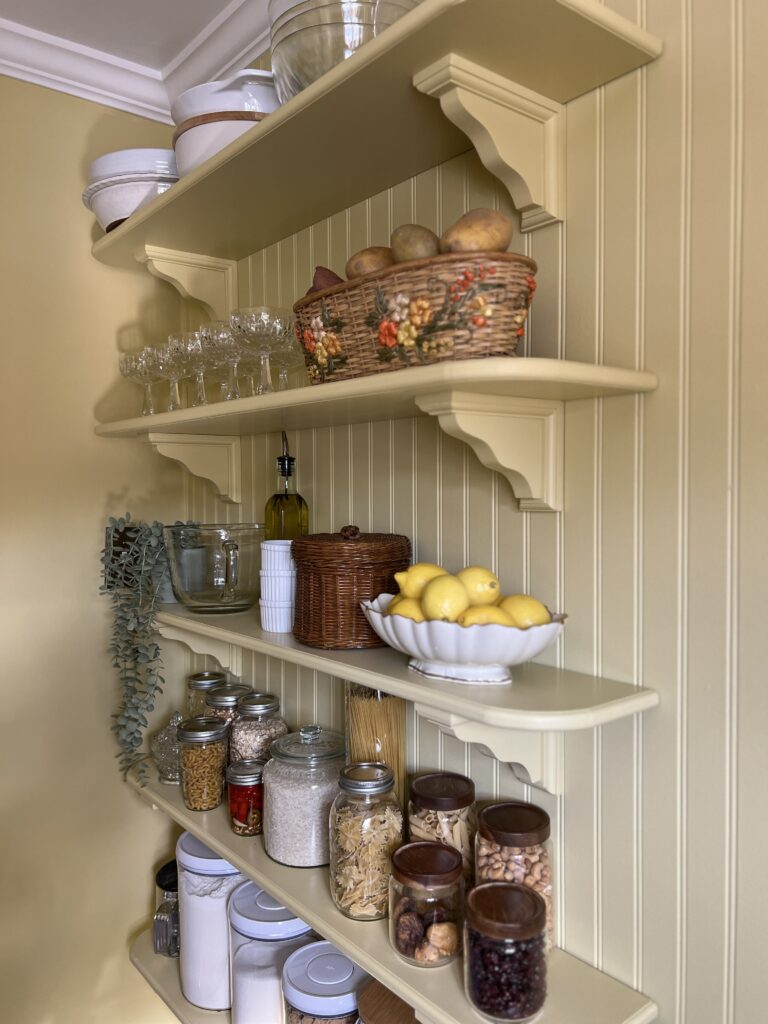
When I tell you this DIY pantry shelving is easy to make, I MEAN IT! I just adore the finished look. The wooden brackets are definitely an additional cost, but they add so much charm! PS It’s always a great idea to use glass storage jars for your dry goods 🙂
Here’s my step-by-step tutorial for these DIY wood pantry shelves.
Other Ideas for pantry shelves
In our previous home, we did a small pantry makeover and I made these DIY thin floating shelves!
If you have wire shelves for your pantry storage, you could make some easy DIY wire shelf covers! This is a great way to get the floating shelves look without having to remove your wire shelves.
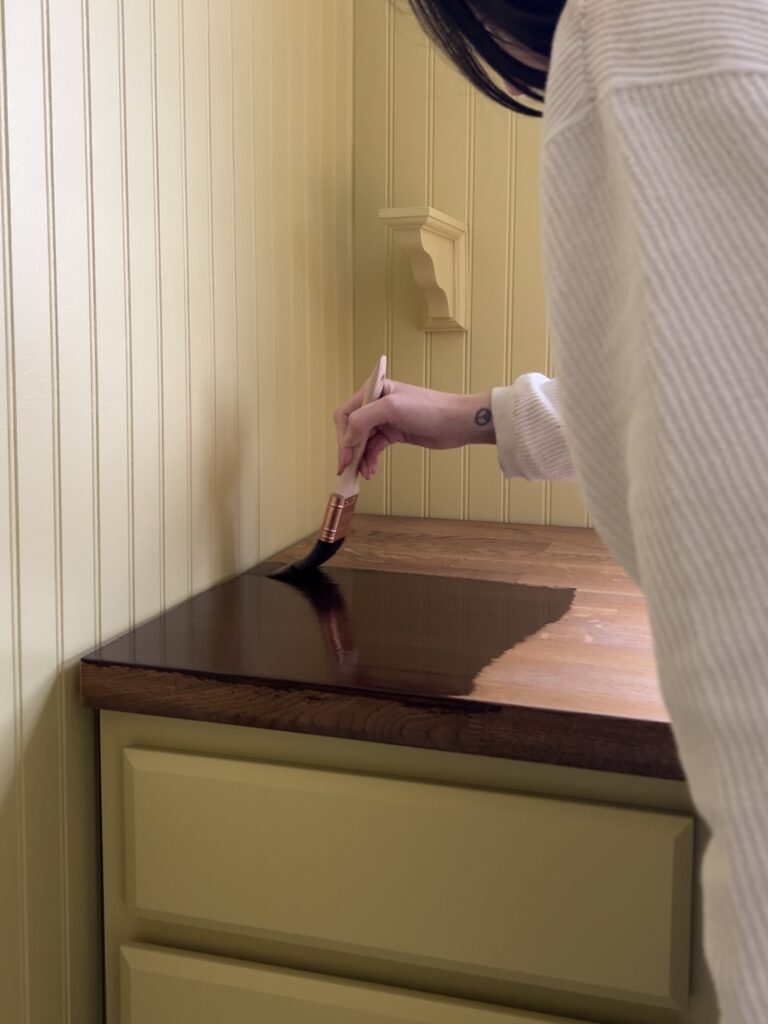
Stained Butcher Block Countertops
We were fortunate to already have a really nice IKEA butcher block countertop in our walk-in pantry space, but I didn’t love the finish. Luckily that’s an easy fix!
Here’s my tutorial on how to stain butcher block countertops!
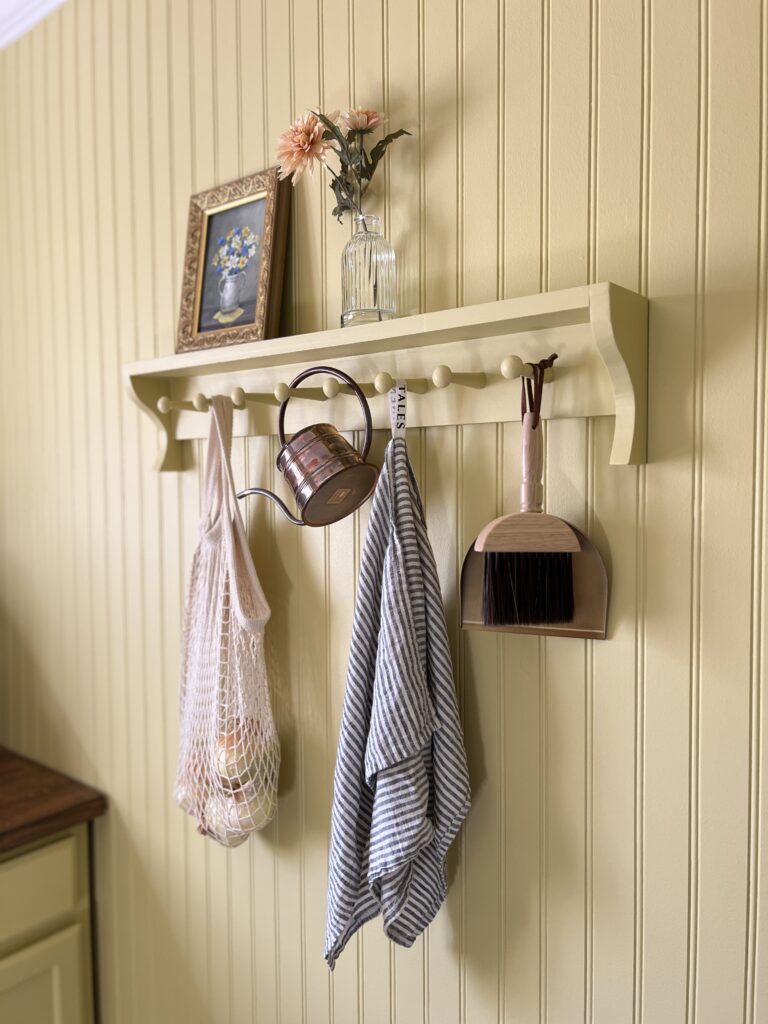
DIY Shaker Peg Rail Shelf
To hang my apron, our onions, and other small items, I made a shaker peg rail for our DIY walk in pantry!
This is a really simple project that anyone can do! All you need for this DIY peg rail shelf is one 1x4x8 board and some shaker pegs! Here’s how I made it:
First I cut two 32″ pieces from the 1x4x8 board (of course cut it to whatever size shelf you need). One of these boards will need holes for the shaker pegs. The trickiest part is figuring out the spacing. Take the length of your board and divide by how many pegs you’d like. If you don’t get a clean number, that’s okay! As long as the spacing between the pegs in the middle are good, you can have a little more or less space on the ends.
I ended up having 3.5″ between my pegs, but a little less on the ends. It’s helpful to mark were your holes will be. First mark the midpoint line lengthwise, and then mark the spacing for the pegs.
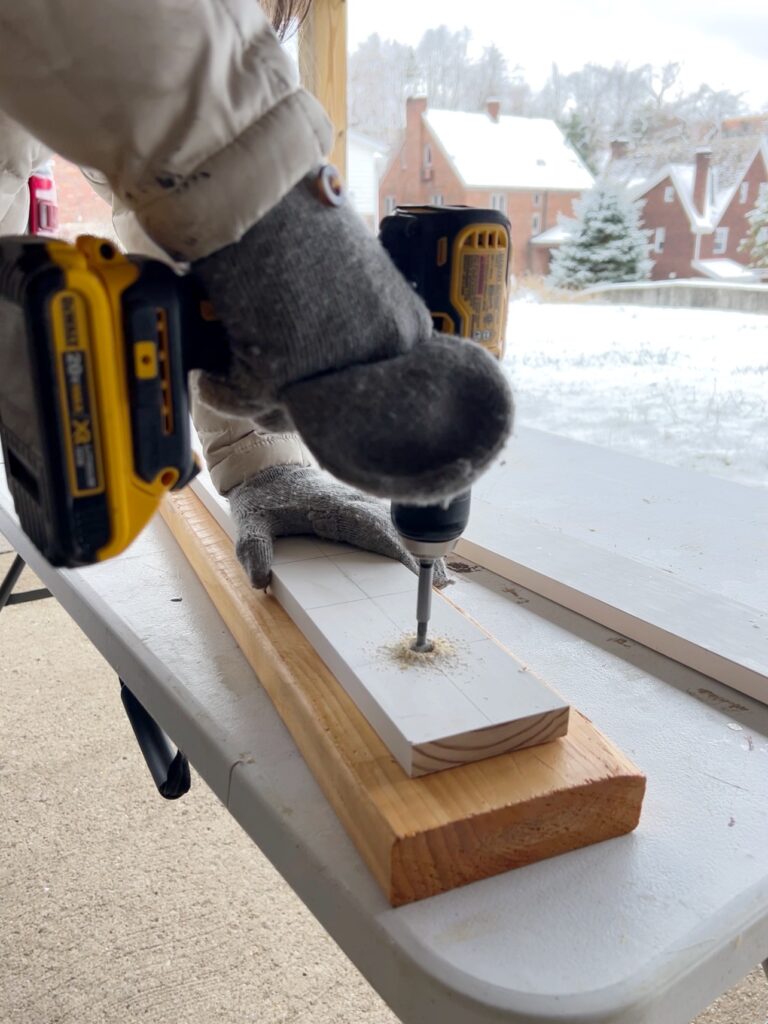
The holes for the shaker pegs needed to be 1/2″. You can use a 1/2″ drill bit, a 1/2″ spade bit, or a 1/2″ Forstner bit. Place a scrap piece of wood underneath so you don’t drill through your work surface. You can also drill your holes after the board is secured to the wall! Whatever feels right!
The hard part is getting the holes to stay straight and not veer off at an angle. Unfortunately that happened to me with one of the holes and it was so bad I ended up cutting that hole out and attaching two boards together, making my shaker peg rail shorter with one less peg. Definitely not ideal, but I was able to disguise the seam pretty well after sanding. Next time, i’ll use one of these drill guides to ensure I have straight holes.
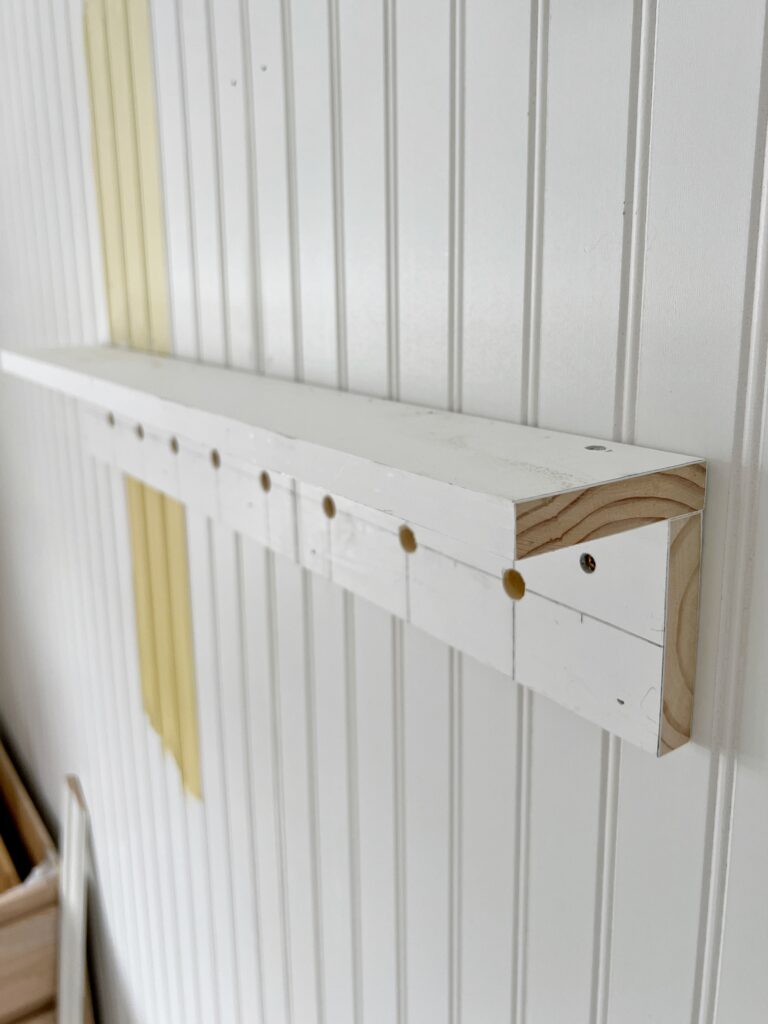
At first I attached the boards with just my nail gun as a temporary hold, and then I made it more secure with some 1 1/2″ screws. Screw the peg board into studs if possible, and then screw the shelf board down into the peg board. I countersunk the screws a bit so I could fill in the holes with wood filler!
To attach the shaker pegs, I just put a little wood glue on the pegs and pushed them into the holes. Wipe up any excess glue.
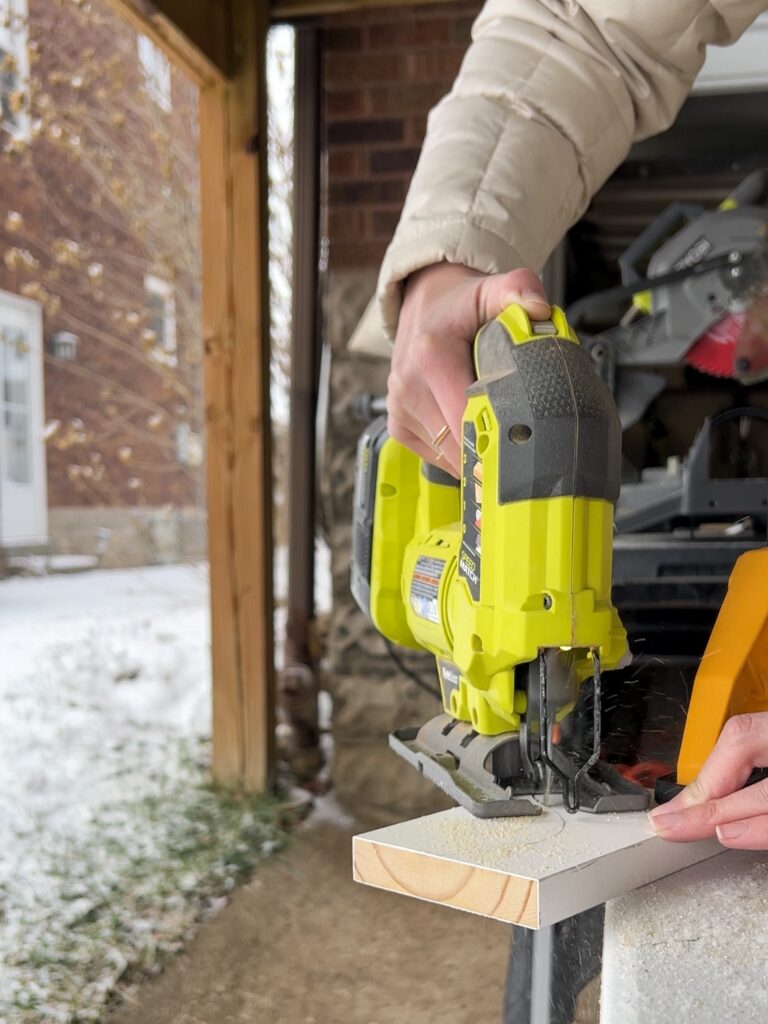
This part is optional, but I decided to make some side pieces for some extra detail! Since I used the leftover pieces from the 1×4, these pieces were no additional cost! I made these 6″ long to have a bit of overhang on the bottom. The curve detail was created with the help of a can of paint 🙂 I cut it using my jigsaw with a detail blade. I attached the side pieces with just brad nails since there won’t be any weight on them.
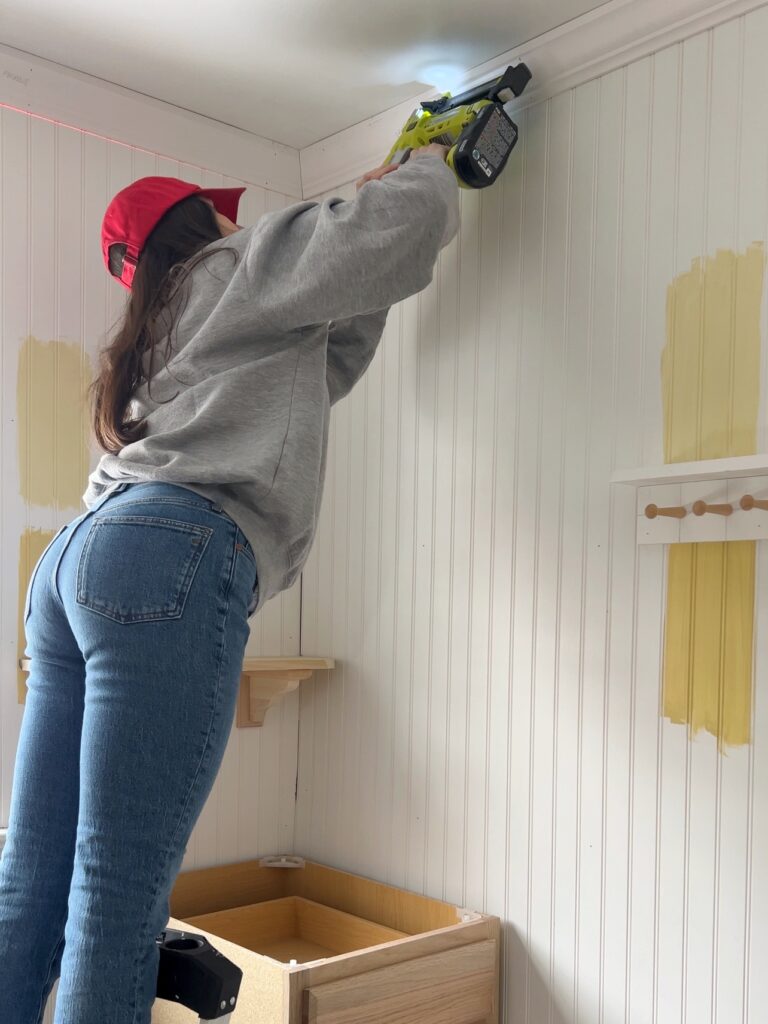
How to Install Beadboard
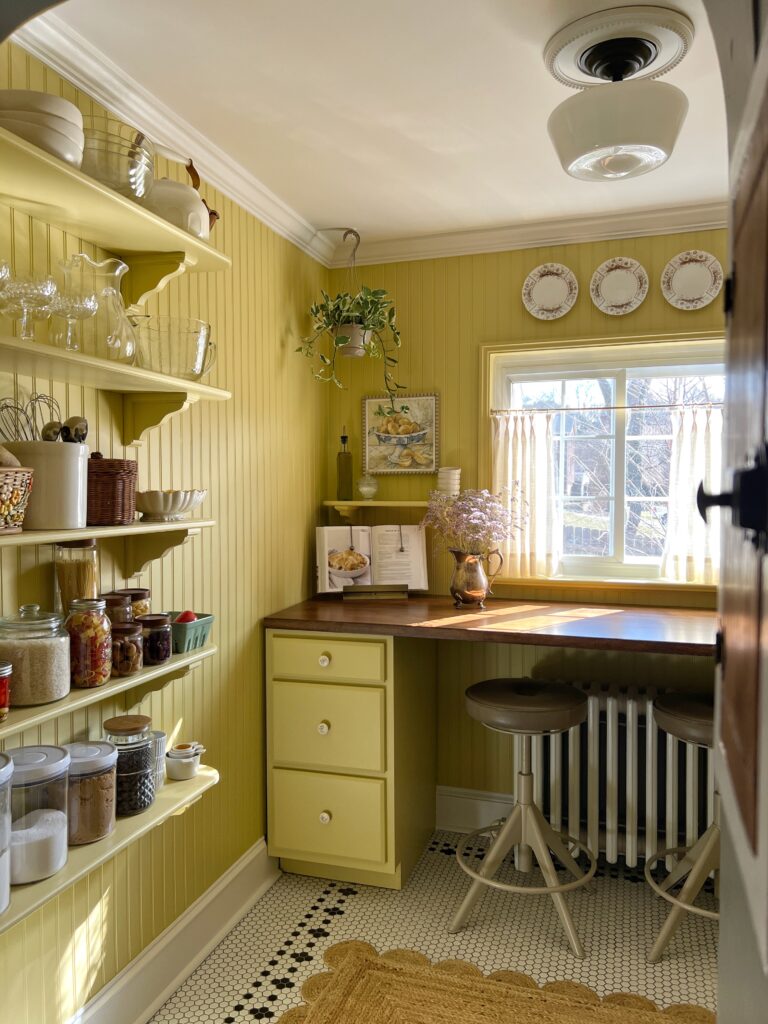
The beadboard is one of my favorite components of this DIY walk in pantry! It adds character, dimension, and it’s simply a timeless look that felt really appropriate for our 1930 home. Beadboard is also very affordable and simple to install.
My DIY beadboard entryway makeover has a pretty thorough tutorial for installing beadboard, but I just wanted to share a few tips here as well!
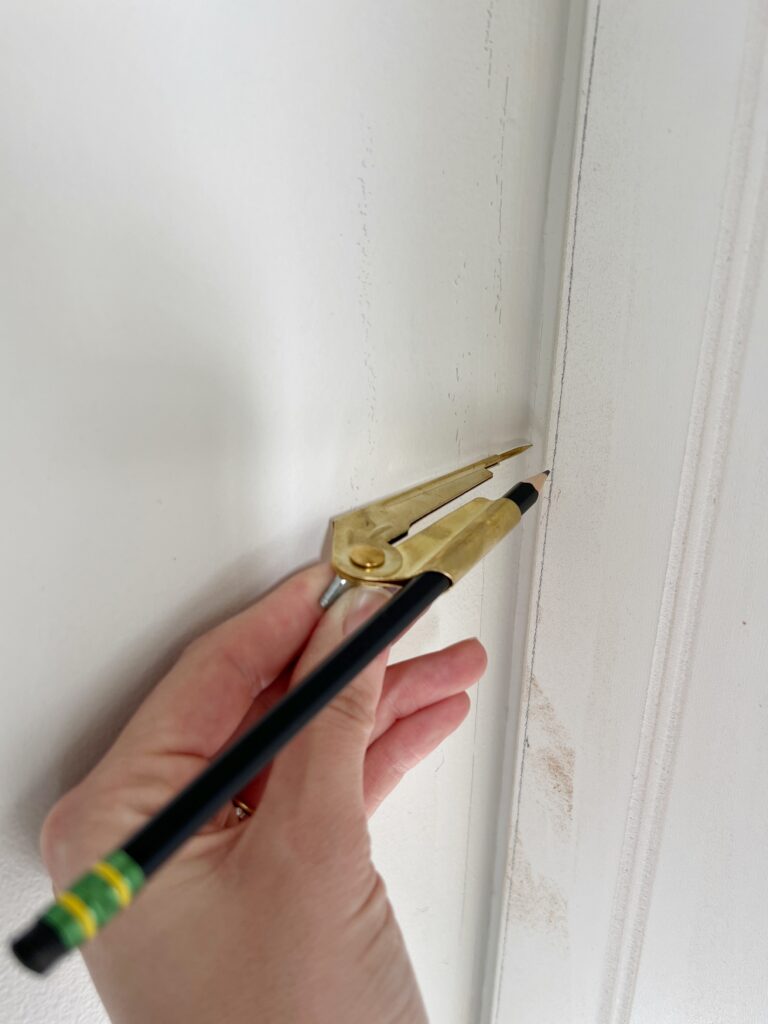
When installing beadboard panels, you’ll likely run into a situation where you need to scribe the panel to fit your uneven wall. There’s various methods for scribing, but I find that using a pencil compass is the easiest. Here’s my little video tutorial on how to do that!
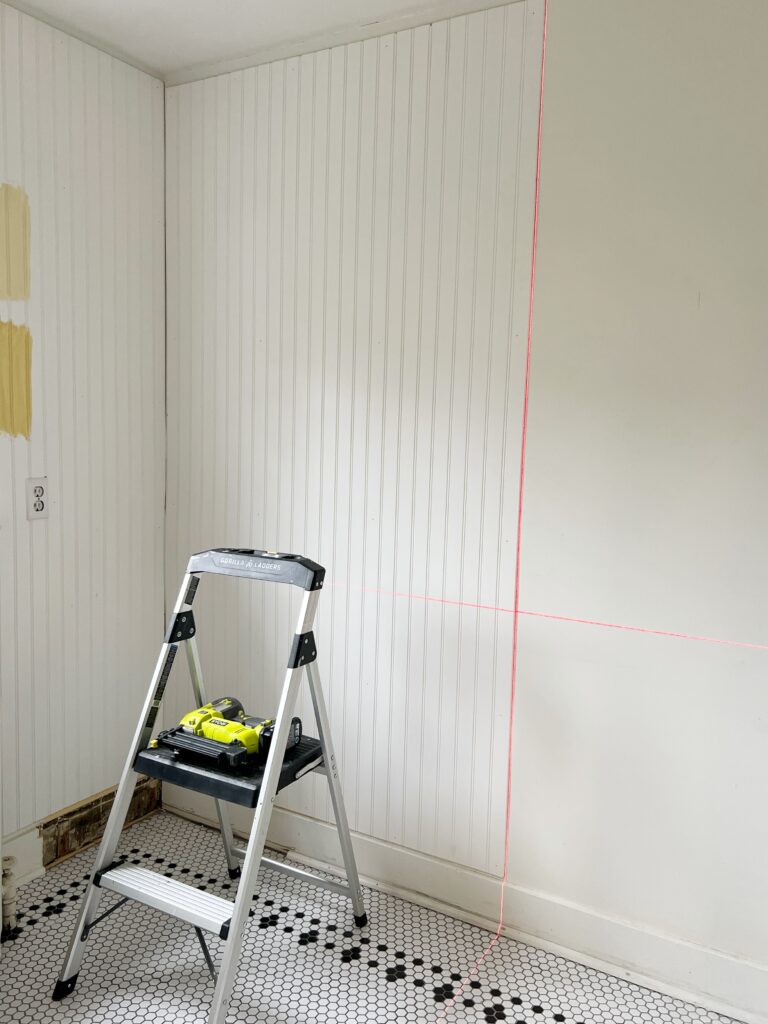
Always make sure your first panel is hung straight, otherwise the whole room will be off. The easiest way to do this is with a laser level, but if you don’t have one, you can measure out and draw a straight line using a large level.
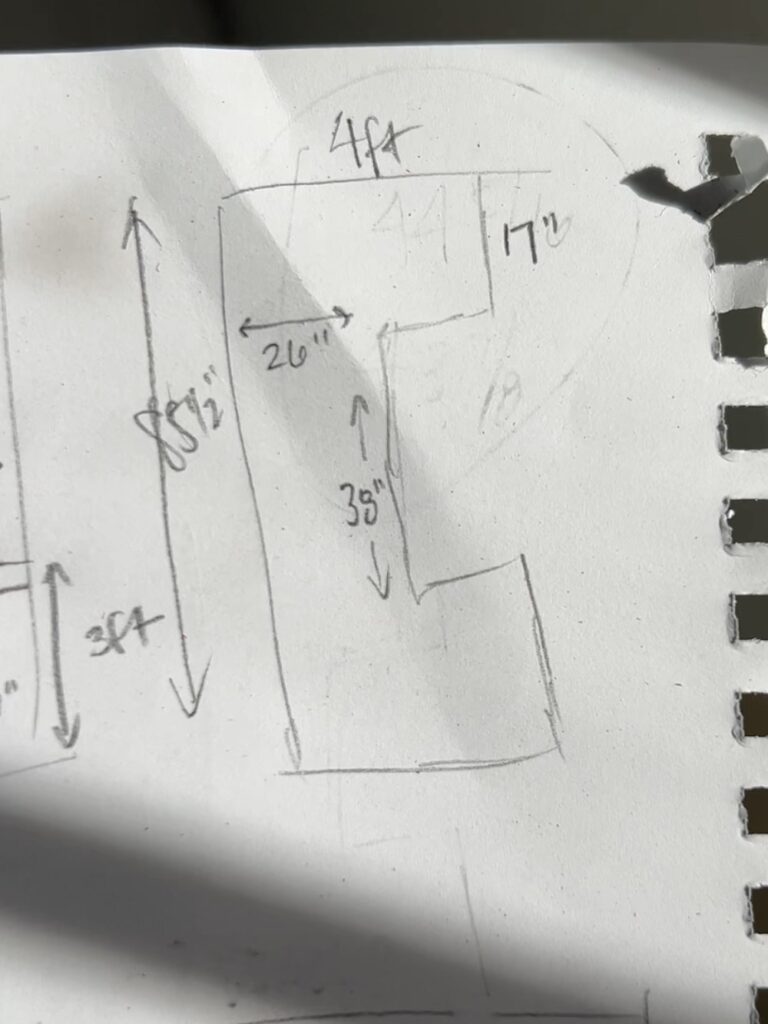
My least favorite part about installing beadboard is doing the complicated cuts around a window. For these cuts, I always make a rough sketch of the outline of the panel with the measurements. Measure once, measure twice, and measure three times!! Use a jigsaw and take your time cutting.
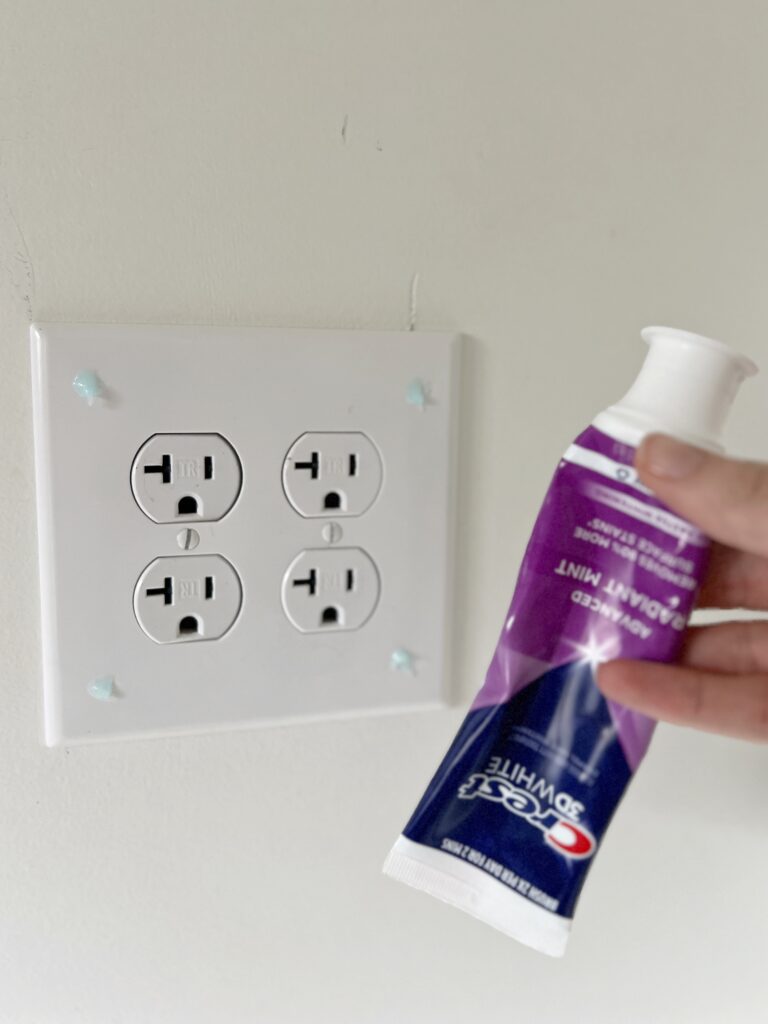
The last tip is for cutting around outlets or light switches. Once your panel width is the proper size, mark the four corners of your outlet cover with toothpaste, paint, or whatever you have 🙂 When the beadboard panel is in its proper place, gently press it against the outlet cover and you’ll have reference points for your cut. Use a drill with a large bit to create four holes and then cut it out with a jigsaw!
I used to think you had to use an adhesive when installing beadboard panels, but you really don’t! This time around I only used brad nails, but I made sure to smooth my hand from top to bottom and nail in any areas that felt loose.
You may have noticed that I only did beadboard on three of the walls. Why? Well, the fourth wall is where the archway to the kitchen is and I wasn’t sure of a clean way to end the beadboard. I was a little worried it would look odd having one wall without it, but I don’t even notice it now! For a cleaner look, I used this little piece of trim in the corners!
Caulk all the seams and corners of the beadboard paneling!

Trimwork
I kept the trimwork pretty simple for our DIY walk in pantry so I could let the other details shine, but I did add a few pieces of trim that really gave this room a traditional, clean look.
Crown Moulding
No matter how many times I install crown molding, it’s still a head scratcher for me!! You’d think after building this DIY coffered ceiling, which required 38 crown moulding cuts, i’d have it down. But I still always refer to my own blog post LOL! This post has a ton of great tips: How to Install Crown Molding for Beginners.
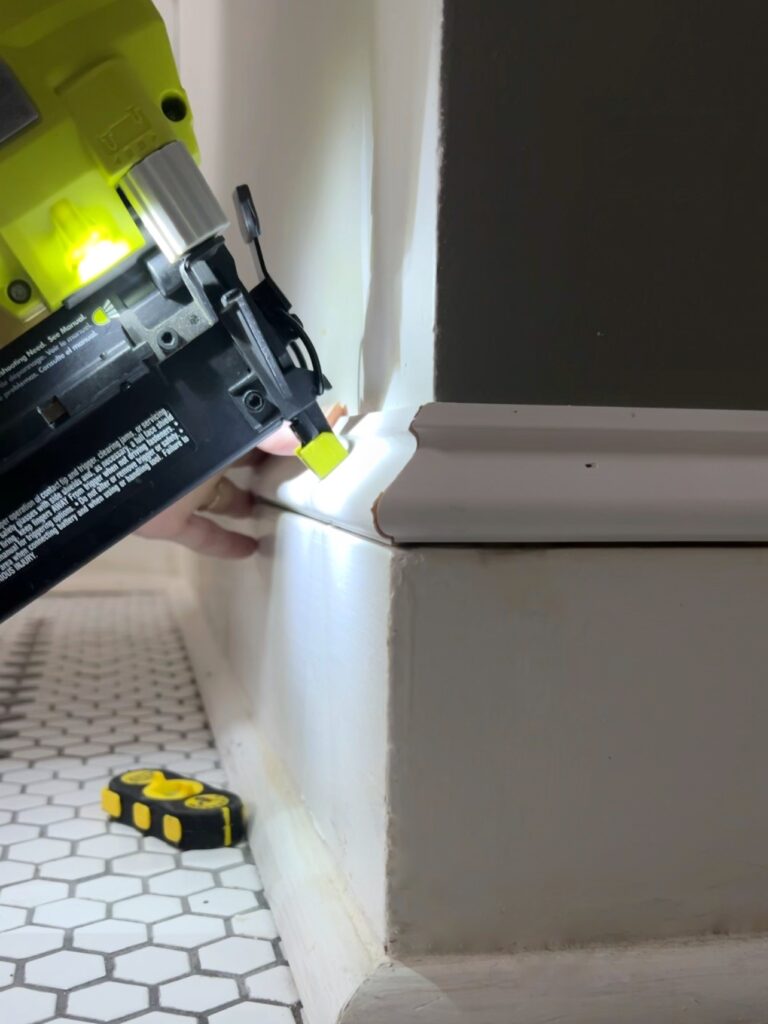
Baseboards
For the baseboards, I simply added some base cap moulding. This extra piece of trim just adds a little more dimension and a traditional feel.
Window Frame
The windows in our home don’t have any trim around the perimeter. For this butler’s pantry makeover, we needed some otherwise there would be no clean way for the beadboard to end. I’ve never framed out a window so I just sort of went for it and don’t know if I necessary did it “right”, but it works!
The first thing I did was add a 1/2″ thick piece of wood along the inner part of the window.
Since I wanted to leave the original window stool in tact, which really doesn’t extend far beyond the window, I had to choose a small piece of trim to frame the window.
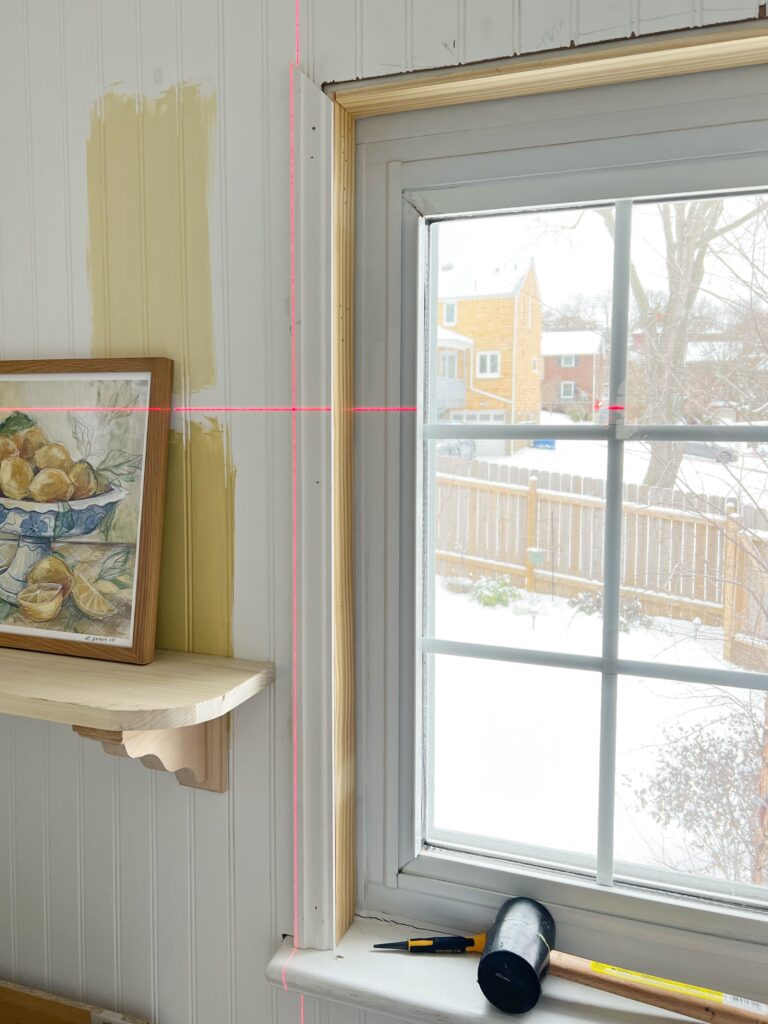
Unfortunately we had to remove the original apron (the trim underneath the stool) because the new cabinets we got raised the counter top so there wasn’t enough space for for it. This is the little trim I used instead!
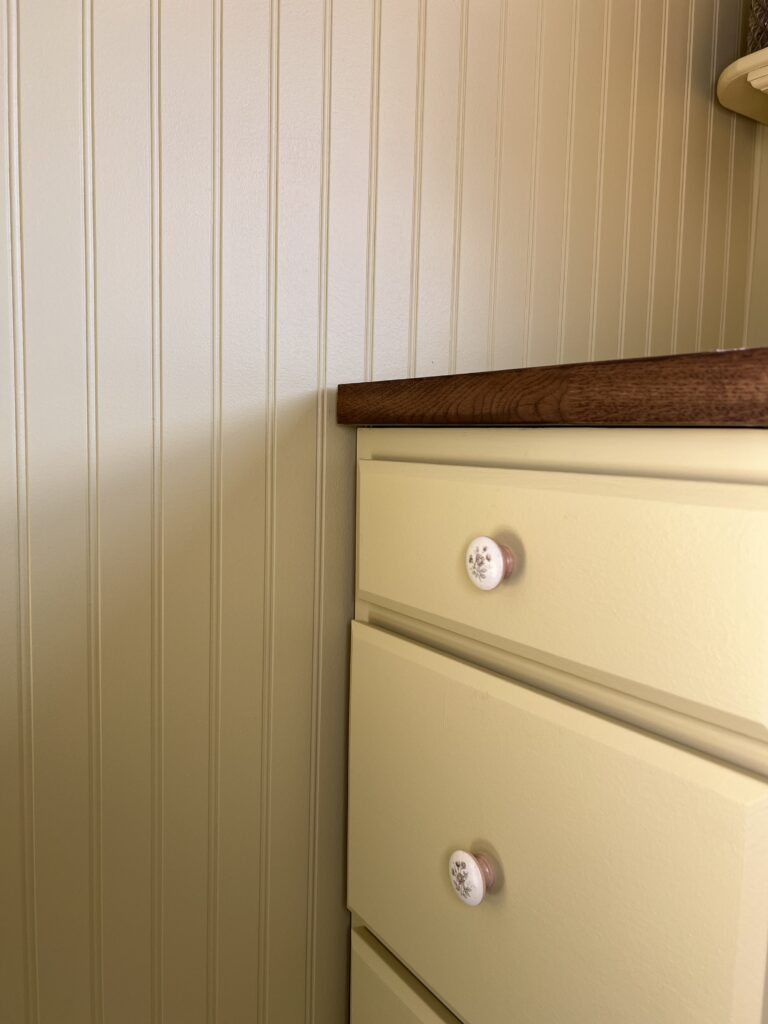
Cabinets
Originally we had two IKEA cabinets in our butler’s pantry. They were perfectly nice but not the most functional for us and I didn’t like how they were uneven in size. We ended up bringing those down into our workshop and got a couple different lower cabinets instead.
Don’t sleep on the pre-made cabinets from Home Depot and Lowes! It’s a great option for a DIY walk-in pantry build! We used one three-drawer cabinet and one with a drawer and a door.
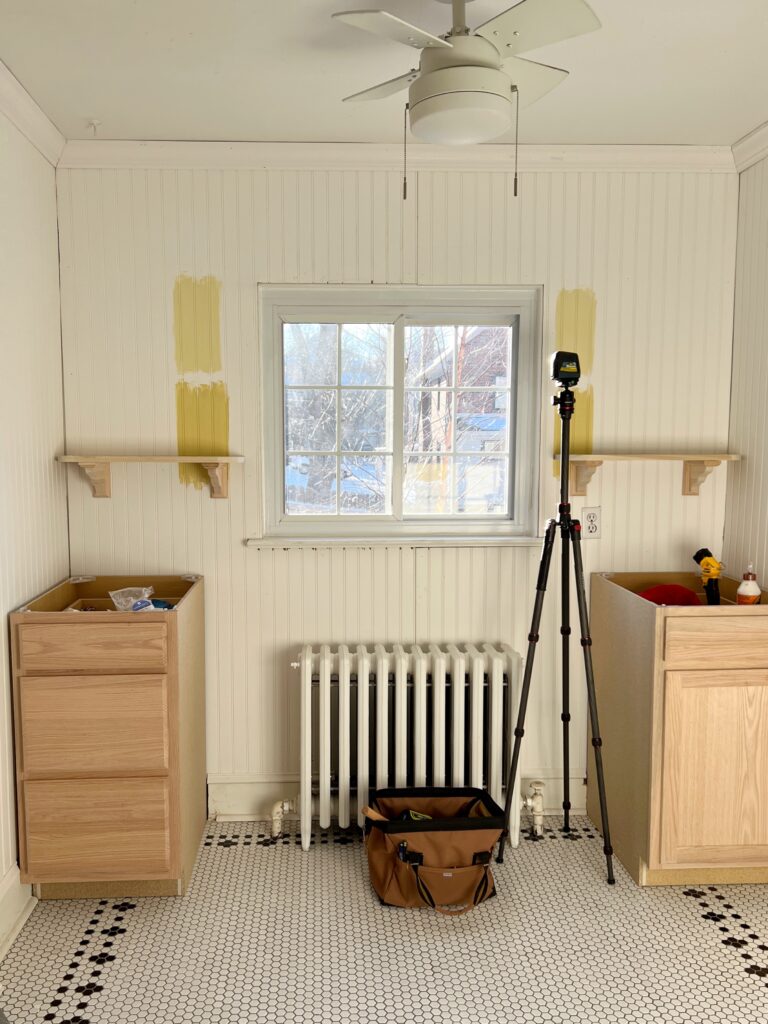
In order to get these to fit, we had to cut into our baseboard a bit more using our multi-tool. We then secured them to the wall from the back of the cabinets.
I ended up painting the cabinets the same color as the walls and most importantly, added these adorable wooden knobs for the cabinets doors and drawers! Aren’t they so cute?!
I’m still working on the storage organization for these cabinets. So far, I’m keeping parchment paper, foil, baggies, etc in the top drawer. In the bottom two drawers I’m storing my baking gadgets and some small kitchen appliances. For the right cabinet, I’m thinking I’ll get some vertical dividers so I can store muffin pans, baking sheets, etc.
Paint Colors
This DIY walk in pantry makeover was actually in partnership with HGTV Home by Sherwin Williams using their 2025 Color Collection. (This post itself is not sponsored and all opinions are my own!)
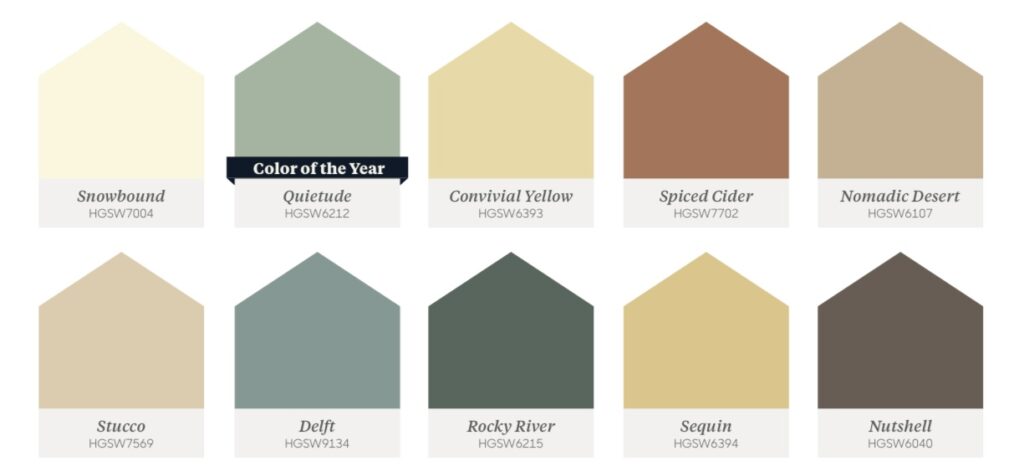
My heart was already set on a yellow pantry and their collection had two beautiful shades to choose from; Convivial Yellow (HGSW6393) and Sequin (HGSW6394)
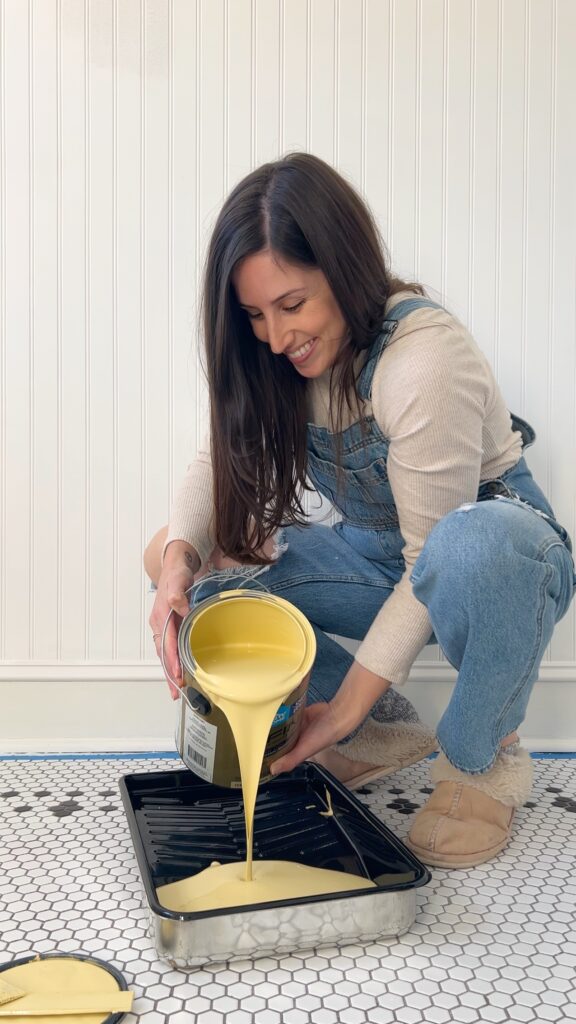
I decided to use Sequin which is a gorgeous honey, mustardy yellow. It tends to comes through more intensely in photos and videos, but it really is such a beautiful mid-tone yellow with a bit of a green undertone. It’s definitely a bold color so be sure to order a free sample to make sure it’s suitable for your space and lighting!
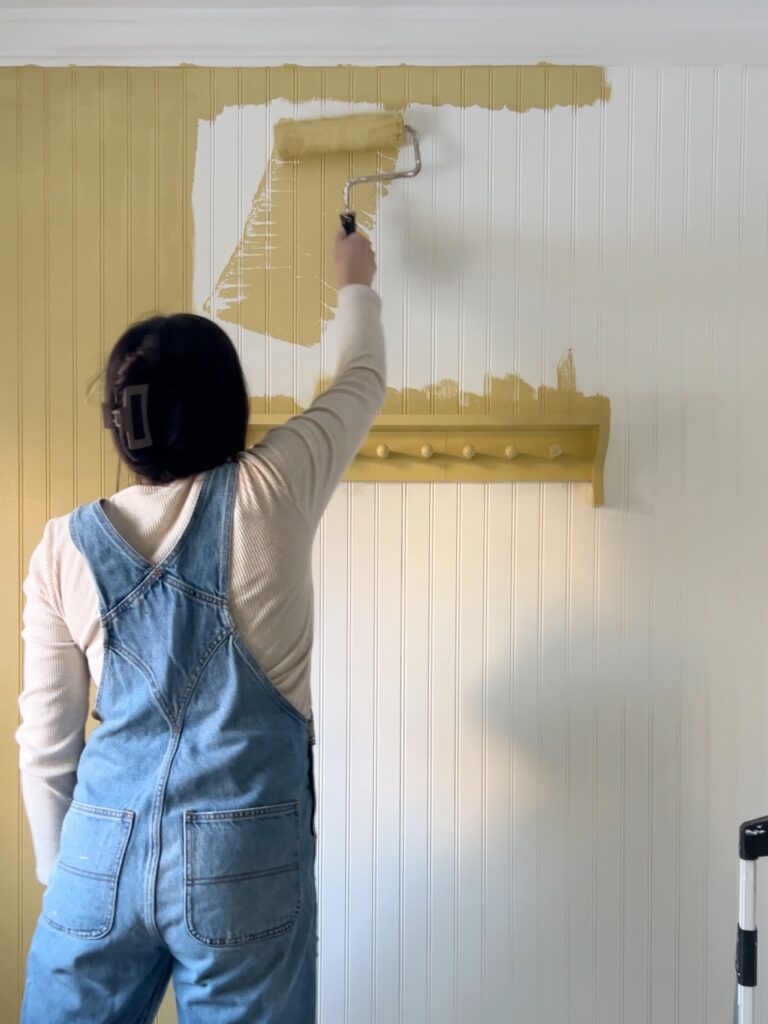
On the ceiling, crown moulding, and baseboards I used Snowbound (HGSW7004). This is a bright, fresh, and slightly warm white with a subtle gray undertone.
DIY Beaded Frame
One of my favorite decorative details in this pantry makeover is my sister-in-law’s gorgeous lemon print. I knew I wanted this art displayed front and center which called for a cute frame!
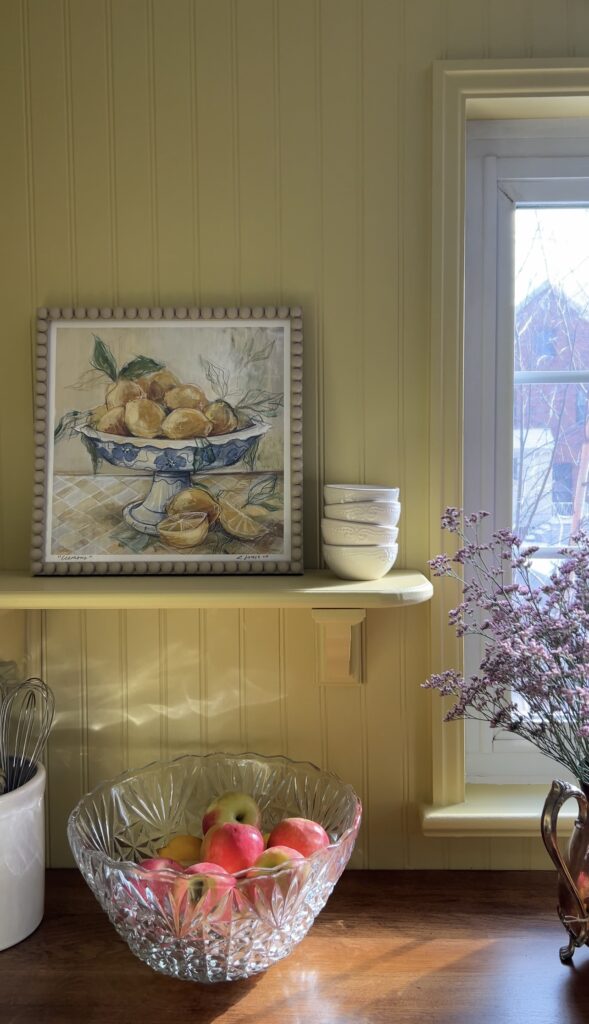
This DIY beaded frame came out so adorable and was really simple to make. This is the tutorial I followed and here’s what I used to make mine:
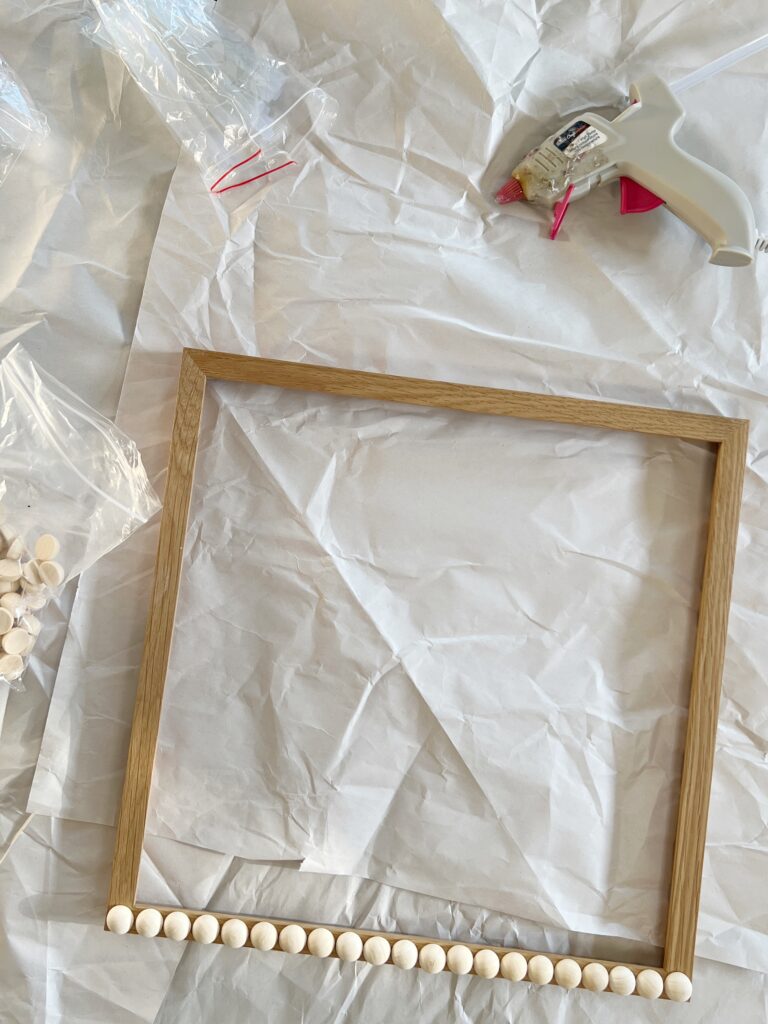
Once the frame was made, I used this spray primer and painted it with Nomadic Desert (HGSW6107).
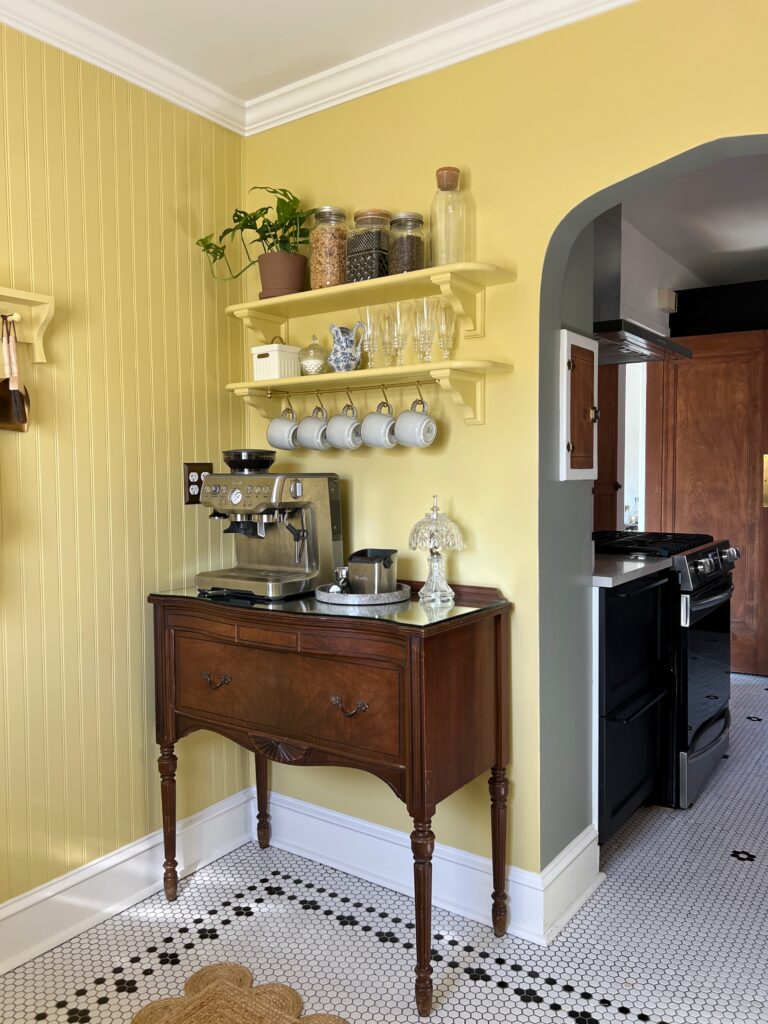
Coffee Station
The coffee station is probably our favorite part of this DIY walk in pantry! It’s my first stop every morning 😉
I happened to already have the perfect piece of furniture to act as a countertop for our coffee machine! In order to hang the mugs, I attached a brass curtain rod with outside mounts underneath the bottom shelf. For the S-hooks, I ended up using these from IKEA and spray painted them with this gold spray paint! (Originally I tried these hooks, but they were too long for our setup!)
This was such an easy DIY coffee station and the perfect addition to our breakfast nook!
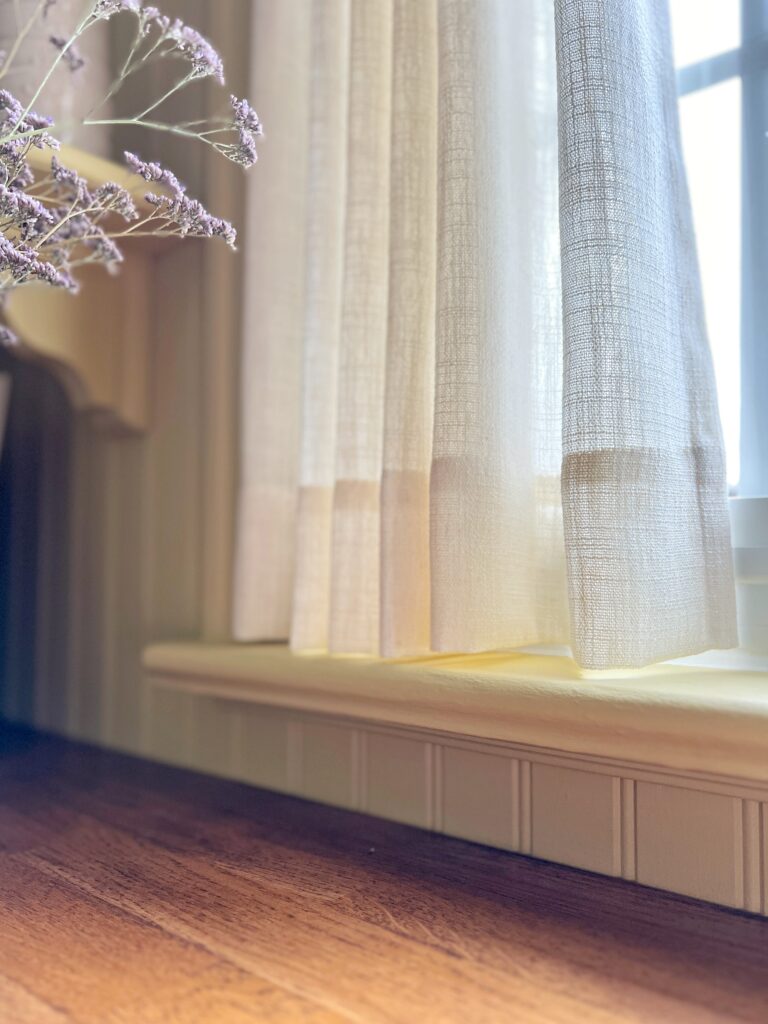
How to Hang Cafe Curtains
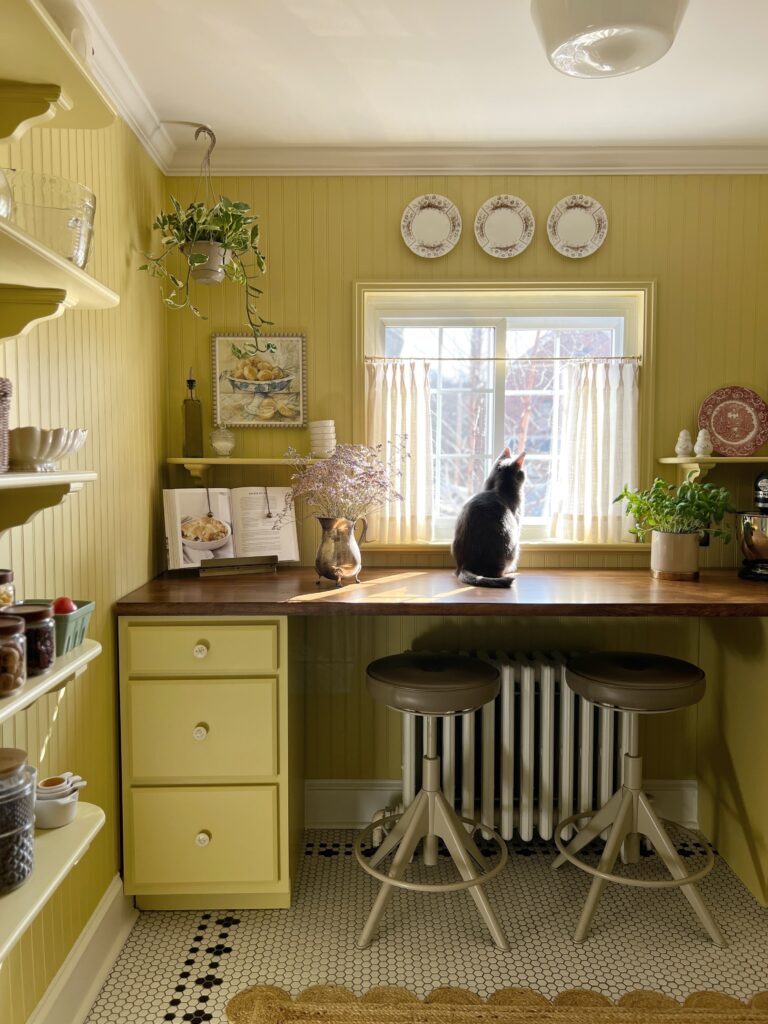
What better place for cafe curtains than a walk in pantry with a window?! It’s the perfect spot for them! Cafe curtains just add so much charm and in this case they’re also very functional, providing us the perfect amount of privacy!
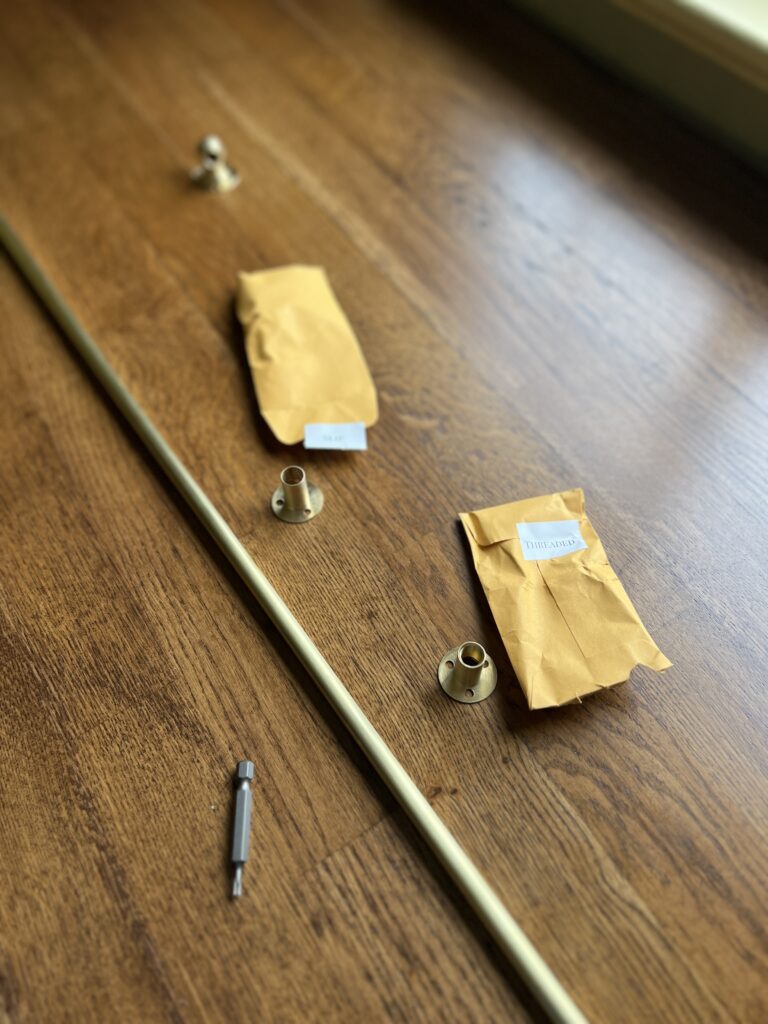
I used this inside mount hardware. One side is threaded and the other isn’t (the brass rod is the same). When you’re measuring, take into account the fact that the rod will slip into the bracket on one end! I started longer to be safe but I had to cut it a few times to get the length right.
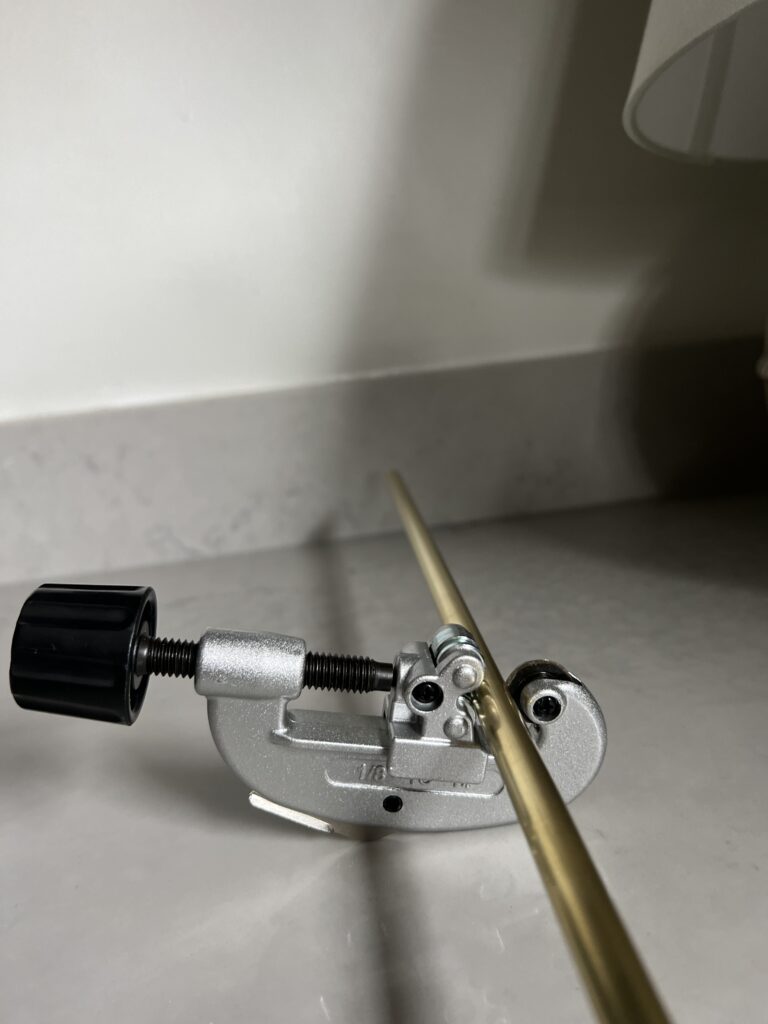
You can get a pipe cutter from any home improvement store, but I snagged this one from the same site that I got my hardware. It’s very simple to do! You place the rod where you want it cut, tighten, twist a few times, tighten a little, and repeat this process until it cuts through 🙂
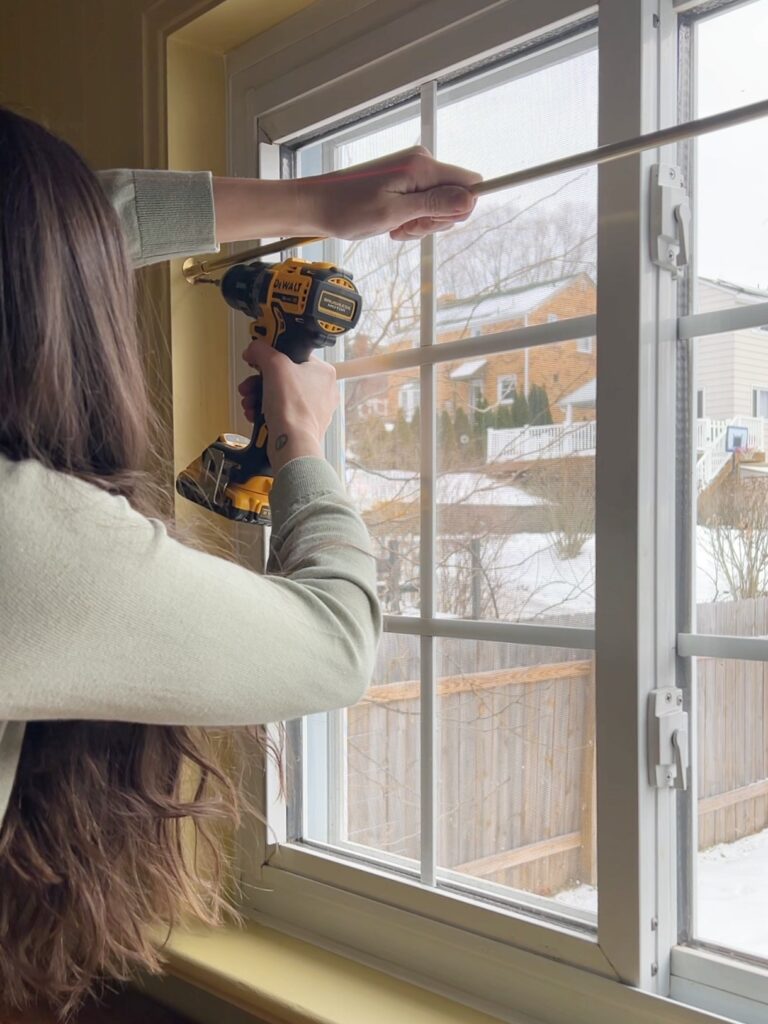
This was my first experience hanging cafe curtains so it was a bit of a learning curve! As I mentioned, one end of the rod is threaded, meaning it twists into the bracket. I secured that end of the bracket first, using the provided screws and drill bit to screw it into the window frame. To ensure the rod was hung straight, I used my laser level!
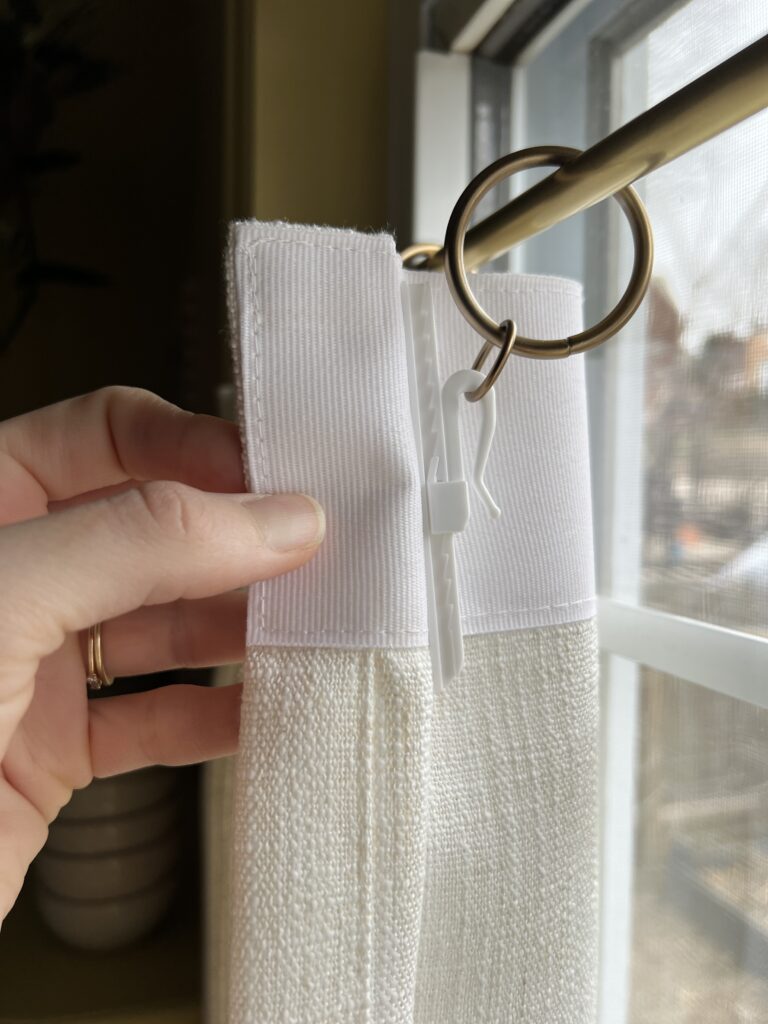
Once one side was in place, I slipped the other end of the rod into the second bracket. I almost screwed in the second bracket before it hit me… wait a minute, I need to put the curtain rings on first!! Phew! Since I got pleated cafe curtains, I needed eyelet curtain rings. These are the ones I used!
The linen cafe curtains I used in here are actually the same ones I used for our sunroom makeover! They’re truly stunning and I have a 15% off discount if you’re interested! The code is ELISHA. Here’s the details on my order:
- Liz Linen Cafe Curtains
- Color: Ivory White
- Header Style: Pinch Pleat
- Unlined
- No memory training (I trained them myself!)
These curtains come with adjustable pin hooks. These slide into the pleats and you can click them up or down to make slight adjustments to the length of the curtains.
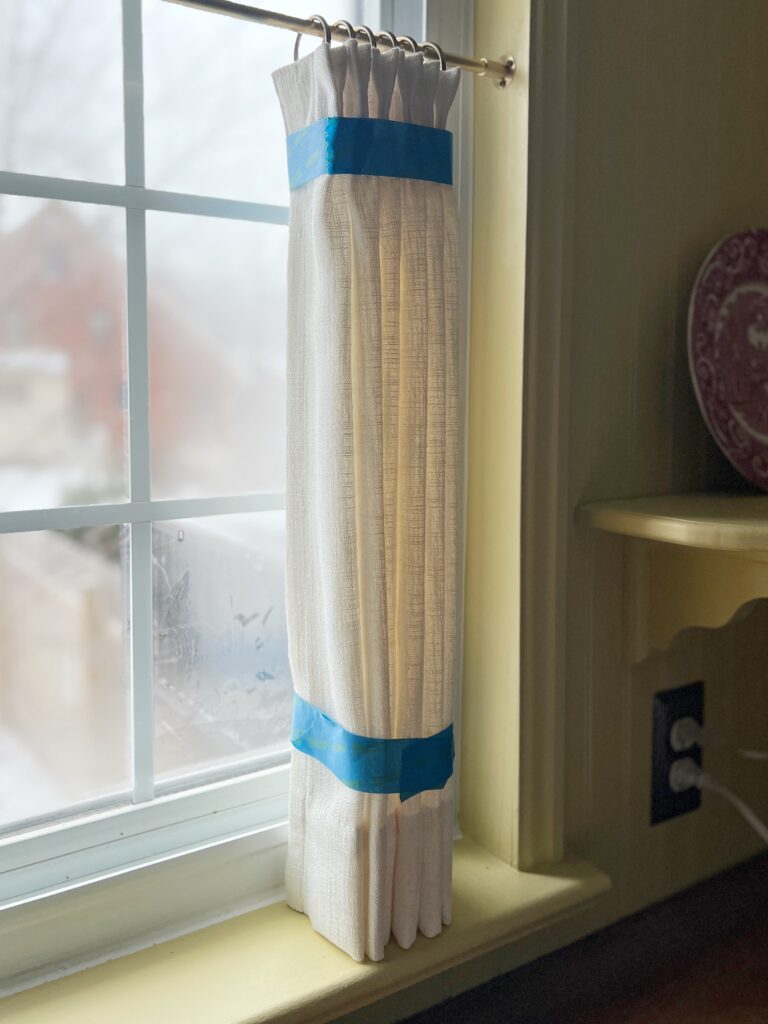
Have you ever heard of training your curtains?! Weird, I know, but it’s simple to do and helps your curtains stay nicely shaped! All you have to do is steam them and use some painter’s tape (or string, fabric ties, clips, etc.) to hold them in place at the top and bottom. Let them stay like this overnight.
DIY Walk In Pantry Photos

Pantry Sources
You can also shop our walk in pantry here, but below is a more detailed list!
- Paint Color Sample
- Light Fixture
- Outlet Cover
- Light Switch Cover
- Ceiling Medallion
- Linen Cafe Curtains
- Curtain Rod
- Curtain Rings
- Plates (vintage, but these are similar and so are these!)
- Plate Hangers
- Butcher Block
- 3-Drawer Cabinet
- 1-Drawer Cabinet
- Cabinet Knobs
- Lamp
- Bar Stools (from IKEA, no longer sold)
- Scalloped Jute Rug
- Lemon Art
- Recipe Book Stand
- Vase (vintage)
- Stems (real, but I got these for when those die!)
Coffee Station
- Tea Tin
- Rail for Mugs
- Mugs
- S-Hooks
- Planter
- Small Crystal Jar (thrifted)
- Large Crystal Jar
- Crystal Lamp (vintage)
- Crystal Fluted Glasses (thrifted)
- Espresso Machine
- Marble Tray
- Mini Floral Pitcher (vintage)
- Chest (Facebook Marketplace)
Floating Pantry Shelves
- Teapot
- Glass Batter Bowl
- Margarita Pitcher
- Ramekins
- Ceramic Measuring Spoons
- Embroidered basket (vintage)
- Lidded basket (vintage)
- Rice Jar
- Crystal Stemware (inherited)
- Lennox Fruit Bowl (inherited)
- Large Crystal Jars
- Wood Lidded Jars
- Berry Basket
- Glass Salad Bowls
- Pasta Bowls
Shaker Peg Shelf
Well, I hope you love our yellow pantry as much as we do! If not, I hope you at least got a walk-in pantry idea or two!! 😉 Please let me know if you have any additional questions! Thank you for being here.
Elisha
