

Our entire second floor was carpeted when we moved in. It’s been a goal of ours to slowly replace it with new flooring while we’re here.
We started by removing the carpet on our stairs and did this easy DIY stair remodel. Our guest bedroom was next and now that we know how to install vinyl plank flooring, we’ll eventually continue it throughout the rest of the upstairs!
The idea of installing flooring can be intimating, but I promise it’s not as complicated as you’d think!
We opted for a floating floor and went back and forth between engineered hardwood and vinyl plank flooring. Check out my blog post comparing these two flooring options and what you should consider before choosing!
We (obviously) decided to go with luxury vinyl plank flooring! This blog post has everything you need to know about how to install vinyl plank flooring!

Disclaimer: This post contains affiliate links. This means, if you purchase something from a link I provided, I will receive a small commission. This is at no extra cost to you! Thank you so much for the support!
materials:
tools:
- Painter’s Tool
- Pry Bar
- End Nippers
- Gloves
- Laser Level
- Knee pads
- Tapping Block
- Rubber Mallet
- Pull Bar
- Spacers
- Staple Gun
- Utility Knife
- Tape Measure
- Multi-Tool
- Jigsaw
- Jigsaw Laminate blade
Preparing to Install Vinyl Plank Flooring
The first thing you need to do before choosing your new floors is to figure out how much you’ll need. Once you know the square footage, you can get a bigger idea of what flooring will fit into your budget.
We went with the Lifeproof brand from Home Depot! A few people had recommended it and it’s lifetime warranty!
How do you calculate for flooring?
The formula to calculate flooring is L x W = square footage.
First, measure your walls in feet. If your room isn’t a rectangle, you can break the room into sections and use the L x W formula for each section and then just add them up.
If you look at my sketch below, the pencil lines represent the shape of the room (bird’s eye view) so it isn’t a perfect rectangle. But I used the yellow highlighter to extend it out and just used those measurements instead. (You’ll want extra anyway!)
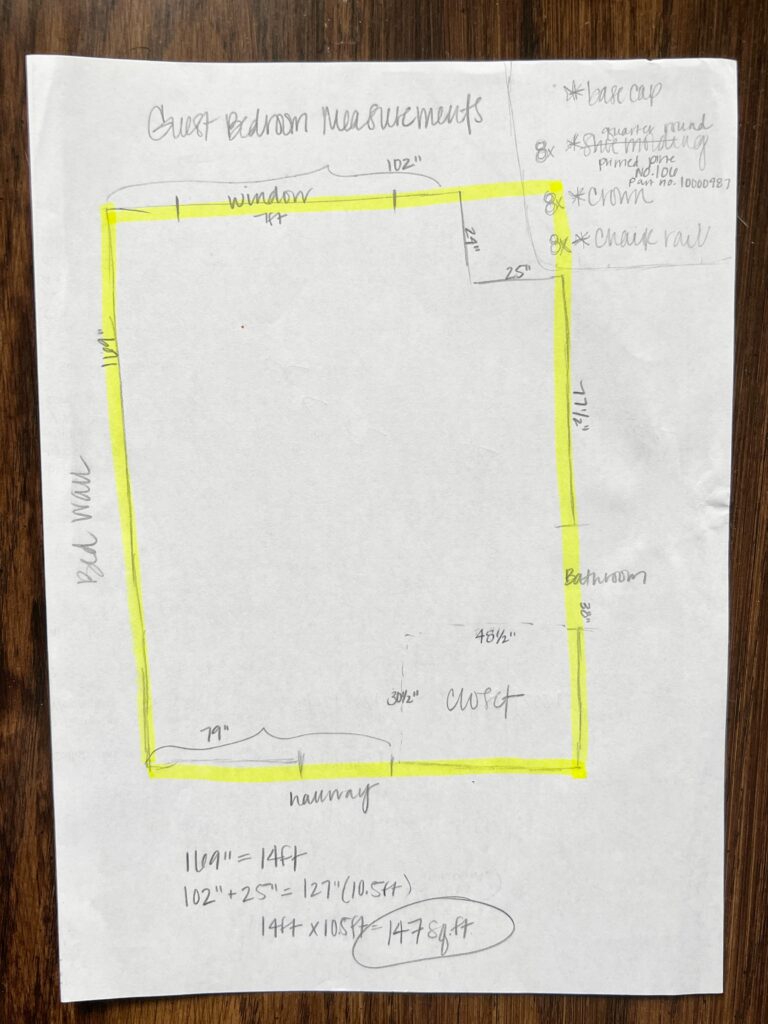
How much extra should I buy?
With LVP, you’ll want to buy 10% extra to account for cuts and any mistakes.
Our room came to 147 square feet (which already was a little extra since I boxed out the measurements) so we bought 160 square feet and that ended up being the perfect amount for the entire room.
What was the cost breakdown?
- $641 (8 boxes of flooring)
- $150 (2 rolls of underlayment)
- $40 (Transition piece)
- $30 (Spacers)
- $16 (Tapping Block)
- $12 (Pull Bar)
Total cost was about $889 for a 14ft x 10.5ft room.
Keep in mind there is a range of quality levels and prices for LVP! Ours was $3.79/square foot, but there are both cheaper and more expensive versions as well.
Do I need to acclimate my flooring?
This depends on the vinyl tiles you choose! Check the instructions. Ours did not need to be acclimated first.
In case you’re wondering what I’m talking about, some materials need to acclimate to a new environment (temperature and humidity) for a certain about of time before a diy installation!
How long does it take to install vinyl flooring?
We could have the entire floor for this room in a weekend! But with most any diy project, we like to take our time and do a couple steps each day!
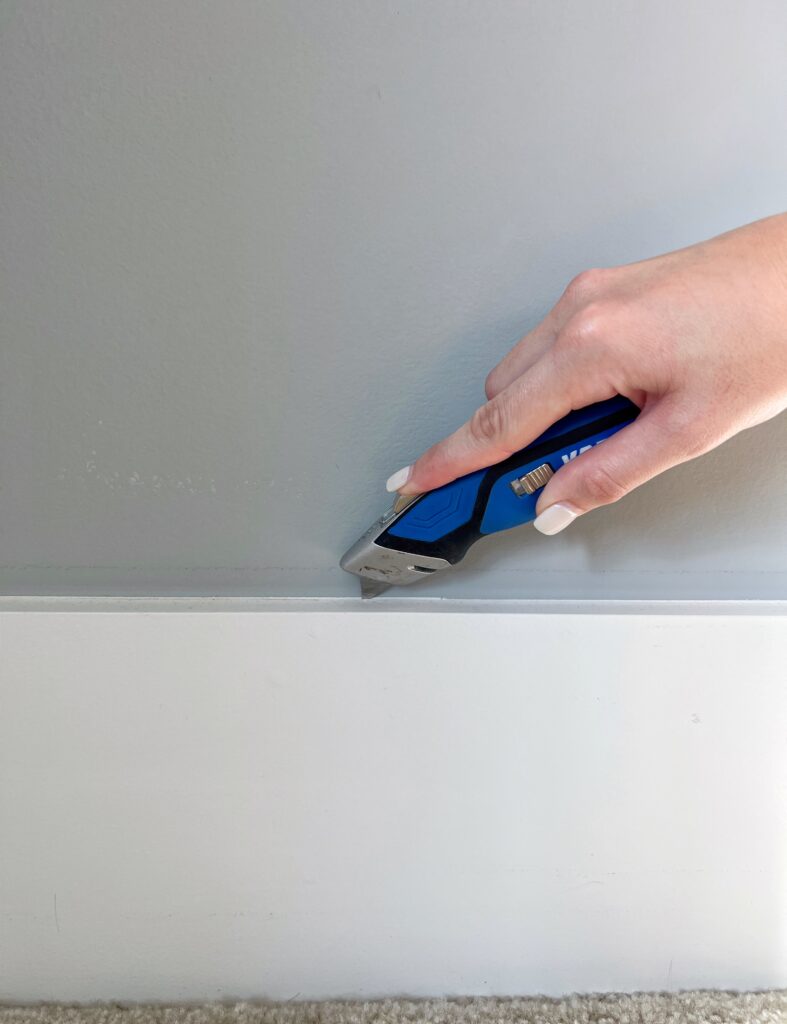
Step One: Remove Baseboards
You don’t have to remove your baseboards before installing vinyl plank flooring. But if you choose not to, you’ll need shoe mouldings to cover up the expansion gap (more on that later)!
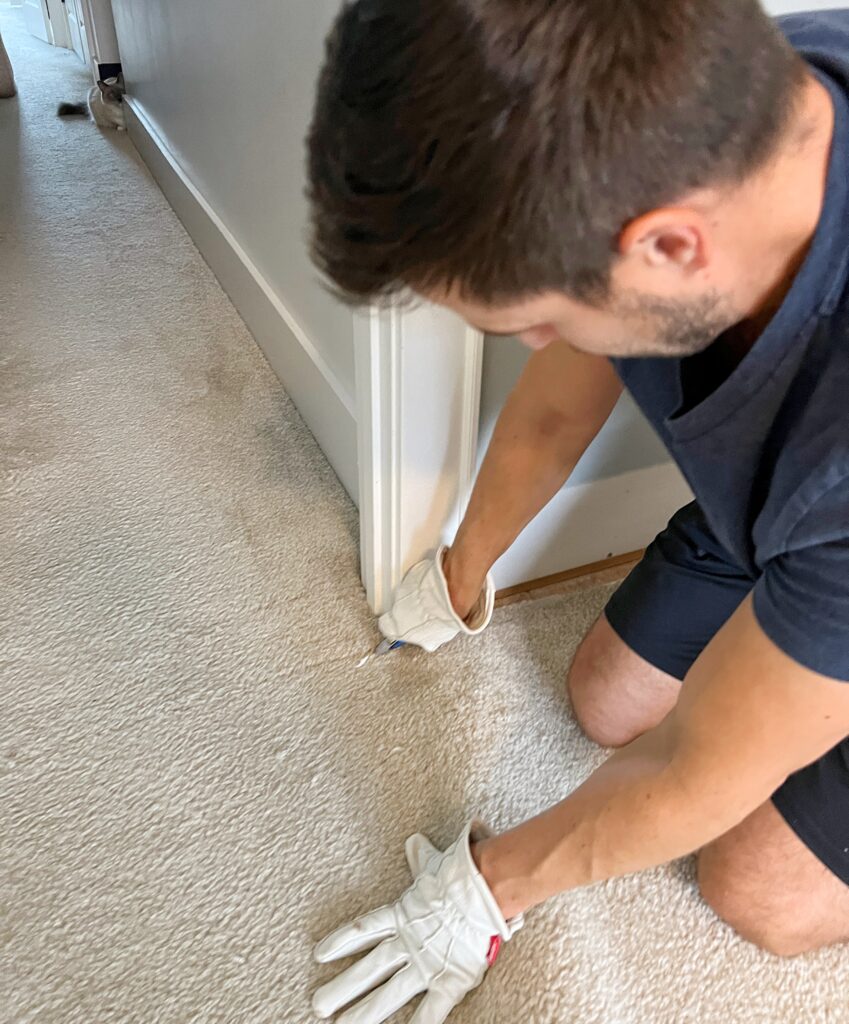
We decided to remove our baseboards for ease of installation. I also knew I wanted to keep the baseboards we have (since I like the way they look!) so we had to be really careful not to break them while removing.
How to carefully remove baseboards!
First you’ll use a utility knife to score the caulk along the seams of the baseboard.
Place the tapered end of a painter’s tool into the seam and gently tap on the handle with a rubber mallet. The baseboard should start to separate from the wall.
Work your way down the length of the baseboard loosening a little as you go. Once it’s all loosened, use a pry bar to fully pull it out!
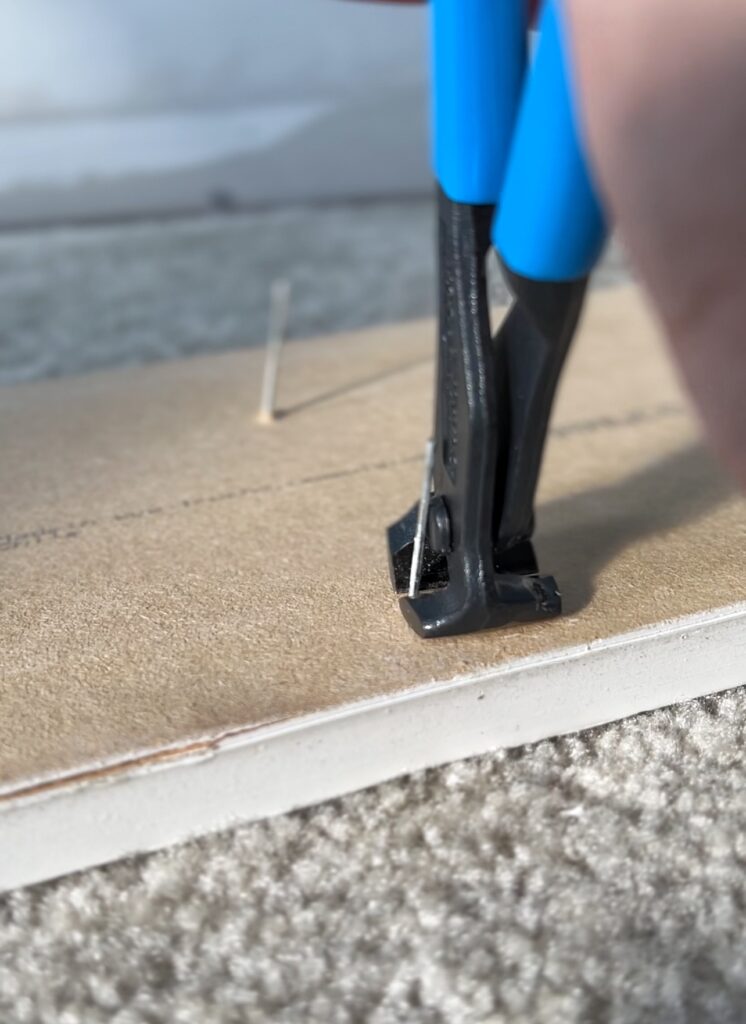
Since I knew we’d be reusing these baseboards, and just for safety, I used these end nippers to cut the nails that were sticking out of the baseboards.
Step Two: Remove Carpet
Can you install vinyl plank flooring over your existing floor?
If you have a different type of flooring like tile or engineered hardwood, you should be able to just install the vinyl flooring right overtop of it! Your old flooring would have to be in good shape and you’ll definitely want to check your manufacturer’s guidelines for appropriate subfloors.
How do you remove wall to wall carpet?
Removing carpet is so simple and fun! Start in a corner and just pull!
It may be a little harder to grasp if you don’t remove your baseboards, but usually carpet is installed after the baseboards so it should still be a simple task!
I definitely recommend wearing gloves while removing carpet because the tack strips have a bunch of small nails poking out! Yikes!
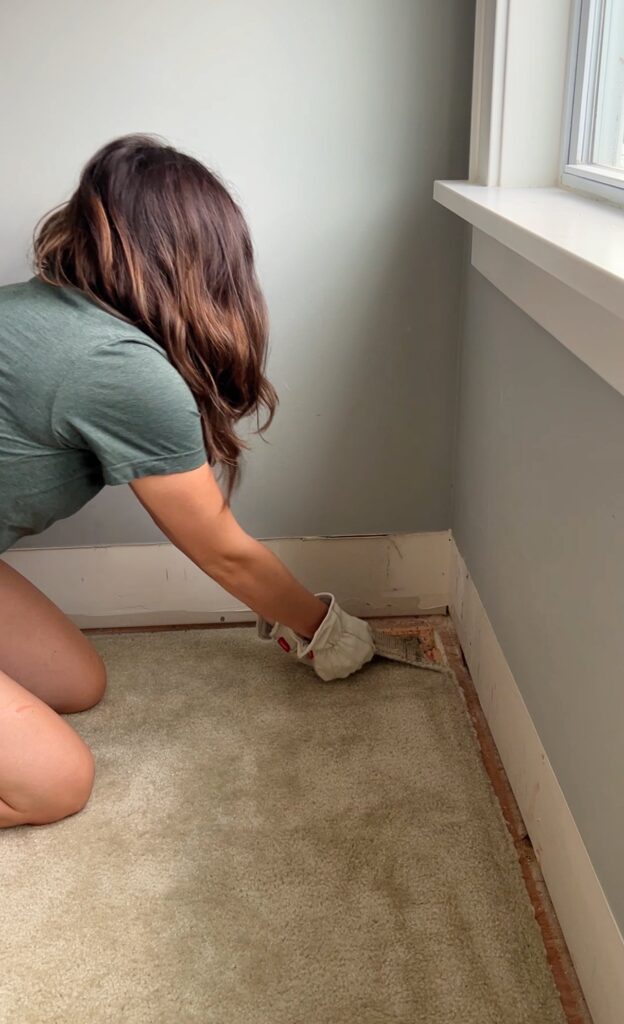
You’ll see a carpet padding underneath which also comes up really easily!
For the transition into the hallway, we cut it with a utility knife and will install a transition piece later on!
Tip: Use a utility knife to cut the carpet into strips so it’s easier to dispose of!
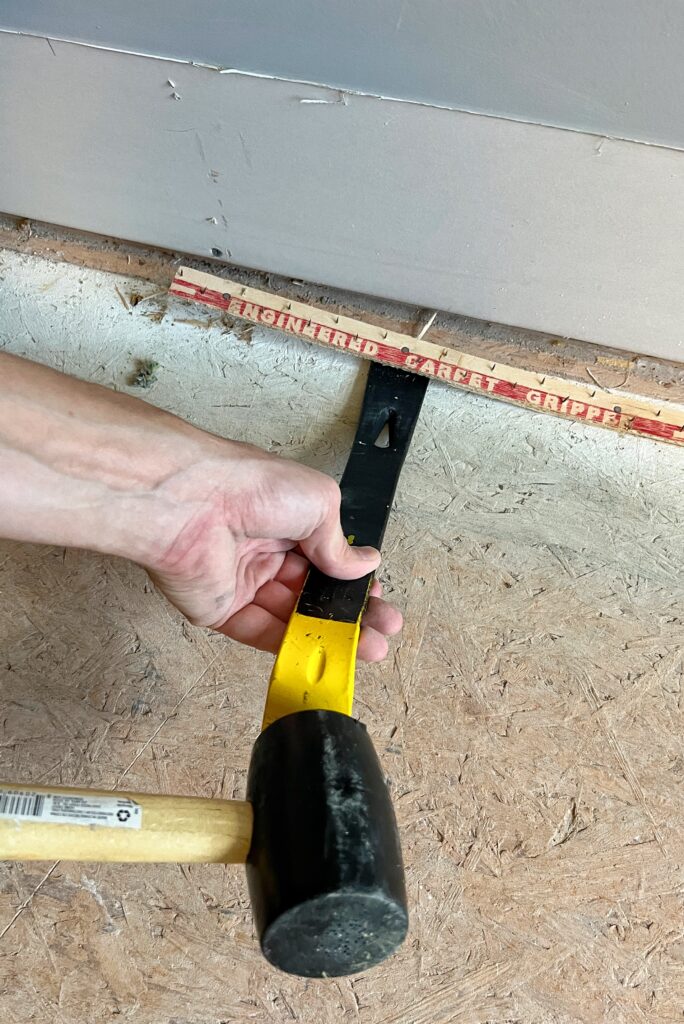
Once the carpet and carpet padding are gone, you’ll have tack strips and staples that need to be removed.
For the tack strips, look for the nails and just wedge your pry bar underneath those areas, working your way down!
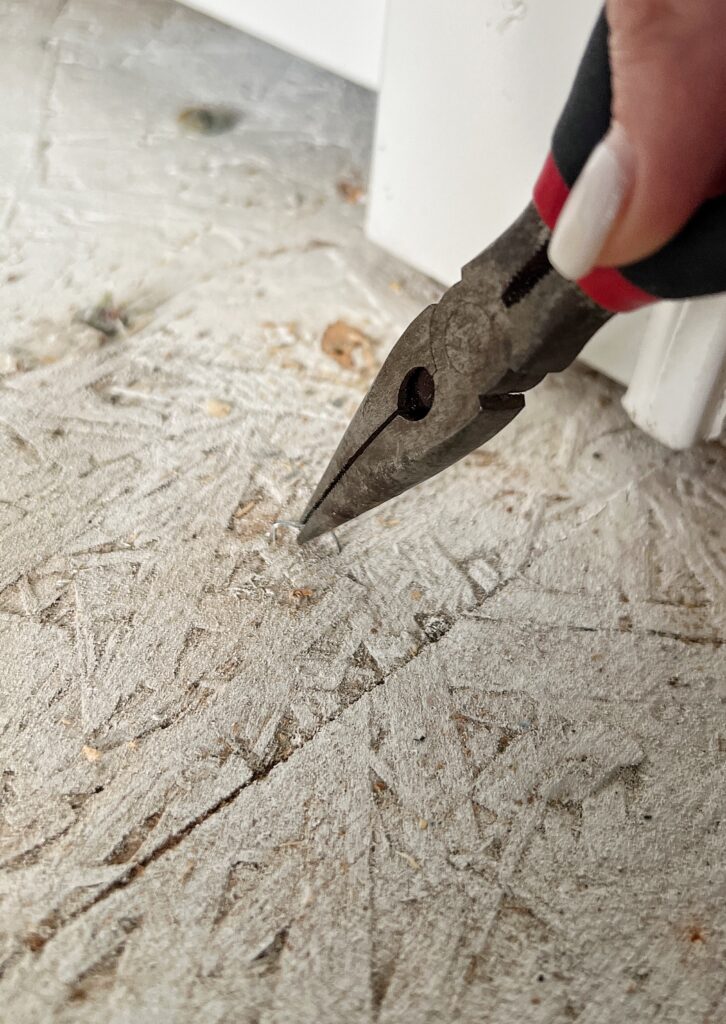
The staples can be easily removed using pliers. I honestly thought there would be more staples to remove! Not too shabby!
Make sure your subfloor is level!
Before moving forward with the underlayment or flooring, you need to make sure you have a level surface to work with.
We used our large level to check and luckily it was okay!
If you do have uneven surfaces, you could use a patching or self-leveling compound that is approved by your flooring manufacturer’s guidelines!
Step Three: Plan for a Layout
Which direction should I lay my flooring?
To make it simple, lay your flooring in the direction of the longest wall in the room. This will ultimately make your space feel larger!
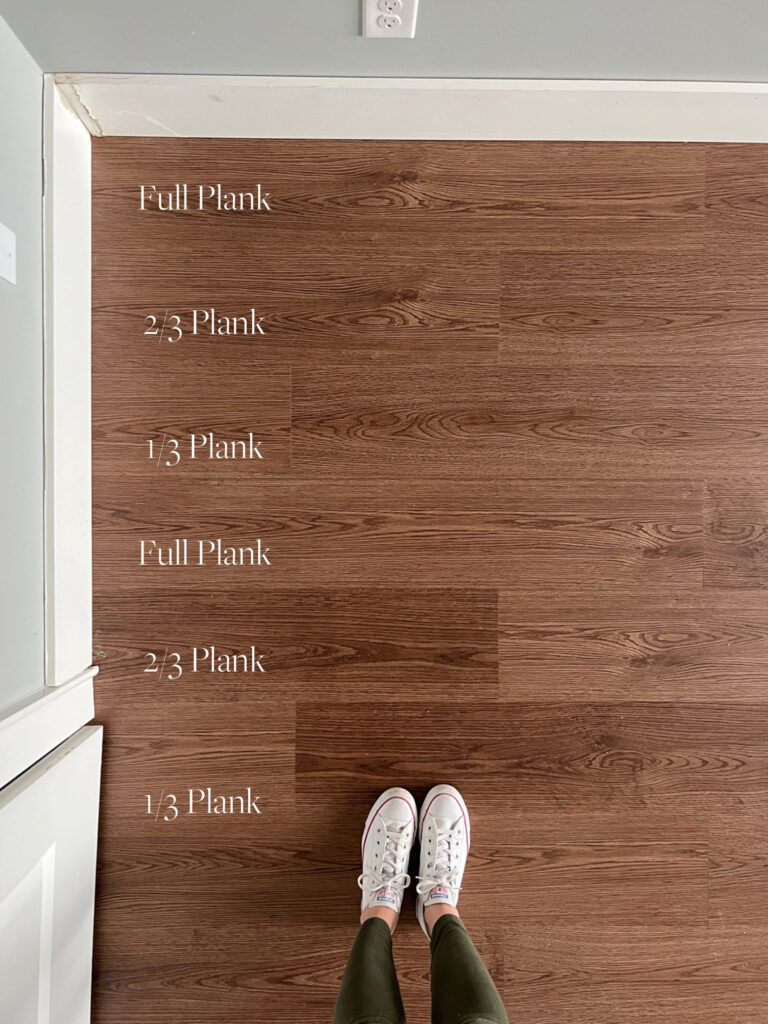
How should you stagger the planks?
There are a lot of different methods you can use, but the main rule is that your planks should overlap by at least 8 inches.
We decided to cut our plank measurement into thirds. Here’s how that looked:
- The first plank was a full plank!
- The second row started with 2/3 of a plank
- The third row started with 1/3 of a plank
- Repeat for the consecutive rows.
Step Four: Install the Underlayment
What is underlayment?
Underlayment is a thin layer of material (usually foam, felt, cork, or plywood) that goes in between the subfloor and the flooring.
Do you need underlayment for vinyl plank flooring?
Not always, no. If you’re installing over a concrete floor, you will want to use an underlayment. I would also recommend using it if you’re installing flooring in a wet area such as a bathroom, kitchen, or laundry room.
Otherwise, it’s up to you. It is an additional cost, however I do think it’s important to note the benefits of underlayment:
- Moisture protection
- Sound control
- Added comfort
- Heat insulation
- Helps even imperfections in subfloor
- Increases the lifespan of your flooring
How do you install underlayment?
The installation process is very simple! Just make sure that your subfloor is clean/vacuumed before beginning.
We went with this foam underlayment and got 2 rolls (each roll covers 100 square feet).
To install it, you’ll want the underlayment to be perpendicular to the way you’re laying your flooring. For ours, we had the foil side face down and we were able to use regular scissors to cut the rows to the right length!
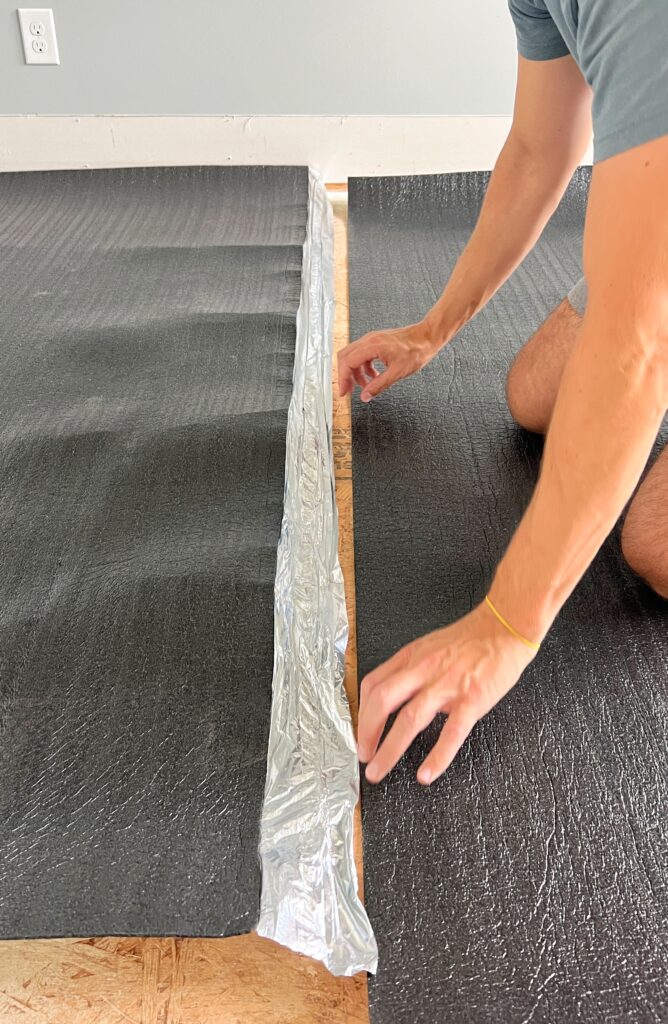
There was a little strip that you pull off the foil to make it sticky and then you place your next piece on top of that. Make sure you keep everything even and don’t overlap it in any areas.
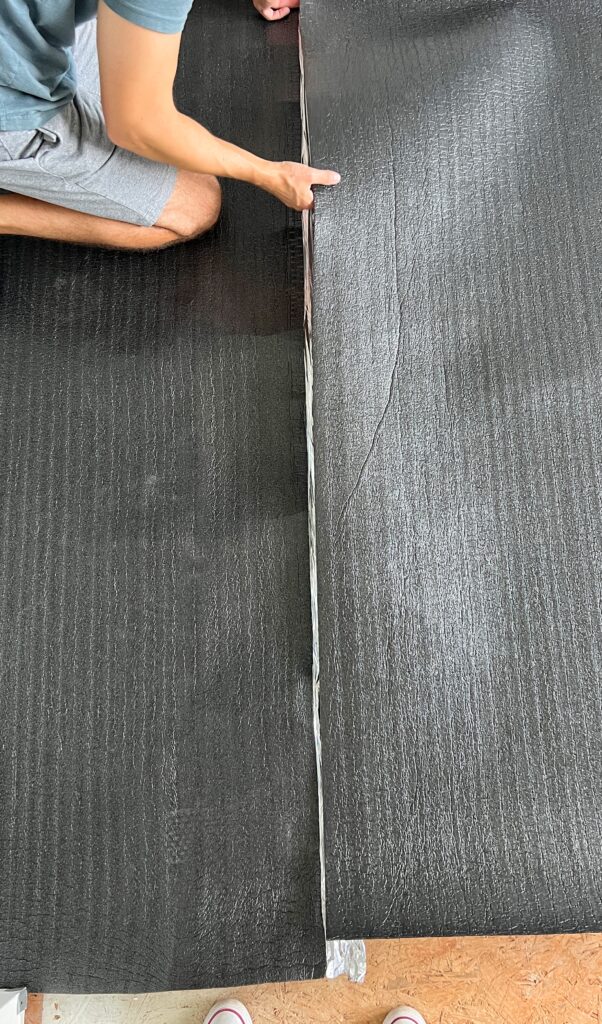
Once we got going we found the underlayment was shifting around a lot so we decided to staple the underlayment into the subfloor at the beginning of each row to hold it in place as we worked.
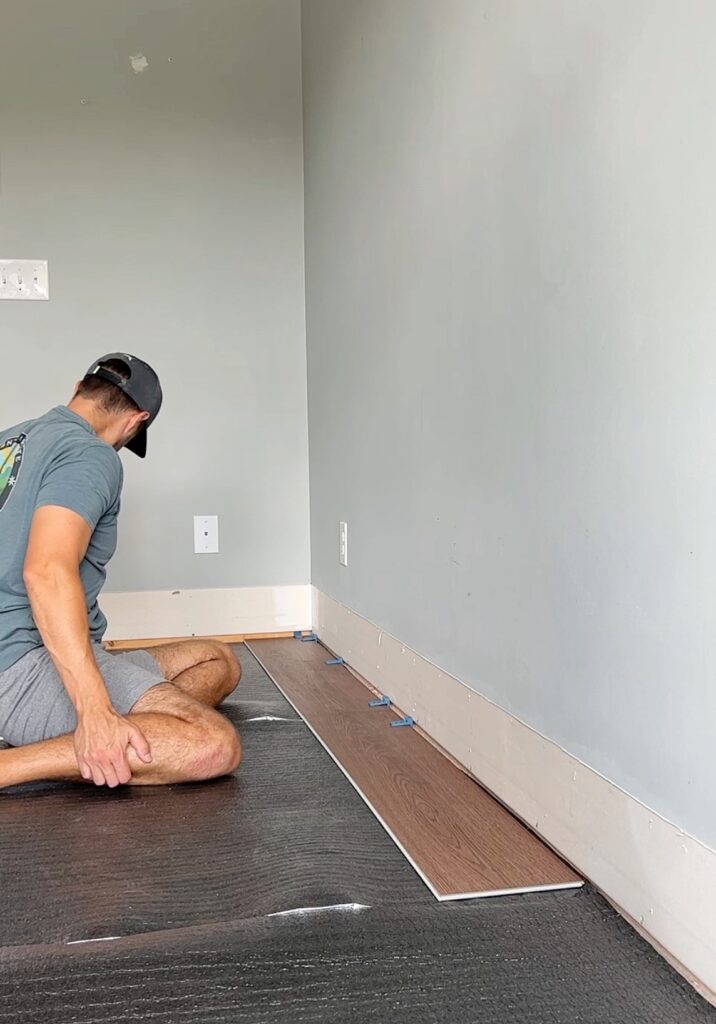
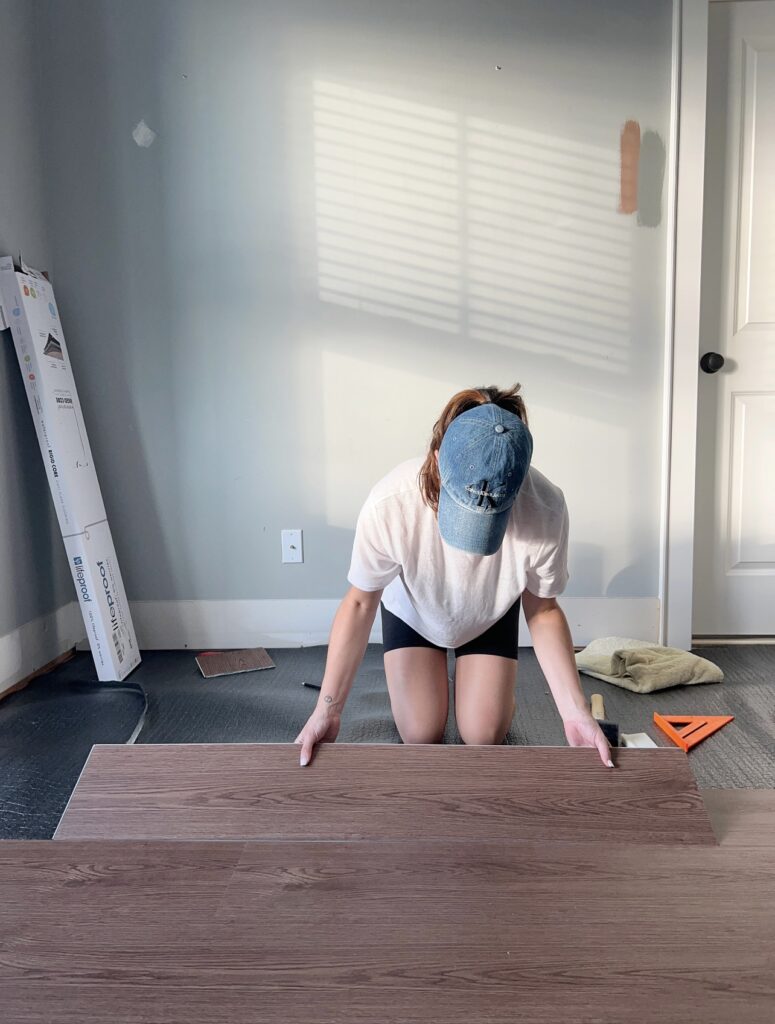
Step Five: The First Row
Gosh, it felt like this first row took us forever! Granted, it was our first time installing flooring and there is definitely a bit of a learning curve.
Why is the first row so important?
If the first row is straight, then subsequent rows will also be straight. By the way- you can’t trust your wall. Most walls aren’t even, and sure enough, ours wasn’t.
How can you tell if your wall is straight?
Find the middle point of both the length and width of the room. Wherever those meet is the center of the room!
Once we found the center, we set up our laser level parallel to the direction we’re laying the planks. Then we measured from that line to the wall all the way down. This is when we noticed the measurements weren’t the same on each end!
If you don’t have a laser level, you can use a chalk line!
What is the expansion gap?
When you’re installing flooring, you need to have a gap between the walls and the flooring to allow for expansion due to temperature changes, etc.
An expansion gap of about 1/4″ works great for installing vinyl plank flooring. We got these spacers to place between the edge of the wall and the flooring- they have both a 1/4″ and 1/2″ side to choose from!
As I mentioned our wall was uneven, so we used our laser level to get it right. Due to the uneven wall, some gaps on the first row were actually too big to even use the spacers.
To ensure that these areas didn’t shift, I used my crown stapler to staple the first row to the subfloor. I stapled on the very edge so the baseboard would cover them up!
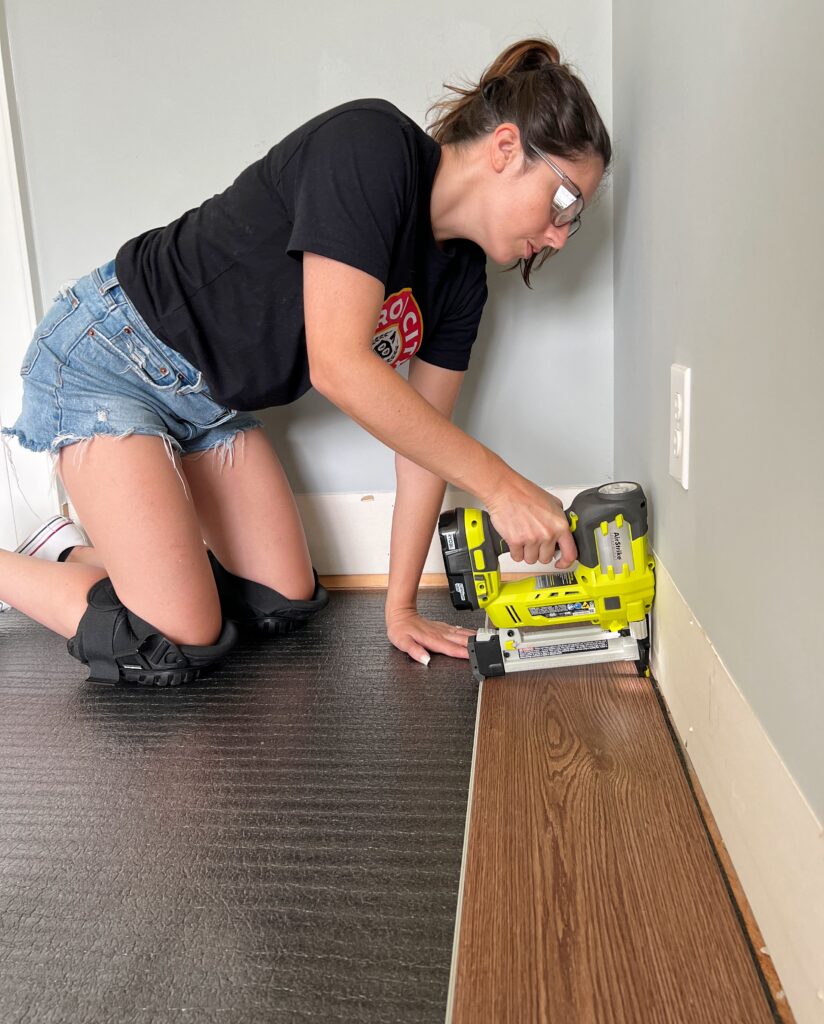
Important Note: I just noticed that our flooring installation instructions say not to staple or glue the planks down. Oops! Hopefully because it’s just on one edge it will be fine. If we run into any issues I’ll be sure to update this post!
Start in a corner!
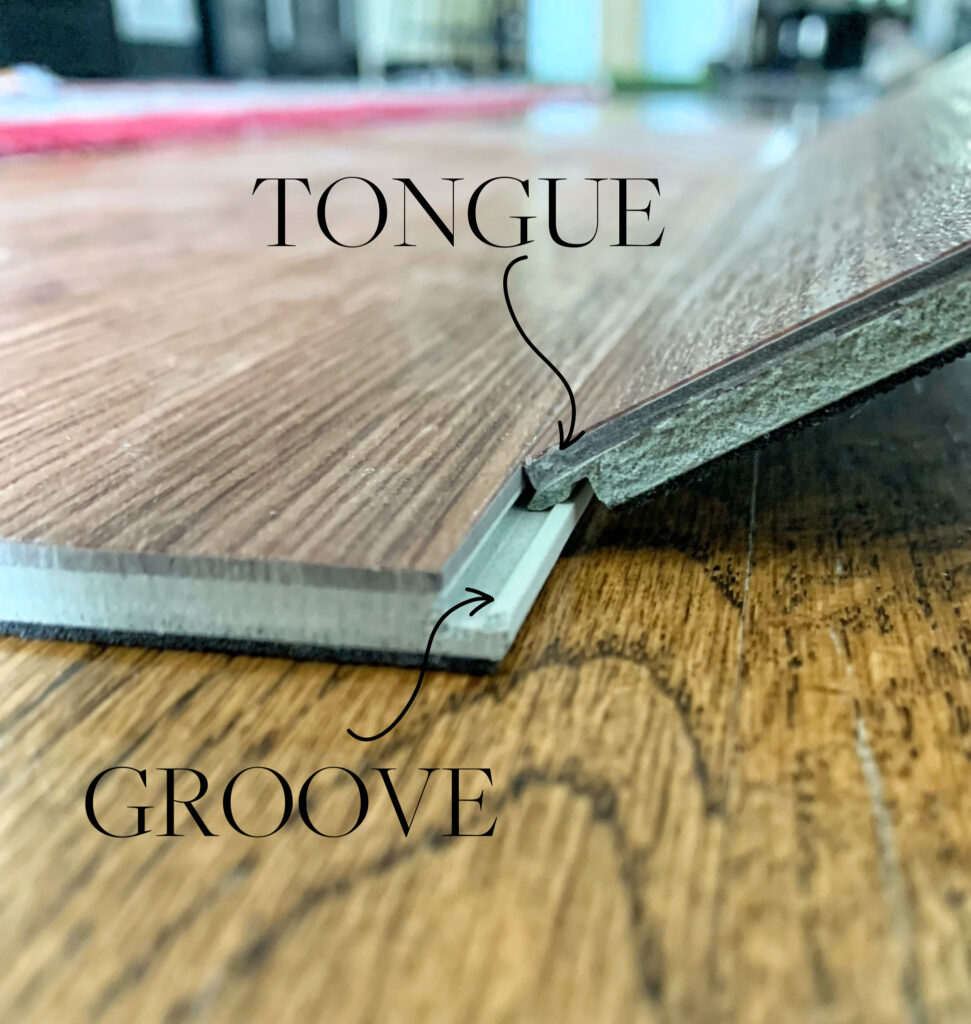
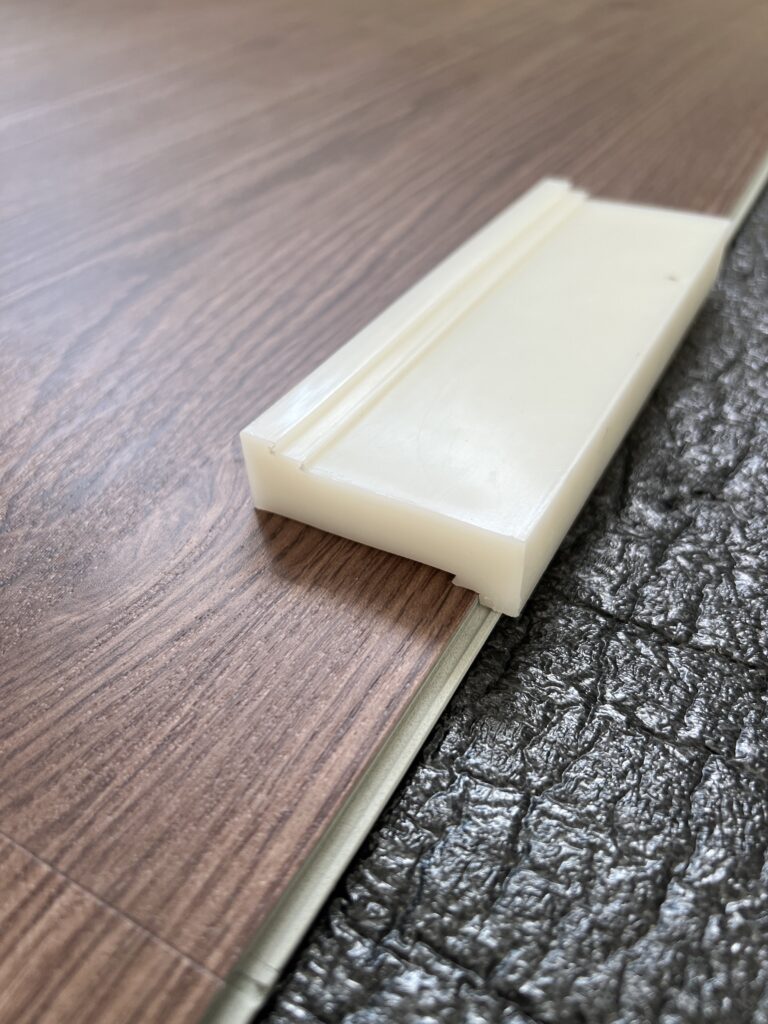
Working from left to right, we had the tongue side of the plank against the wall. The grooves need to be exposed for the next pieces to click into. Here’s a close up picture of the tongue and groove for reference:
For the first row of vinyl planks, you only have to click in the width of the plank. Just insert at a slight angle (much slighter than I’m doing below LOL we were trying to get the hang of it!) and rotate downward.
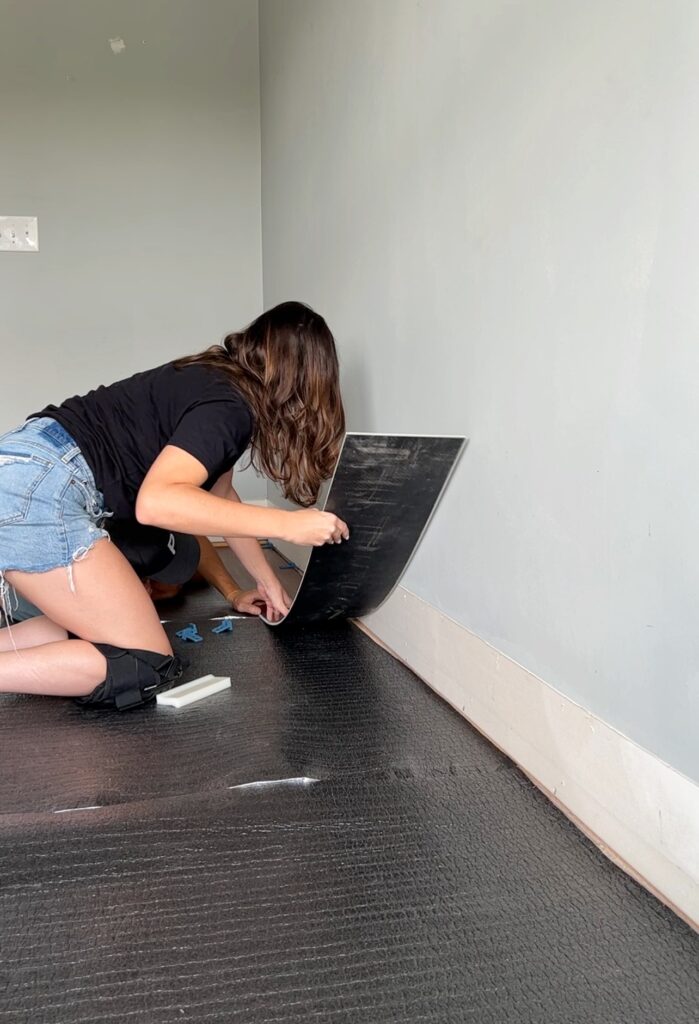
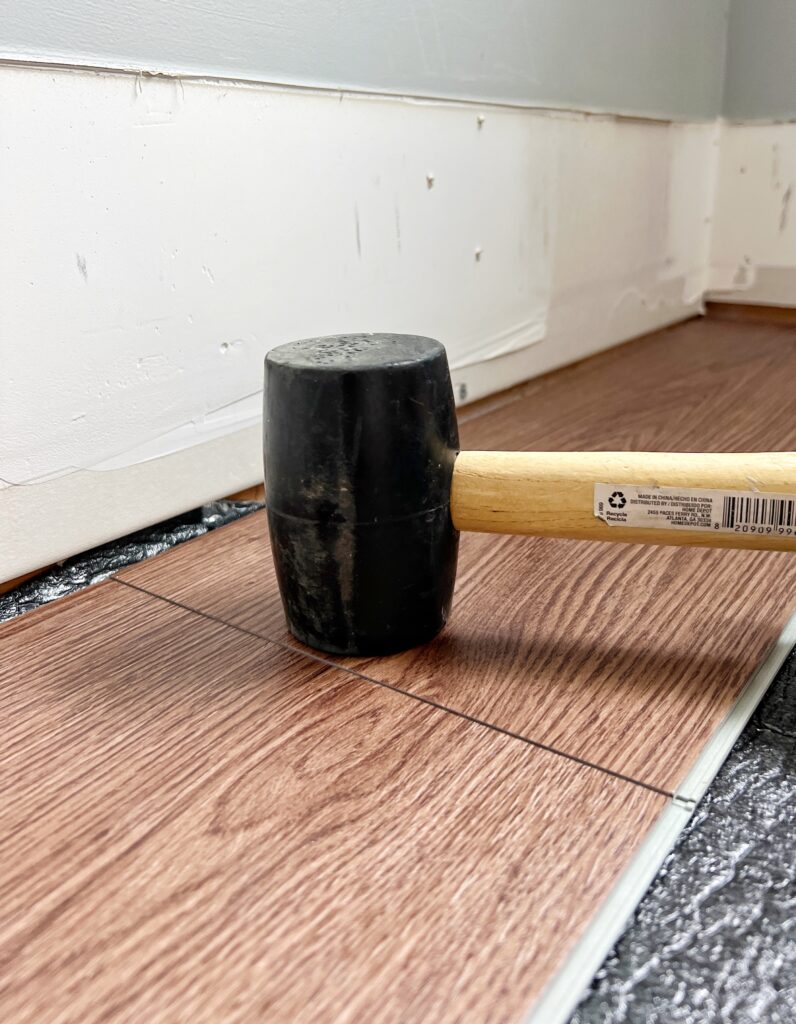
After this, you’ll need to click it into place using a rubber mallet.
We learned there was a “sweet spot” to tap the plank into place (see the photo below!). Two firm taps on the top, then middle, then bottom worked perfectly to lock it into place.
How do you cut vinyl plank flooring?
Most vinyl plank flooring can be cut using a utility knife.
First, mark the cut. You can use a tape measure or mark on a scrap piece of plank. But before drawing a line, make sure you take notice of where the tongue and groove are so you cut the right part of the plank!
Luckily the cuts don’t have to be too clean or precise because they’ll be hidden underneath the baseboards. But you still want to make sure you have room for that 1/4″ expansion space!
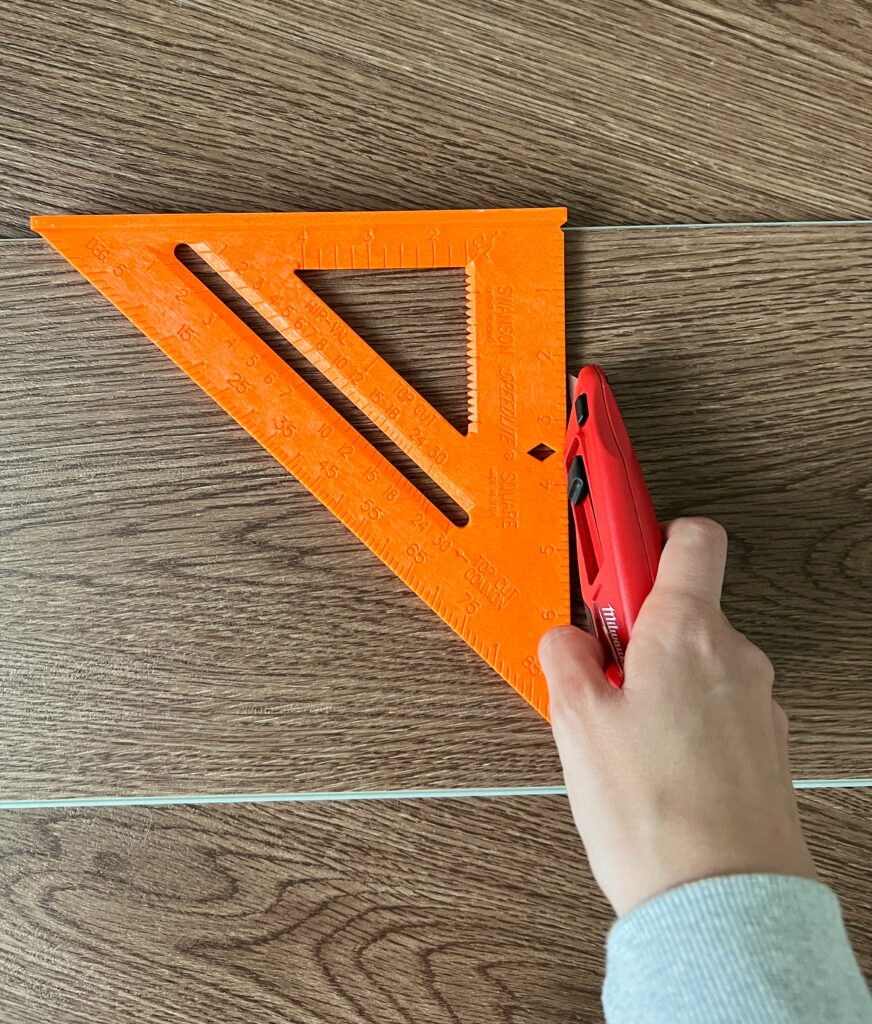
When making cuts, use a sharp utility knife and something straight to guide your initial cut.
The type of vinyl plank flooring we used was pretty thick, so we would score the plank multiple times, flip it over, add pressure where the cut was to break it, and then cut through the backing if necessary.
Other options for cutting vinyl plank flooring are a hand saw, a table saw, miter saw, a jigsaw, or a tool specifically for cutting flooring. Just make sure you get a blade specifically for cutting laminate or one with 80 or 100 carbide teeth!
I’m not going to lie, it took more effort than I thought to cut them with a utility knife. I want this tool for our next flooring project!
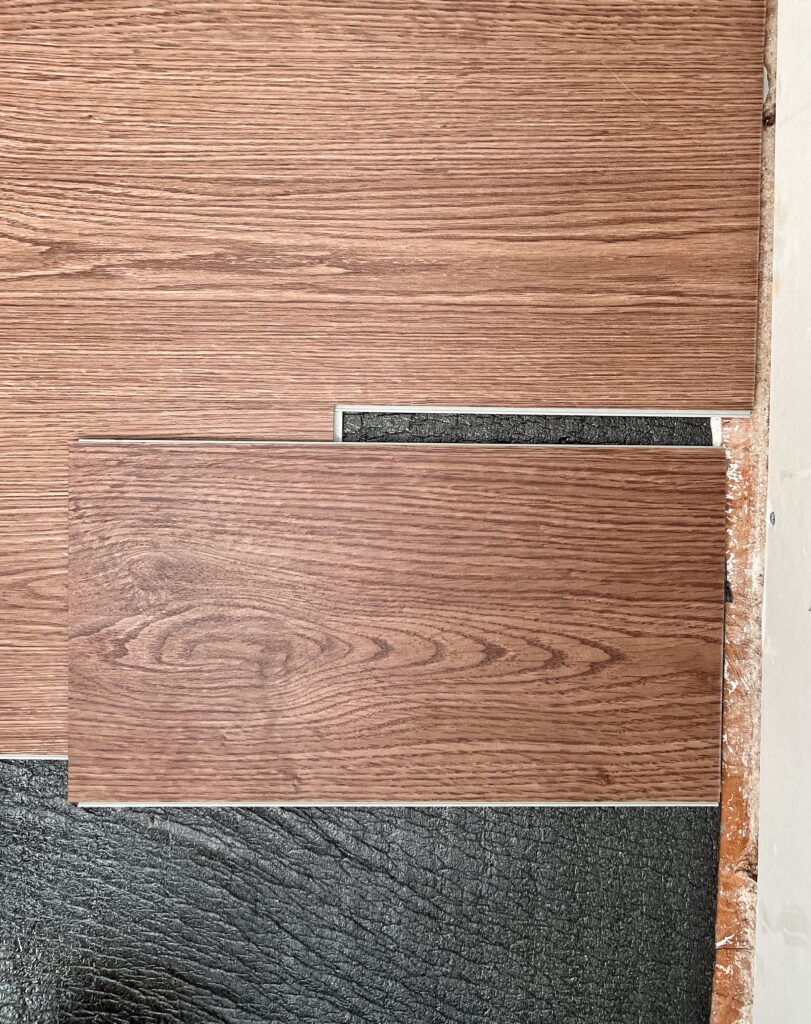
Step Six: The Next Row
For the rest of the room, the planks have to click in both lengthwise and widthwise.
First, you’re going to click in the plank lengthwise as you can see in this photo below!
Then, you’ll click in the width of the plank and use the rubber mallet just like in the previous step!
After that’s locked in, you’ll need to tighten up the seam for the lengthwise part of the plank. There is where the tapping block comes into play.
Be careful about your placement of the tapping block! You don’t want to break the groove! See how I set it up below.
You’ll then use your rubber mallet again to tap the plank in, working your way down the plank lengthwise.
It took some practice for me to get the right momentum with the mallet, but you do want to make sure your seams are nice and tight.
Most of the flooring is smooth sailing after you get the hang of using the tapping block, mallet, and cutting the vinyl plank flooring.
Step Seven: The Tricky Cuts
You will, however, run into to some tricky cuts. My tricky cuts may look different than yours, but hopefully sharing mine will help you!
How do you lay flooring under a door jamb?
If you’re raising the floors higher than they used to be, you’ll need to cut into your door framing.
I used a plank to mark a line on the framing and cut into it with my multi-tool!


How do you transition flooring into the closet?
This one had me scratching my head a little bit at first.
I wanted to keep the pattern going so I made note of where the seams where in previous rows. I laid this plank here so I could measure for that small cut inside the closet.


What tool do you use for the tricky cuts?
For this cut, and all the other tricky cuts, I used my jigsaw with a carbide blade. This blade is made for laminate!
My biggest advice with the tricky cuts is to double, or even triple, check your measurements and make sure that you’re paying attention to the groove and tongue edge before making the cut!

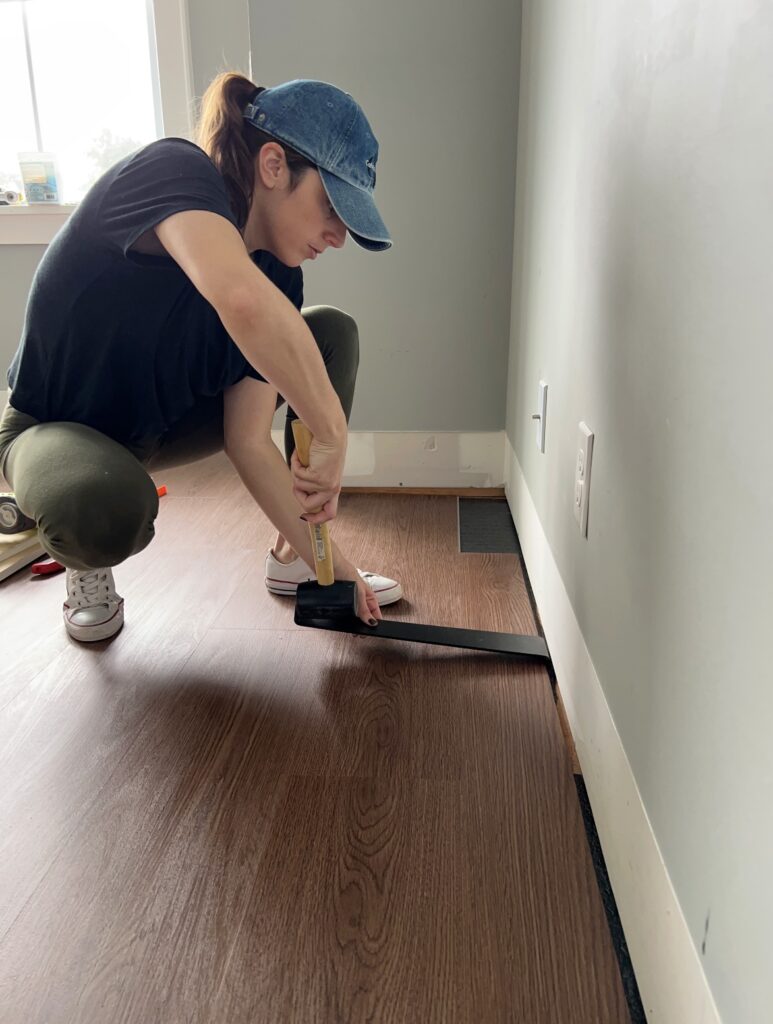
Step Eight: The Final Row
The last row of planks probably took as as long as the first row, LOL! But putting in that last plank was so exciting!
For our last row, we had to cut all the planks down widthwise first
How do you get the final row of planks to click in?
To get them to click in, you’ll need to use a pull bar.
Make sure you leave enough space to fit the pull bar in the gap (but not too much where your baseboard and/or shoe moldings won’t cover it) and then use the rubber mallet to tap on the other end!
Step Nine: The Transition Pieces
This part is always is a little tricky in my opinion! It’s also going to be a little different for everyone.
What type of transition piece should I get?
Whatever flooring you choose should have an option for a matching transition piece. This is was we used for ours! It was also from Home Depot.
I thought this was a great option because it comes with a few different pieces to accommodate different types of transitions.
Our room needed two transitions; one from flooring to carpet and the other from flooring to tile.
How do you transition from vinyl to tile?
First we cut the t-molding piece (see below) to size and glued it down using liquid nails.
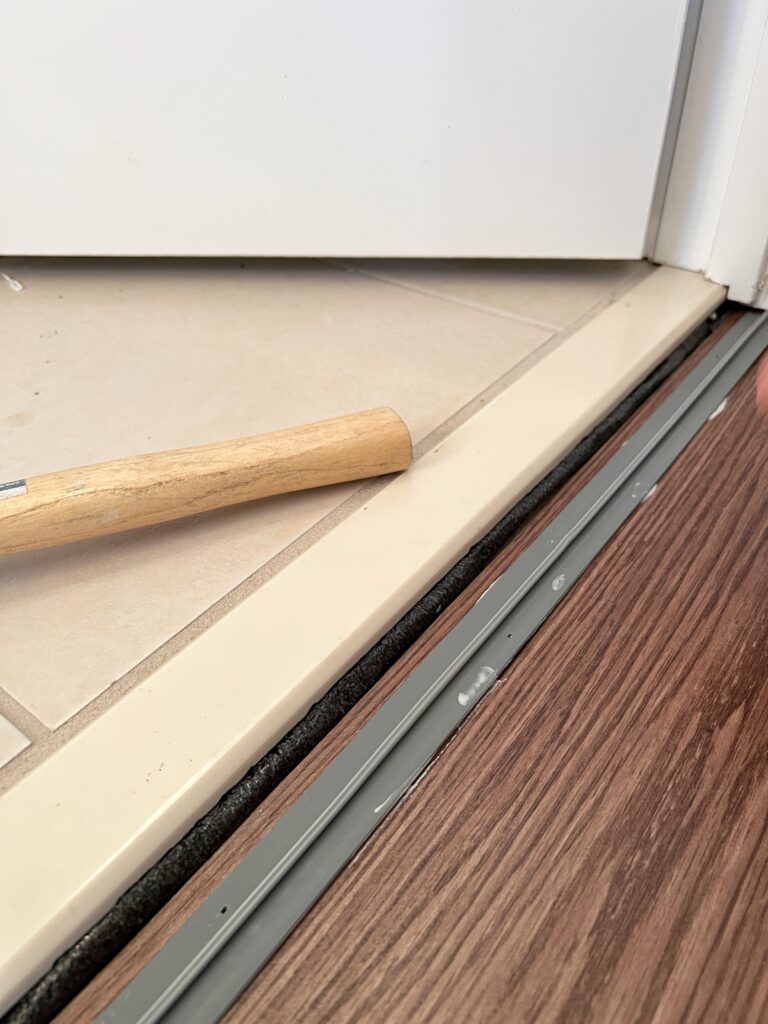
The bottom of the transition piece clicks right into the that middle strip! It’s quite simple!
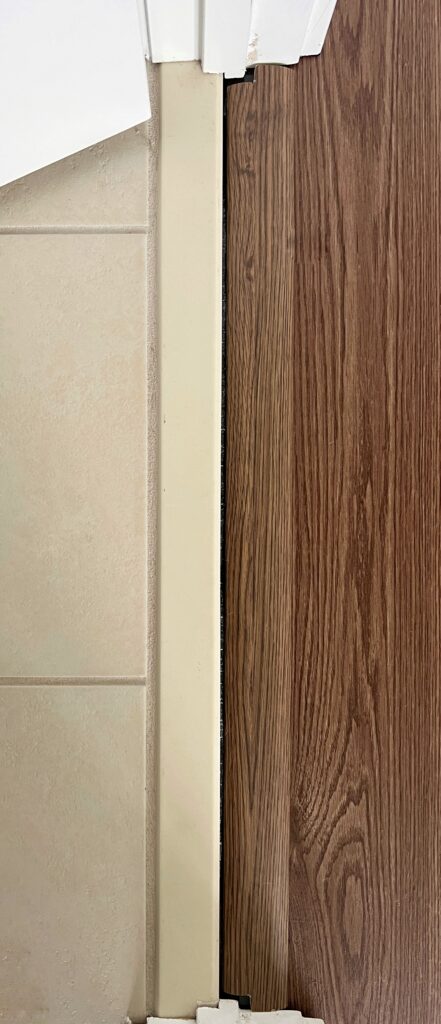
I’ll admit, we didn’t the best job with this one! The cuts around the door jam were too big and there’s a tiny gap between the tile transition and the floor transition.
But for now, it will do!! The good news is, it isn’t one of our high-traffic areas and when you’re doing your own flooring, you can make the rules! LOL!
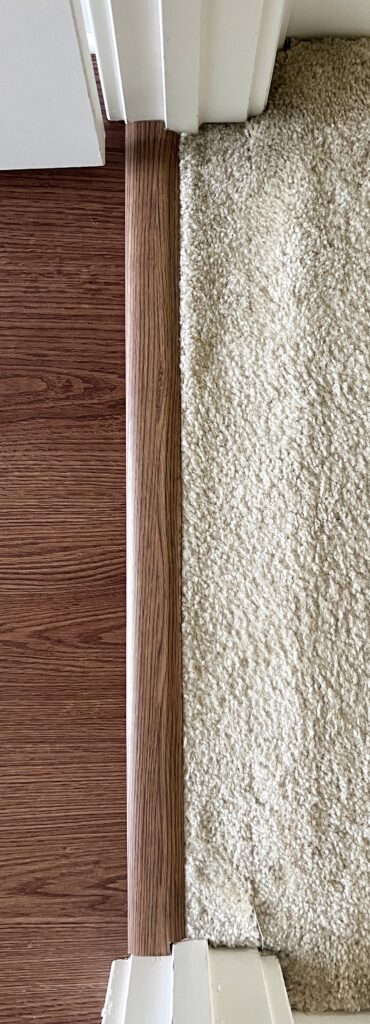
How do you transition from vinyl to carpet?
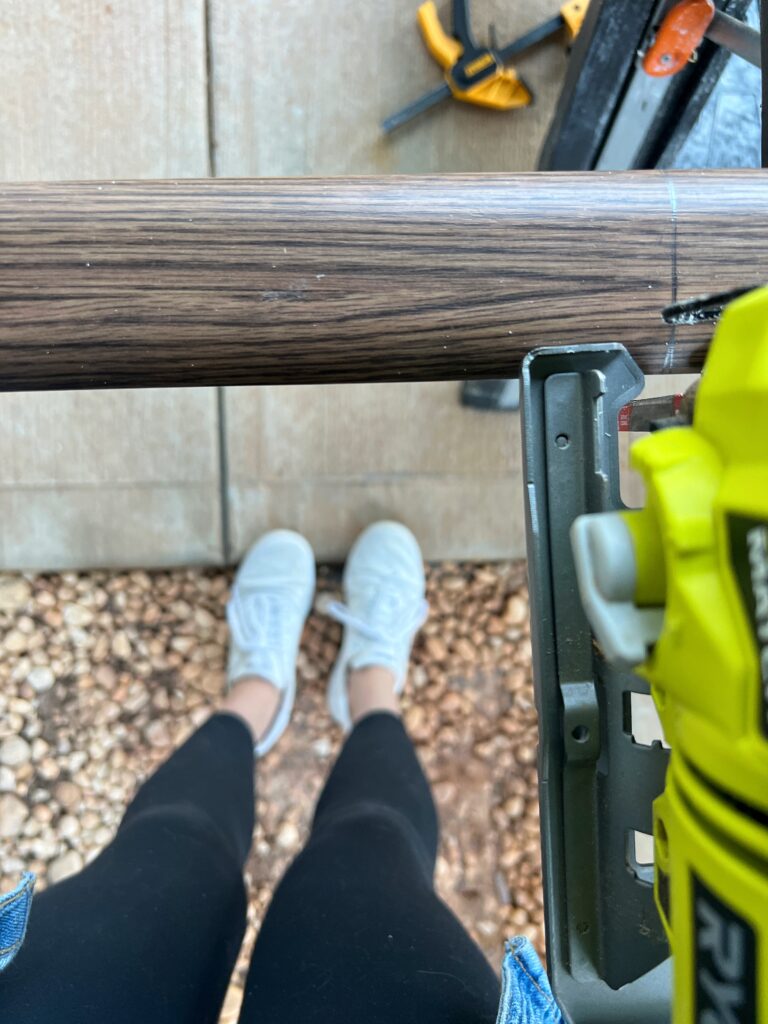
For the transition from flooring to carpet, we had to use one on the provided shims (face down) to raise up the height of the t-molding.
We nailed this into place, glued the t-molding on top, and then clicked the transition piece into place!

To cut the transition piece and additional pieces, I used my jigsaw with the same laminate blade I used for the flooring!
We also had to staple down the edges of the carpet back into place. We weren’t too picky about this part as we do plan to eventually rip this carpet up and continue installing vinyl plank flooring in the hallway!
Two Mistakes We Made
You know me- I’m going to share it ALL- mistakes included!
Some of the spacers got stuck!
This was a silly mistake. When I went to go put the baseboards back on, I realized some of the spacers were stuck and definitely not coming out.
We decided to use a multi-tool to cut them. I did two just fine, and then Dan came in and wanted to try one.
He took a different approach to the cutting it and ended up melting a chunk of our floors. We were totally bummed, but luckily it’s right next to the edge of the floor verses right in the middle.


The bottom photo is how not to cut. The blade on the multi-tool can get really hot. But hopefully you guys won’t have the issue of getting your spacers stuck in the first place!
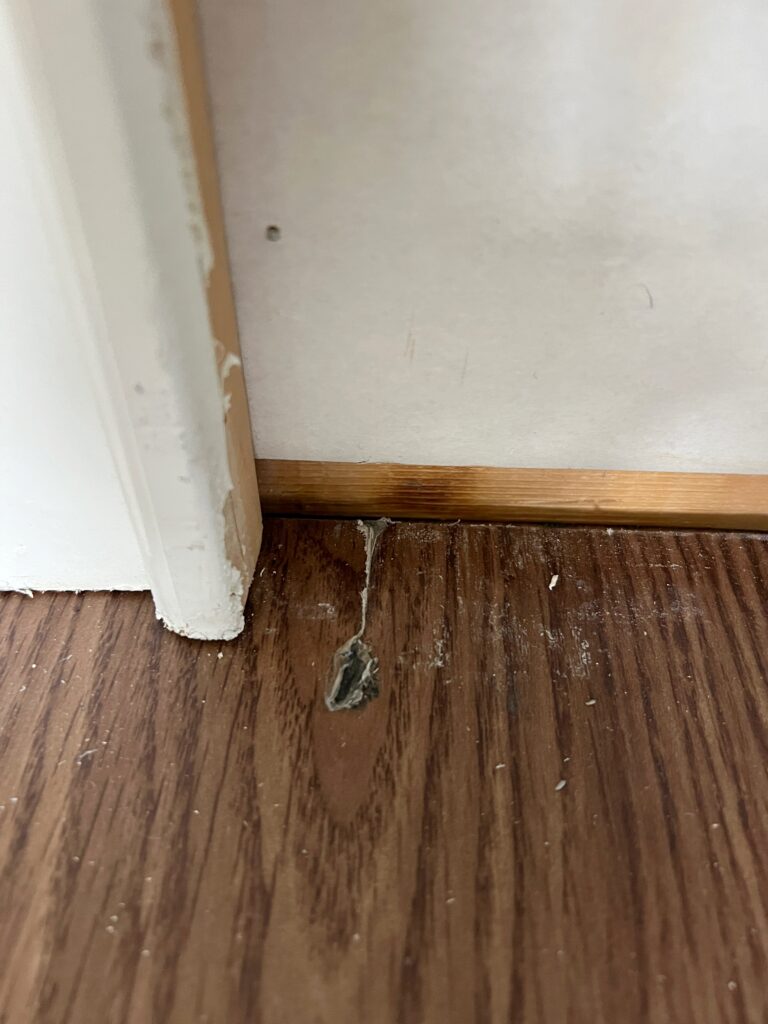
This hurts to look at. We considered trying to remove this one plank but I really felt like it would be tricky since it’s a plank underneath a door jam. For now, we’ll just have to live with it.
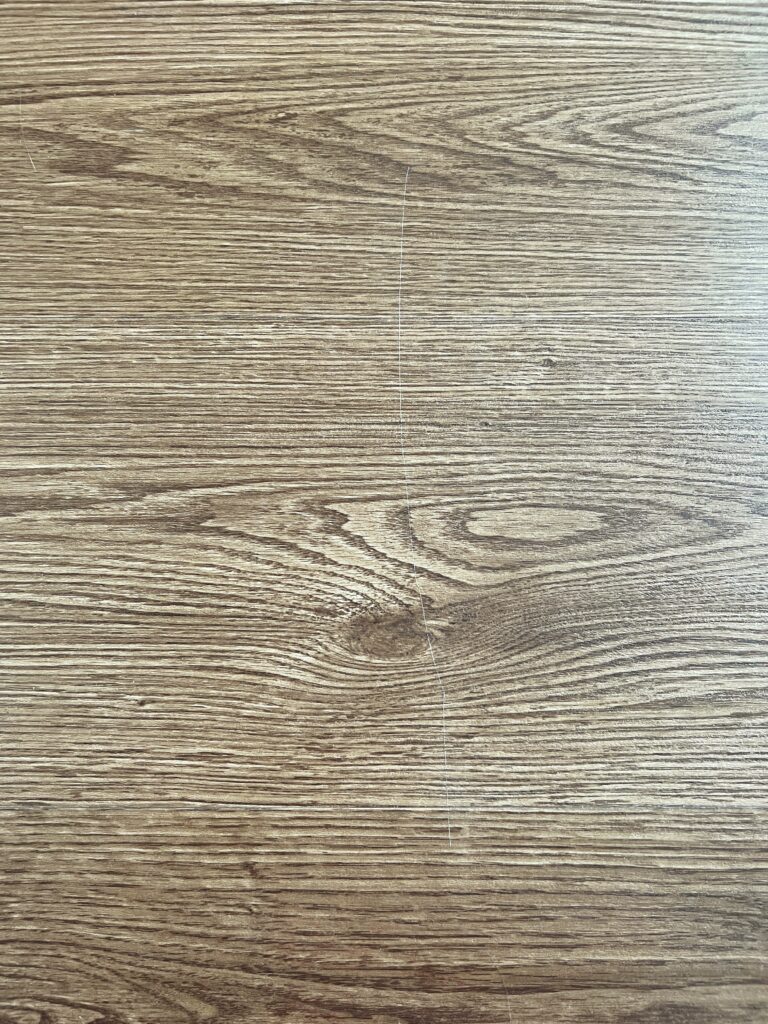
We weren’t being careful and scratched the floors…
Yes, we already scratched the floors. Now I know that vinyl plank floor is supposed to be scratch resistant, but it’s not scratch proof and definitely will scratch in the right scenario.
Like, for example, if you drag a baseboard that has tiny little cut nails poking out from it. Yes… I know! What were we thinking?!
Sometimes we get so caught up in our project we forget to be careful.
How do you fix scratches on vinyl flooring?
Lifeproof recommends a few different products for scratching:
If I end up giving one of these a shot, I’ll be sure to update this post!
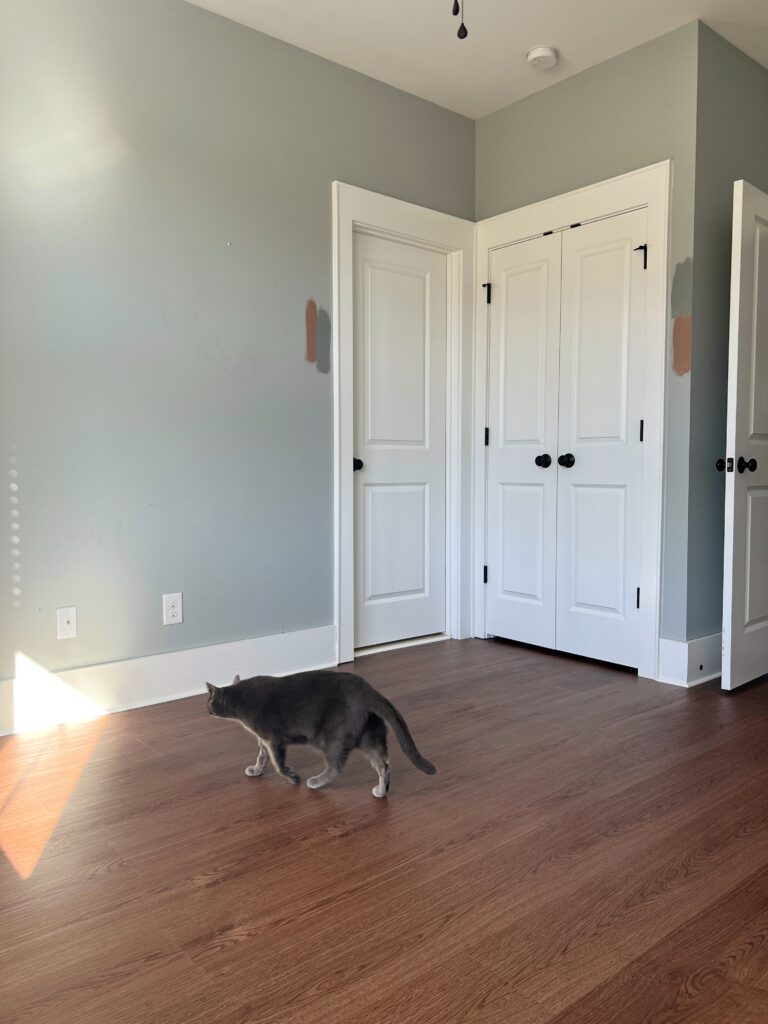
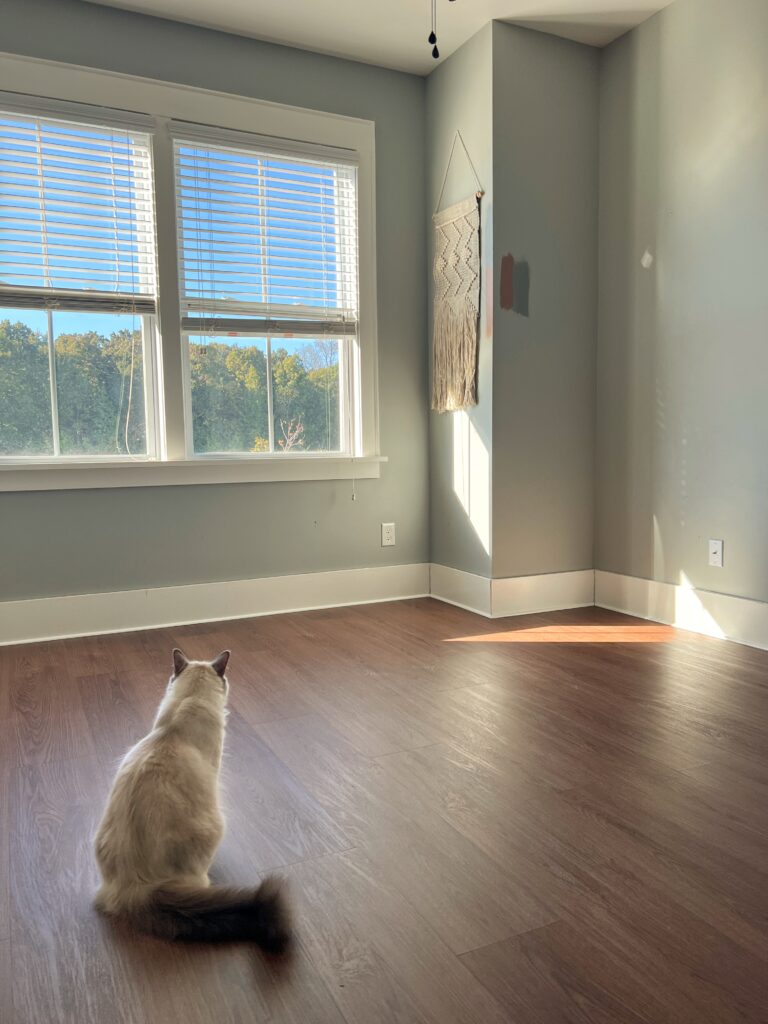
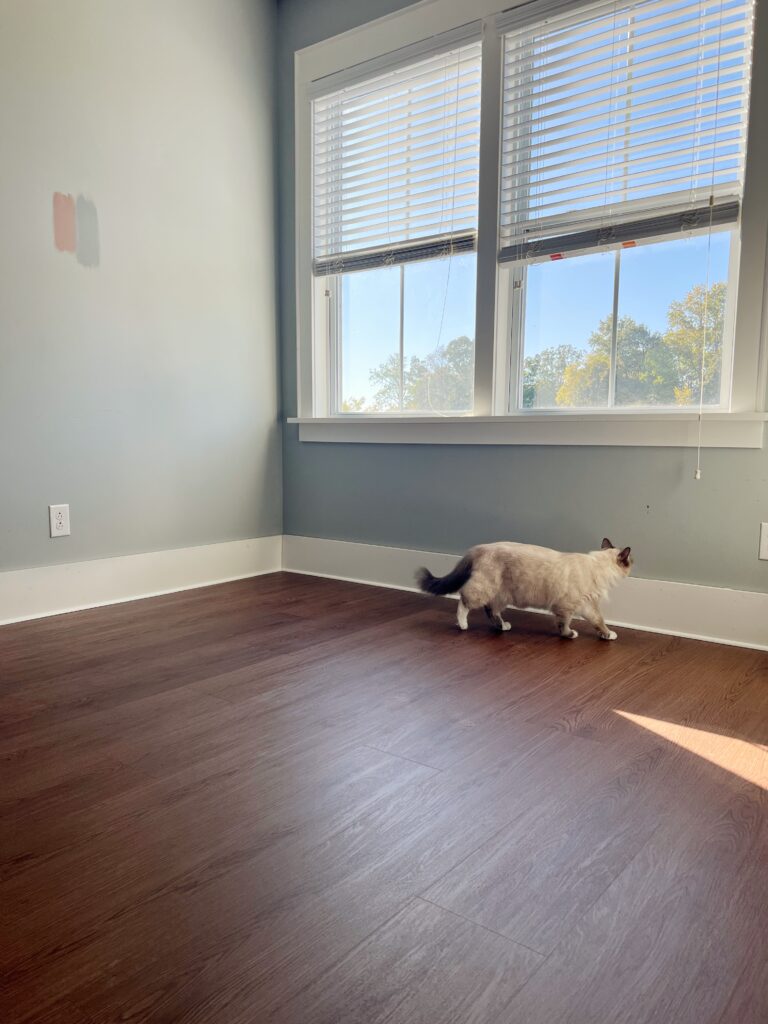
The Finished Look
Our cats are very into the new flooring if you can’t tell! We love it too!!! It turned out so well!
Let me know what you think or if you have any additional questions!!
Next up in our guest bedroom is trimwork and then wallpaper so stay tuned- it’s gonna be so fun!
Elisha

Wow it looks so good with the new floors in there. You guys did a great job!
Looks amazing!! How do you put the skirting boards back on?
Thank you so much Jess!! We’re very proud LOL 🙂
Hi Anna! Thank you SO much! Since I kept all the baseboards, they were already cut to the right size. It was very simple- I just nailed them back in using 2″ brad nails. You can mark where the studs are and nail into those, or you can nail in from opposite angles to lock it into the drywall if that makes sense! I ended up also adding quarter round and plan to make them even higher with another piece of trim- maybe I’ll do a separate blog post for that part 🙂
Elisha,
Thank you for the detailed post… my question comes after seeing your cats. The padding underneath, how reliable is that against pet urine etc or would you have rather gotten a glued down version to prevent seeping into the sun flooring?
Hi Kabir! I’ll be honest- I didn’t research that a ton as our cats have never had an accident (knock on wood) but it is definitely meant for a moisture barrier. If that were a concern of yours, i’d do a little research to determine the best underlayment for potential pet accidents since they make many types! Hope that helps!
How did you know how to lay the pattern down of the flooring? I want to lay the floor down I just don’t get the pattern.
Hi Carlos! I just played around with the planks until I found a pattern I like. Ultimately, it looks best to stagger the planks. If you check out step 3 I shared exactly how I did mine! Best of luck!!
Hi Elisha! Perhaps I missed this, but is this the red iron oak Lifeproof color? I am really struggling to choose a color. If this is the red iron oak, I will be purchasing tomorrow! It’s exactly what I’m looking for!! Thanks I’m advance 🙂
Hi Micalah! Yes it is!! Best of luck!!