

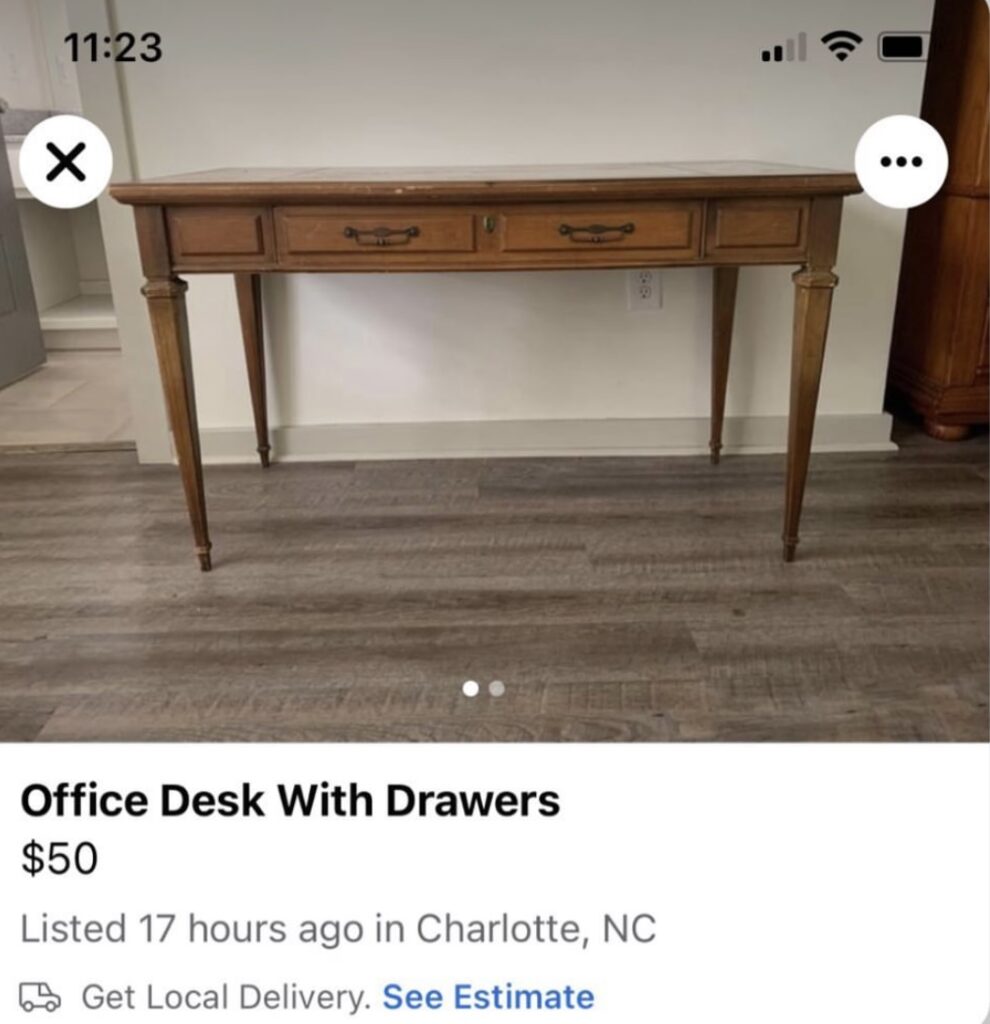
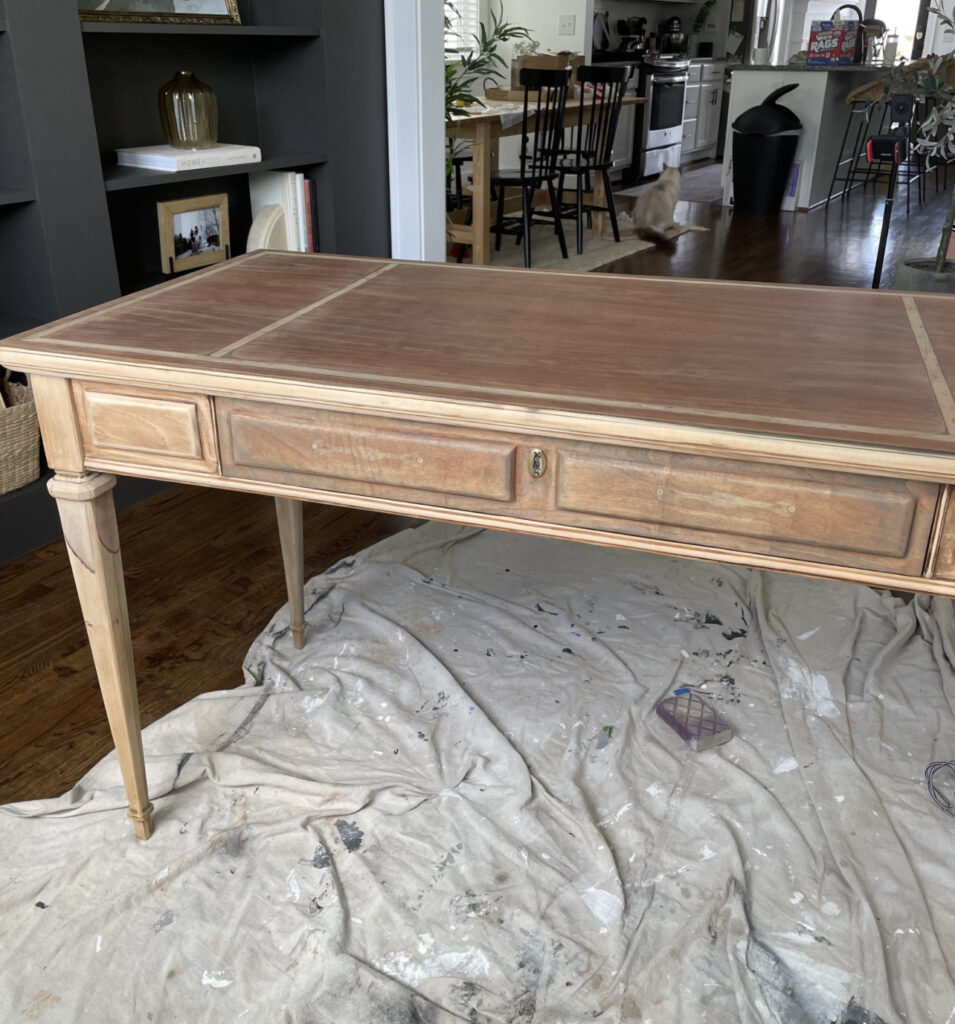
It’s safe to say that this vintage desk makeover marked the very beginning of my love affair with Facebook Marketplace.
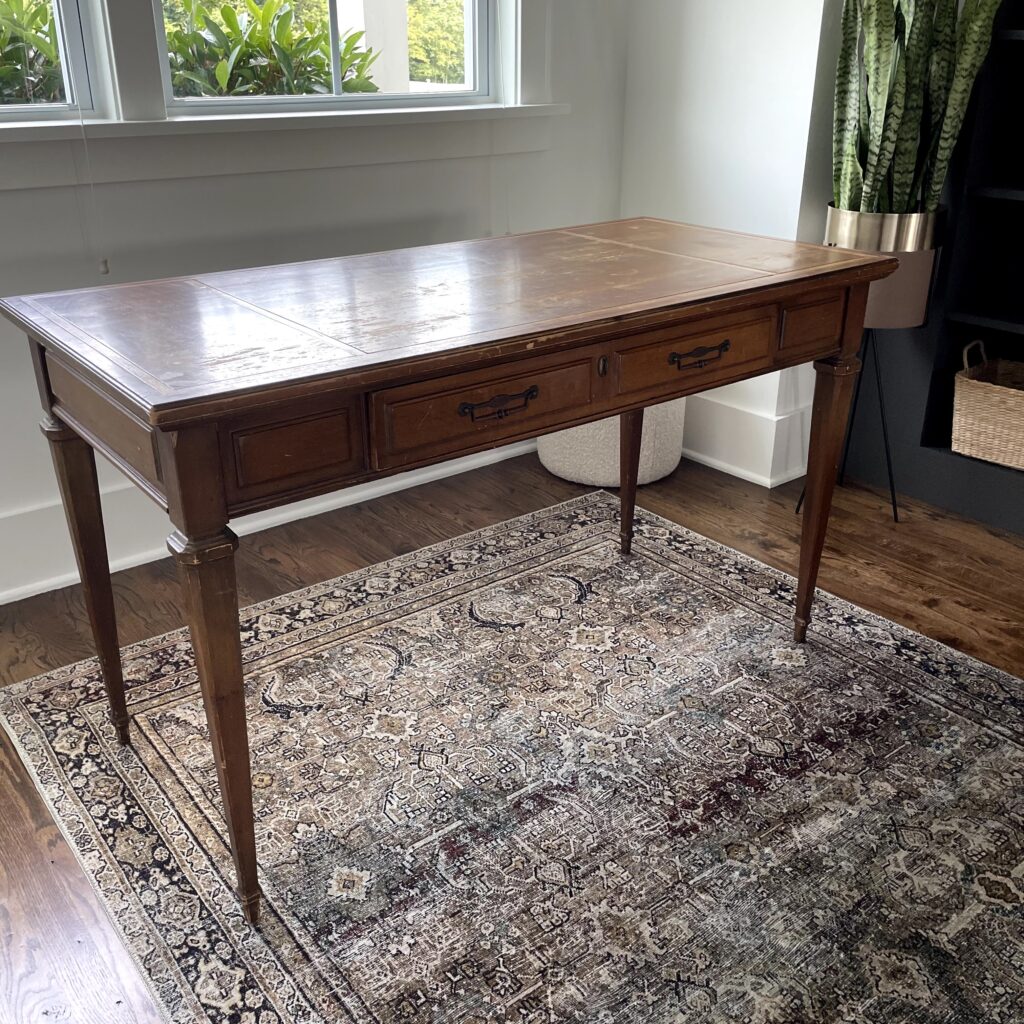
I’d been on the hunt for a vintage desk for months and didn’t have any luck finding one I loved that was also in my price range. But then I stumbled upon this beautiful little vintage desk on Facebook Marketplace. It was only $50 and the perfect size for my office. What a SCORE!
It wasn’t in perfect condition, but there’s nothing a little paint or stain can’t fix, right? I felt confident I could give this desk new life!!
With all the other big DIY projects i’d done up to that point, I assumed this vintage desk flip would be quick and simple! Boy was I wrong. Furniture flips are a whole different beast and there’s a lot to learn!
Full disclosure: this was my first time doing a furniture makeover (other than Ikea which is very different- here’s my blog post on how to paint ikea furniture!) and there was a lot of trial and error.
Not everything worked, and i’m sure there are better methods, but I’m here to share all the details from my experience. We can learn together!
Disclaimer: This post contains affiliate links. This means, if you purchase something from a link I provided, I will receive a small commission. This is at no extra cost to you! Thank you so much for the support!
Tools
- Cute Safety Glasses
- Bluetooth Ear Protection
- Respirator
- Orbital Sander
- Mouse Sander (or Multi-Tool with Sanding Attachment)
- Detail Sanding Micro Tool
- Clamp
- Foam Brushes
- Patience ????
Materials
- Krud Kutter
- Orbital sandpaper
- Multi-tool sandpaper
- Wood Glue
- Plastic Wood Filler
- White rags
- Tack Clothes
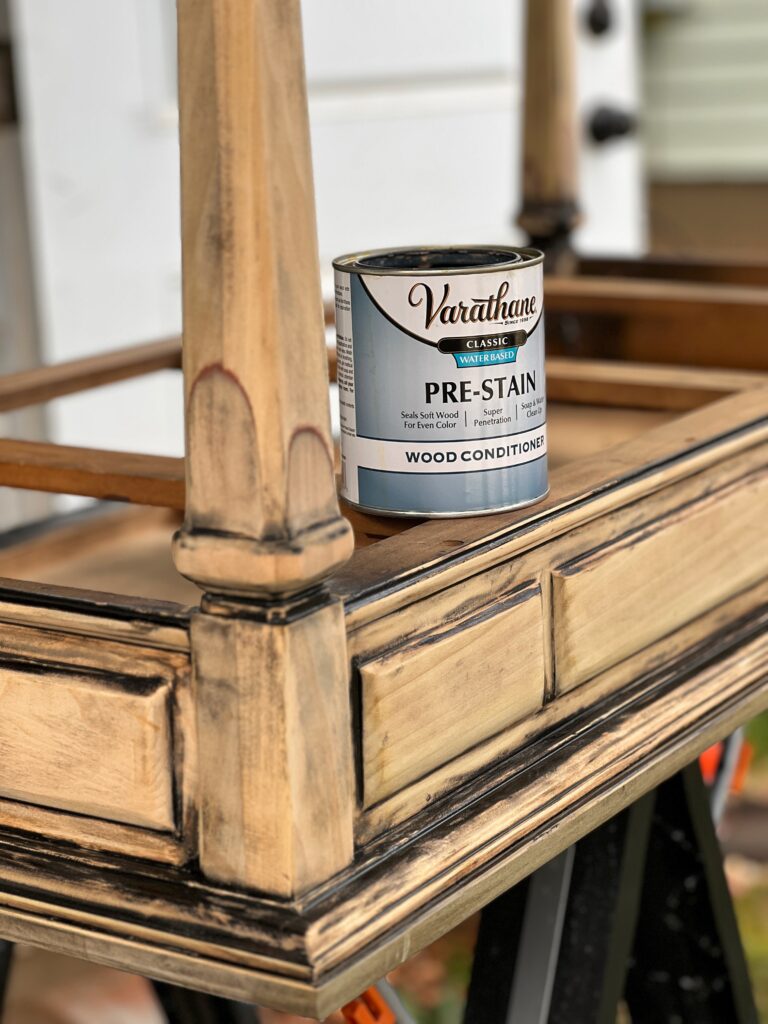
- Wood Conditioner
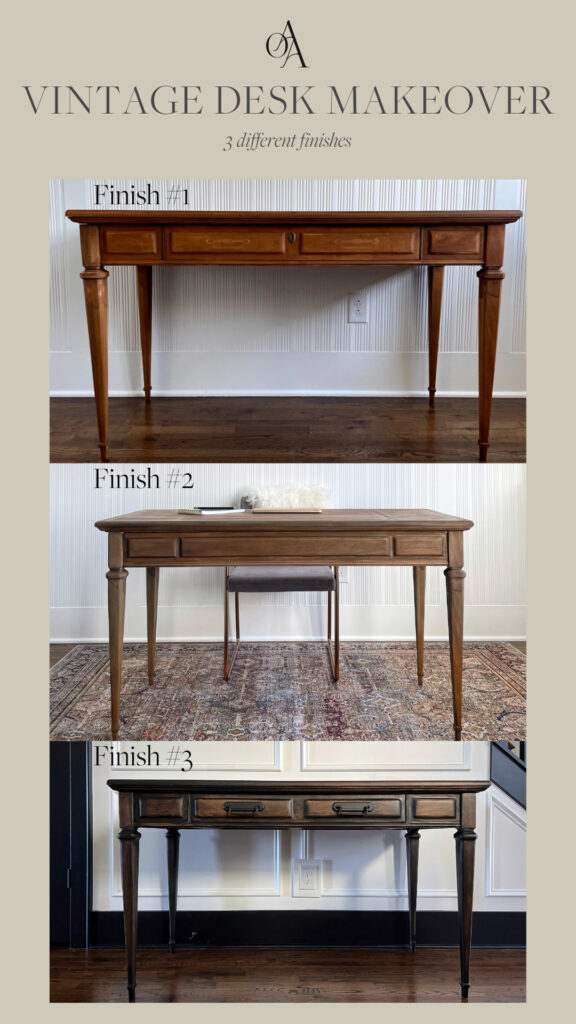
Finish #1
Finish #2
Finish #3
Clean + Remove Hardware
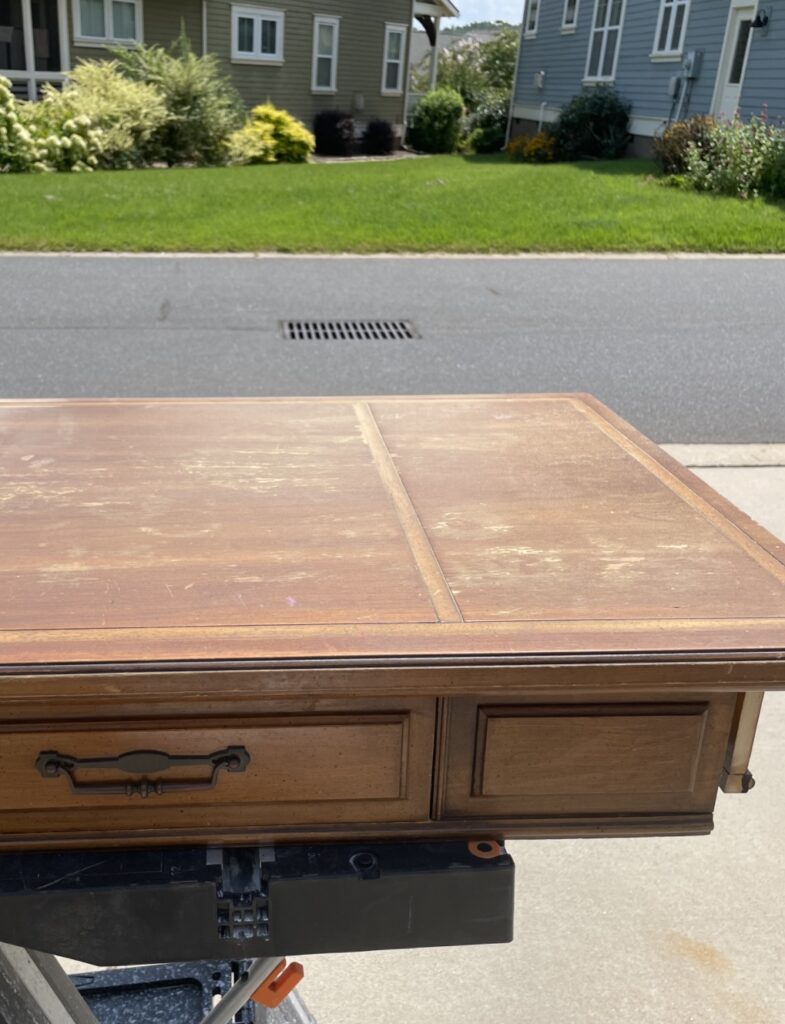
The top of the desk had definitely seen better days. The first thing I did was give it a good cleaning with some krud kutter and rags!
This is also when you’ll want to remove the hardware!
Fix Imperfections
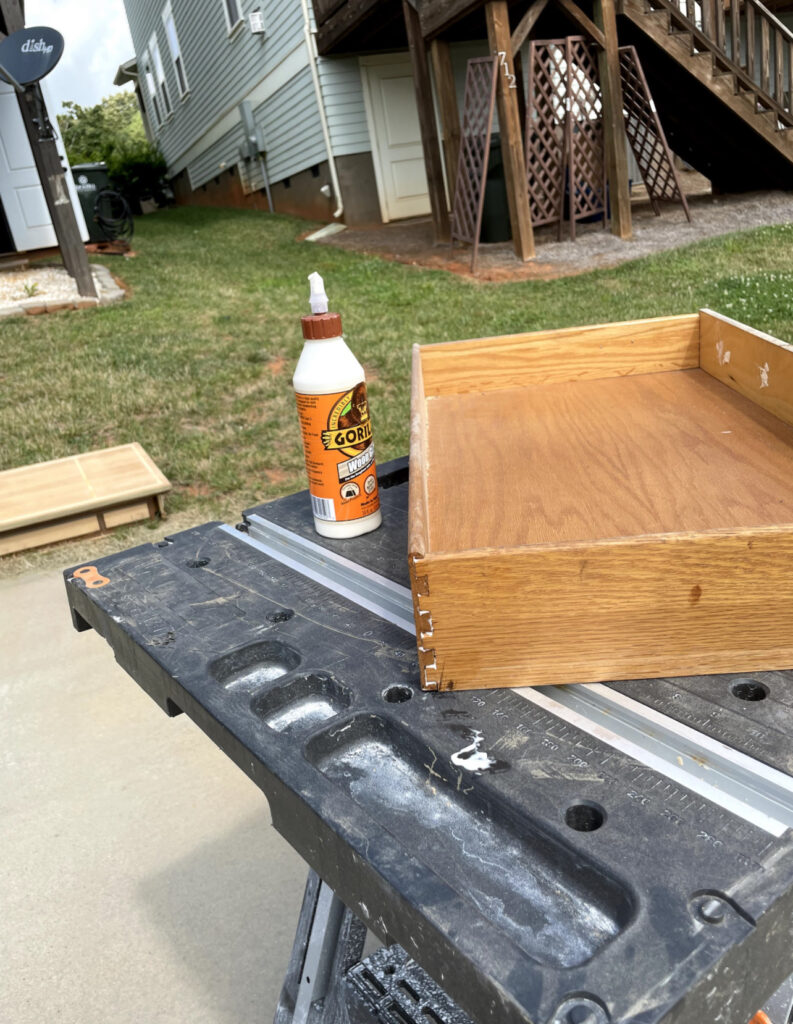
Since it’s an old desk, I inspected it thoroughly to see if there were any structural issues that need to be fixed. I noticed the dovetail joints on the drawer were starting to come apart.
To fix this, I used wood glue and a clamp! I let it set overnight and it was as good as new!
Since I was planning to swap out the hardware, I also had to fill the holes left from the previous ones… just in case I went with something different in size!
I used this plastic wood filler because it dries nice and hard in case I had to drill back into it!


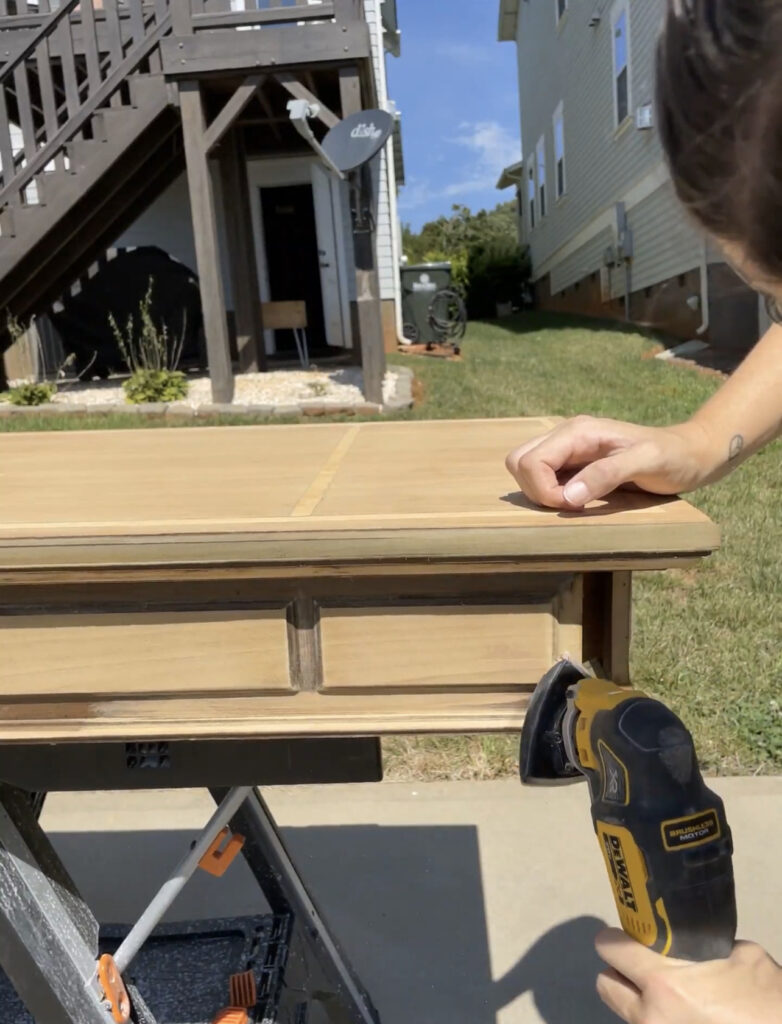
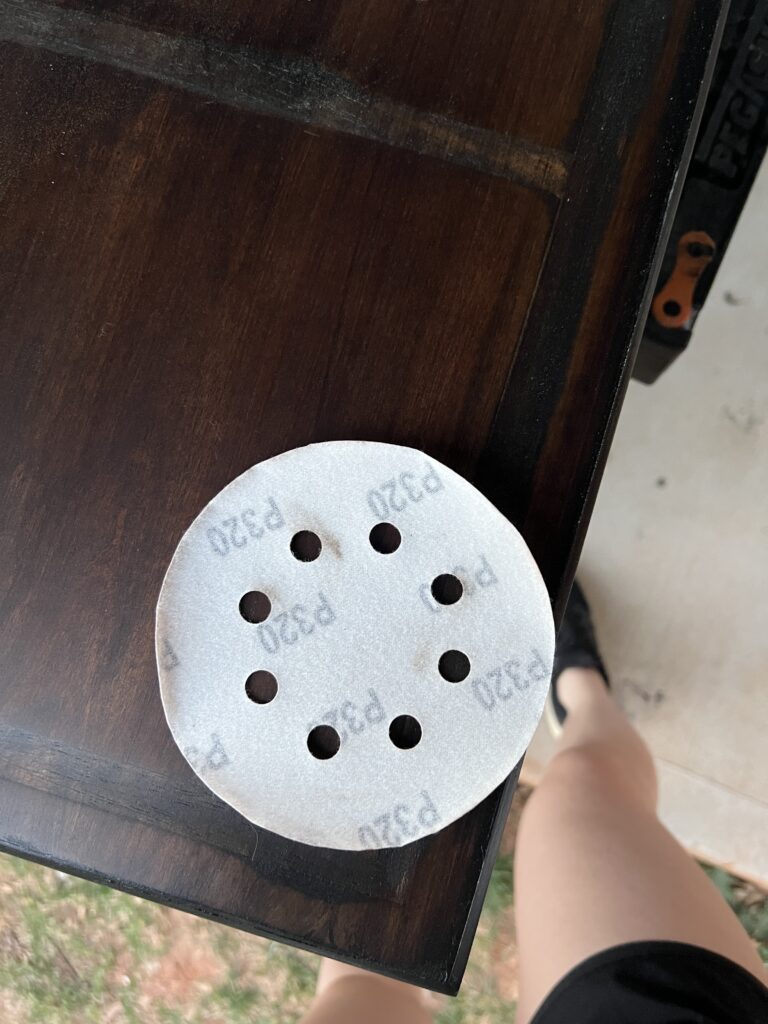
Sanding
I’ll admit, I don’t love sanding, but these bluetooth headphones are the only thing that make it enjoyable for me! Not only do they protect your ears, but you can also listen to music or a podcast instead of the orbital sander… highly recommend!

What grit sandpaper?
If you’re stripping your furniture, you want to start with a low grit sandpaper. The lower the grit, the more coarse the paper is! I started with 60 grit paper and as you can see it exposed some beautiful grain.
As you’re sanding, stay in the same direction as the grain. Let the sander do the work! (Don’t add pressure)
After 60 grit, I used 120 grit and lastly 180 grit!
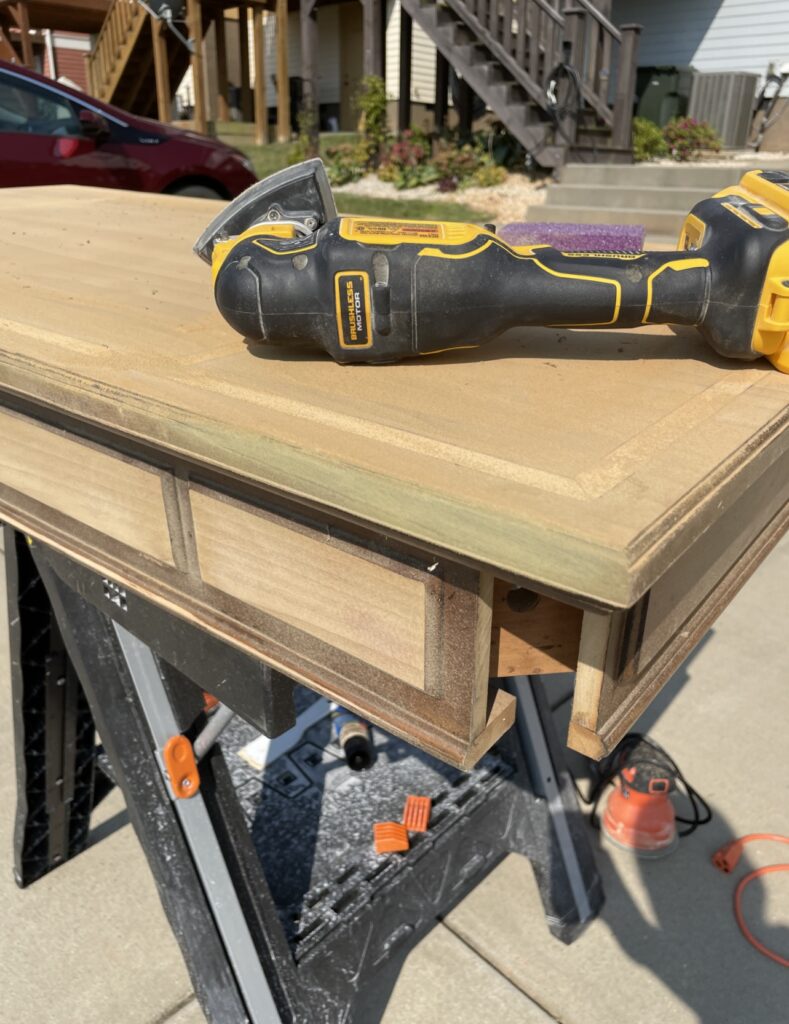
Sanding in the detailed areas
It can be tricky to sand in the smaller areas or details on your furniture piece. I used a combination of a few different tools to do this, but it definitely took some elbow grease.
After using my orbital sander, I used my multi-tool with a sanding attachment to get to some of the smaller areas.
For the tiniest of areas, I used this little finishing tool. You can even fold the sandpaper around the edge to get into crevices! A dremel is a great tool for sanding really tiny areas, but I don’t have one yet.

When you’re done sanding, be sure to wipe off the excess dust with a lint-free cloth or tack cloth!
How do you know it’s solid wood?
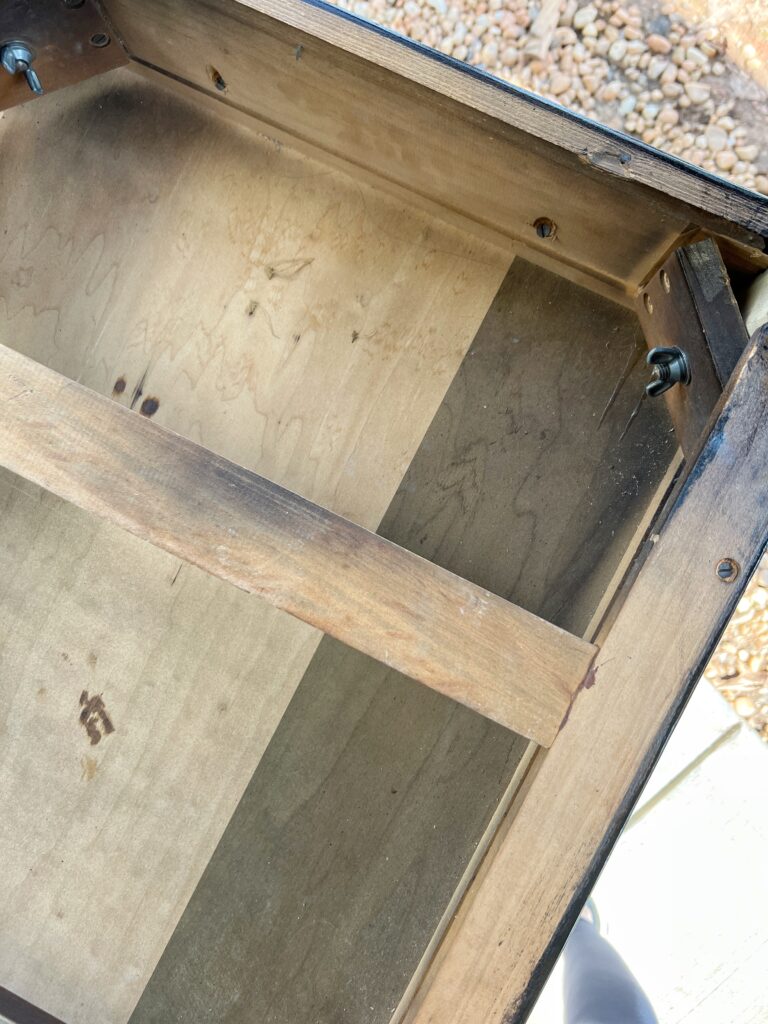
One thing I’m not at all an expert on is determining the types of wood used in a piece of furniture. With the help of google and my Instagram community, I learned that the top is veneer.
Veneer is a thin layer of natural wood that’s glued onto furniture for the aesthetic. Sometimes it’s to make furniture look like real wood. But in this case, my vintage desk was made of wood, but not necessarily the types of wood that produce a beautiful grain.
Another thing I noticed as I was sanding is that the edge of the top part was turning green. I learned that this is poplar wood and that it’s common for a piece of furniture to be made from two or more types of wood to cut down on costs.
When I look under my desk that’s what seems to be the case!
Finish #1: General Finishes American Oak

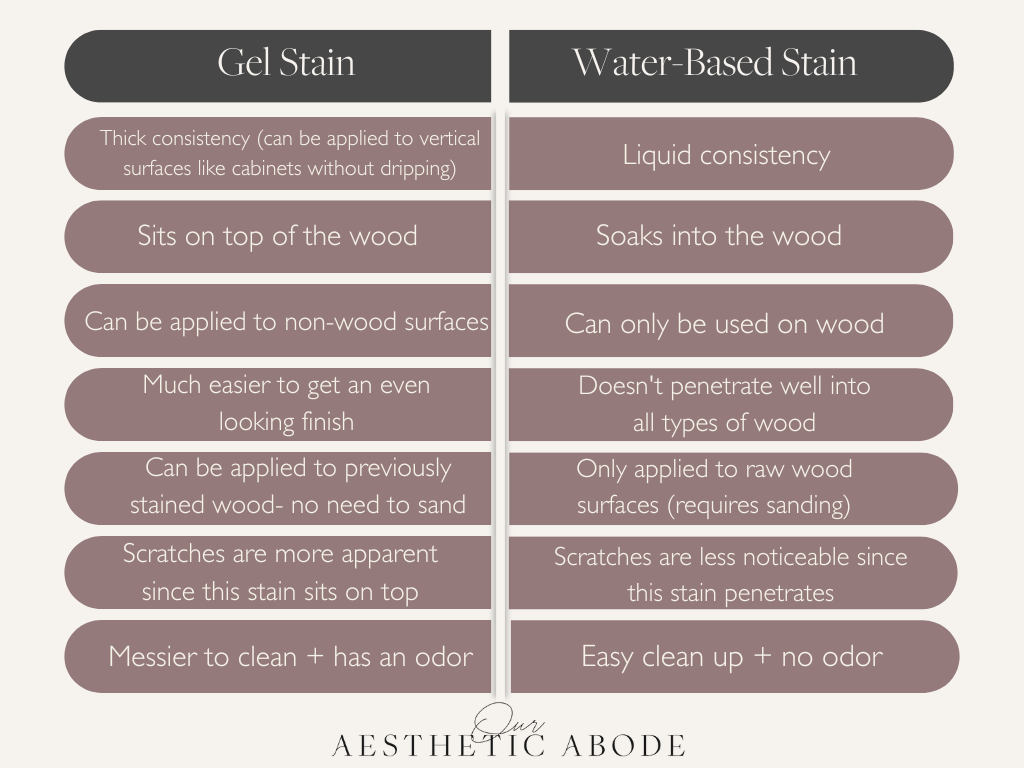
Gel stain vs. water-based stain
My first thought was to use gel stain as a finish since this desk uses multiple types of wood. Gel stain is perfect for this since it sits on top of the wood vs. penetrating in.
If you’re curious about the difference between gel stain and water-based stain, I made this chart that shows some of the main differences!
I picked up this American Oak gel stain by General Finishes and I felt pretty good about it! I liked the way the picture looked on the can so I just went for it ????
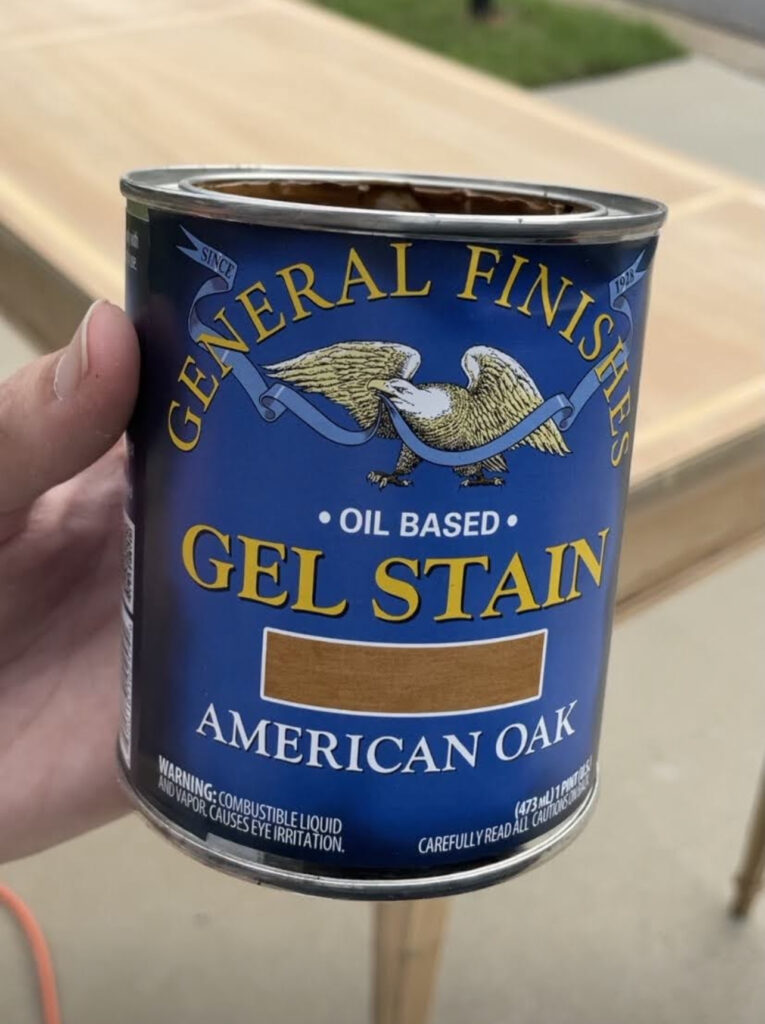
I’ll share more about how to apply gel stain in look #3, but all you need to know here is that this stain was beautiful, but not quite the look I was going for. While it was a little more orange than I was going for, it still had such a beautiful and rich finish!
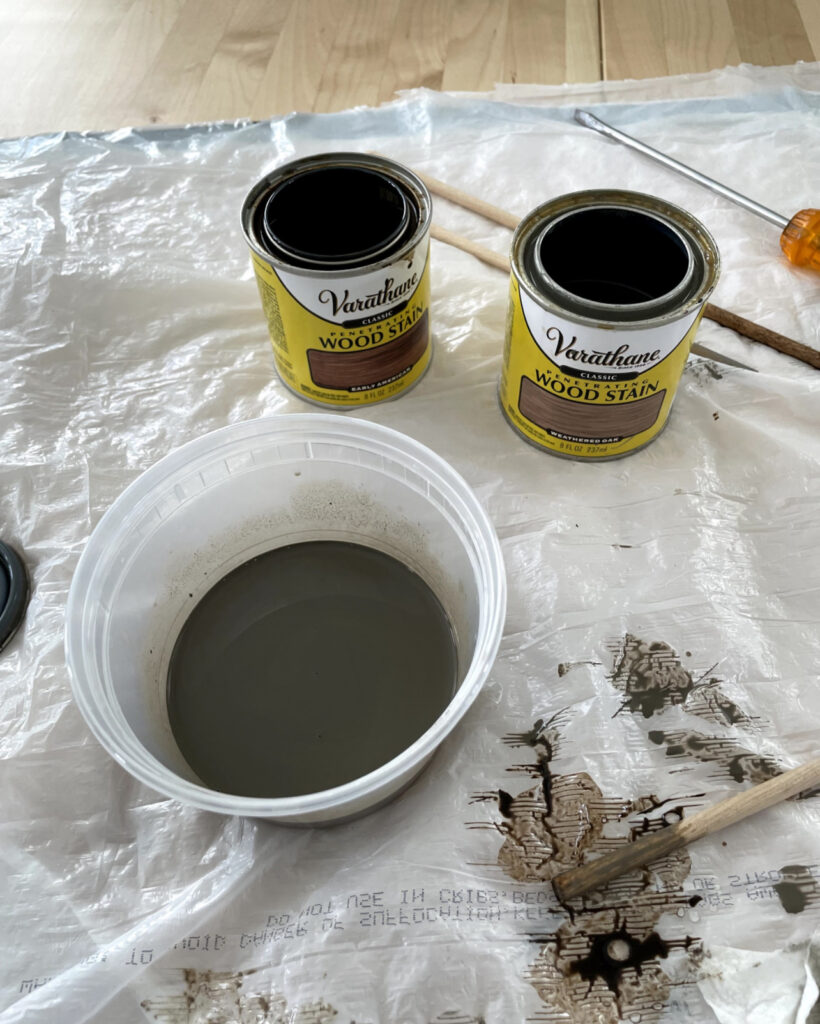
Finish #2: Early American + Weathered Oak
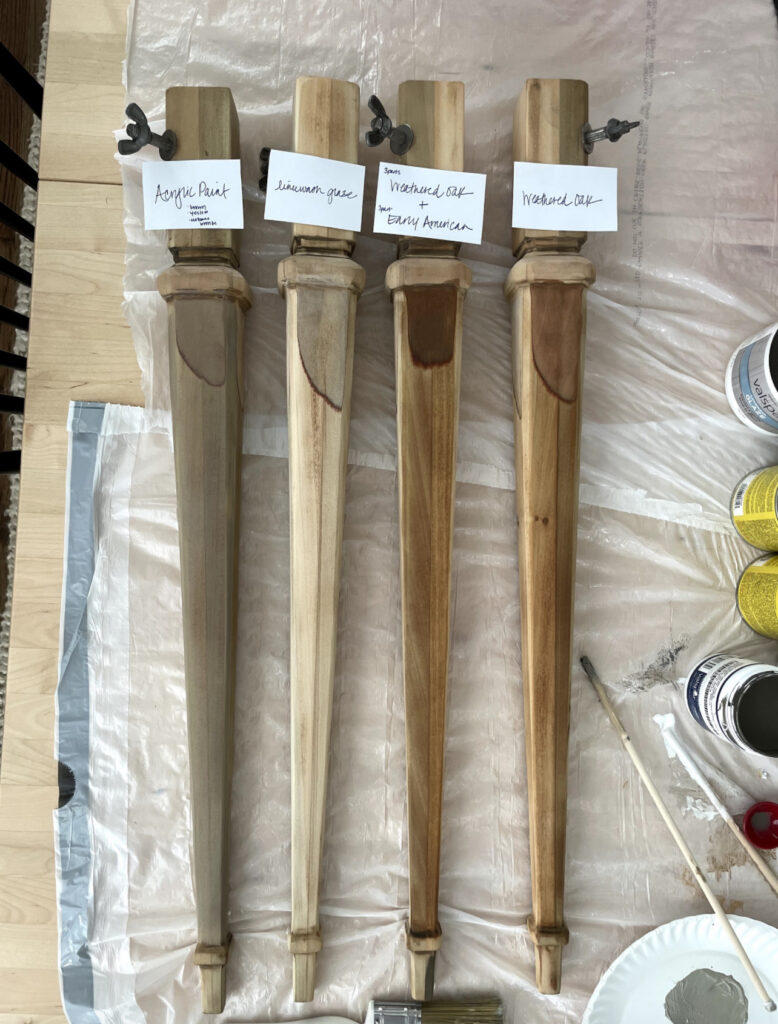
After the above gel stain didn’t work out, I went back to the drawing board and tested some different options on the legs!
As you can see below, I tried everything from acrylic paint to a limewash glaze, but ultimately I loved the combination of weathered oak and early American.
The mistakes I made
This next time around, I got smart and tested the stain on just the top drawer instead of doing the whole desk!
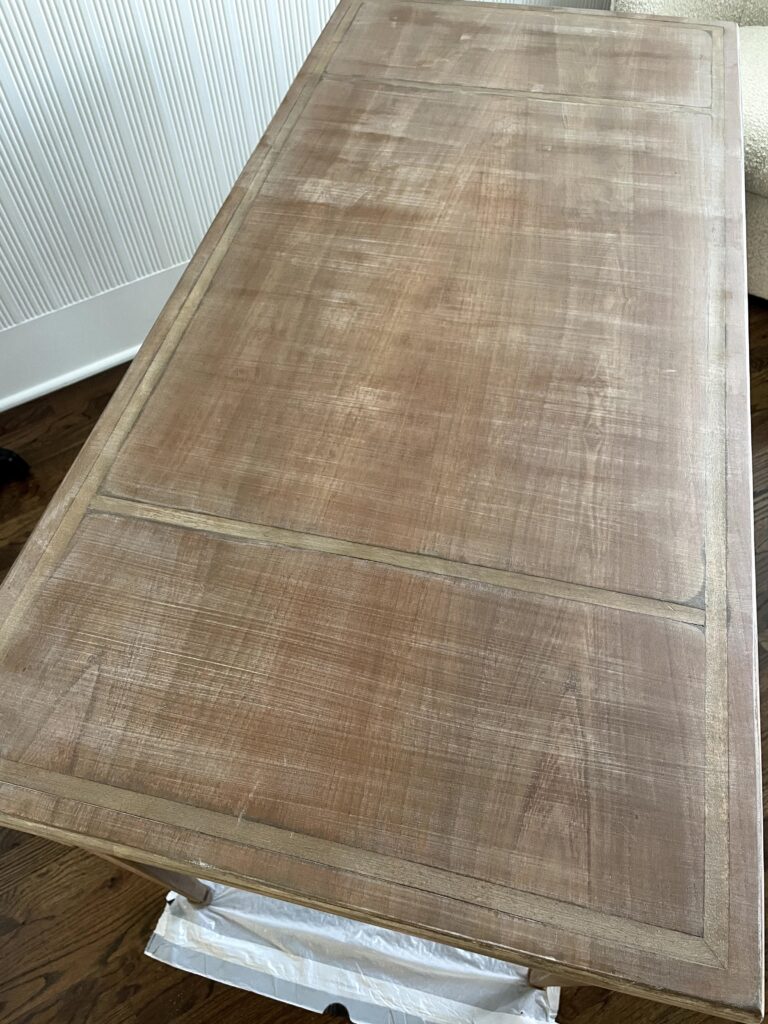
But there were two issues here. For one, I got the ratio off and did too much weathered oak (notice it looks quite gray?) and two, I didn’t use any wood conditioner so it turned out very blotchy.
So I sanded the drawer down and picked up some wood conditioner. If you didn’t know, wood conditioner is used to prevent a streaky or blotchy finish! It goes on before the stain- just follow the instructions on the back of the can!
The second time around, instead of mixing the stains like I did before, I decided to just layer them instead!
Layering the stains gave the desk the exact color I was hoping for! I also loved that the finish was sort of imperfect- it gave it a nice aged look!
But of course I found a way to mess it up again????
Hot tip: Before applying a top coat to your entire piece of furniture, test out a small area first to see how it looks.
In addition to not testing my top coat, I also didn’t stir the poly well enough nor did I apply it with the grain. It ended up with these very unattractive white streaks from the brush strokes.
Sometimes you have to learn the hard way????♀️
How to get finish #2
I felt pretty defeated after ruining the finish by doing a poor job with the top coat.
But the great thing about furniture flips is that you always have another chance! Plus, I finally knew how to get the look I wanted so I just took a deep breath and started sanding.
Here’s exactly how I got the finished look:
- Sanded in this order (120, 180, 220) to remove the previous finish and prepare for stain
- Applied wood conditioner
- Applied one layer of weathered oak with a foam brush, wiped the excess, and allowed it to dry for 2 hours
- Applied one layer of early American with a foam brush, wiped the excess, and allowed it to dry for 2 hours
- Applied a second layer of early American with a foam brush and wiped the excess
- After waiting 24 hours for the stain to cure, I applied this matte polycrylic. I did 3 coats and allowed 2 hours of drying time in between. (The number of coats will just depend on how often you’ll use your desk)
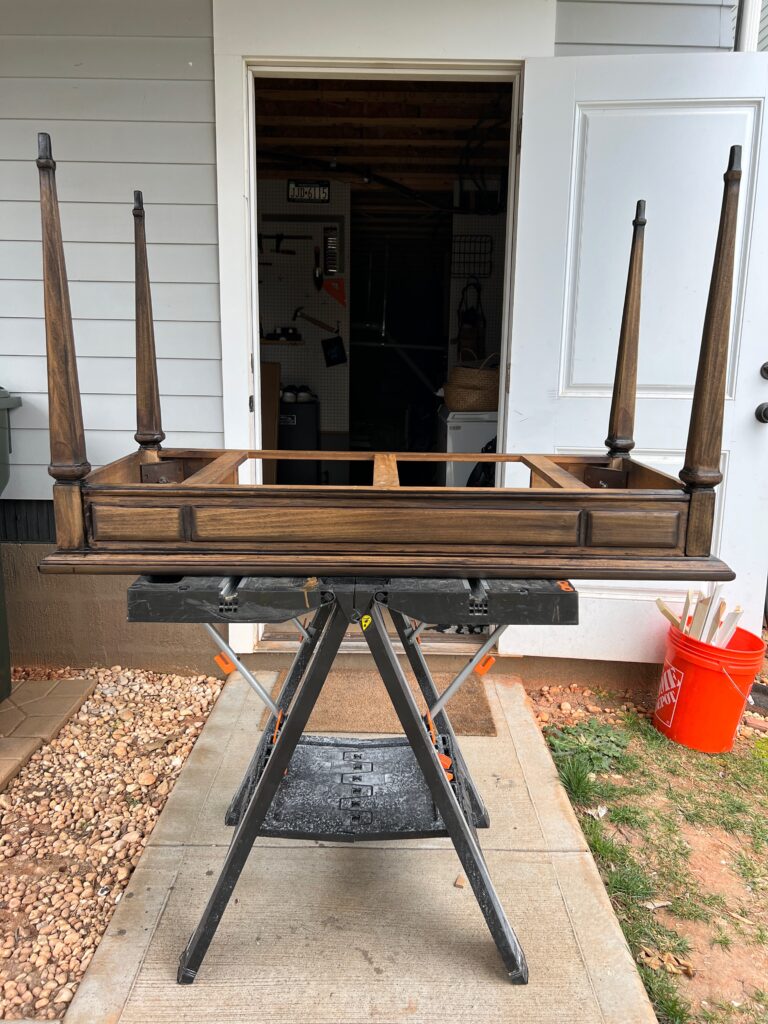
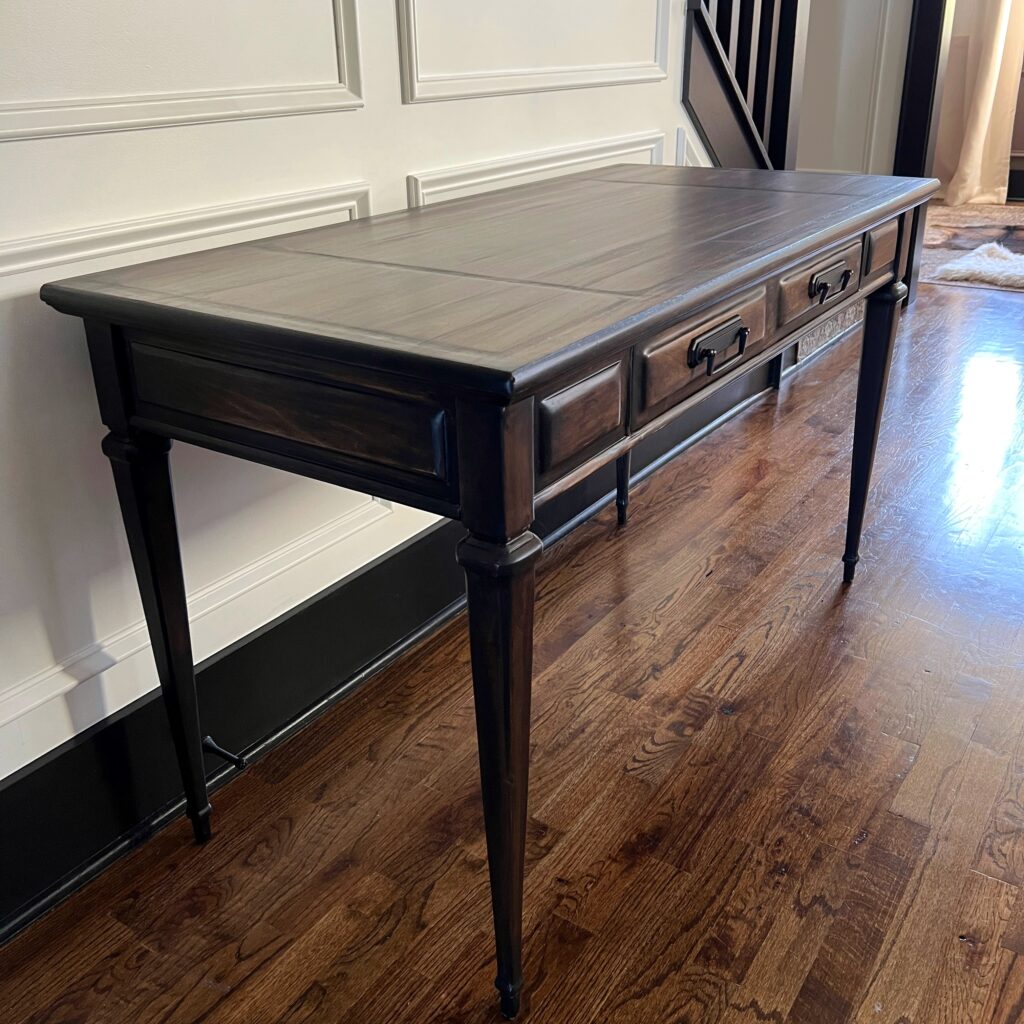
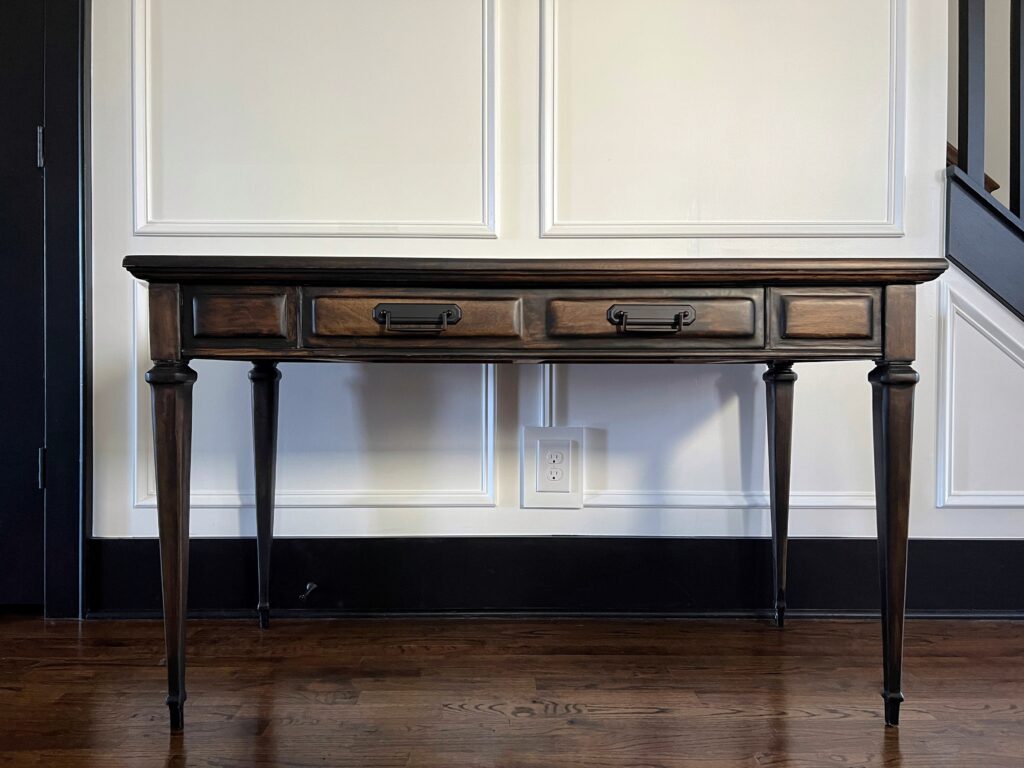
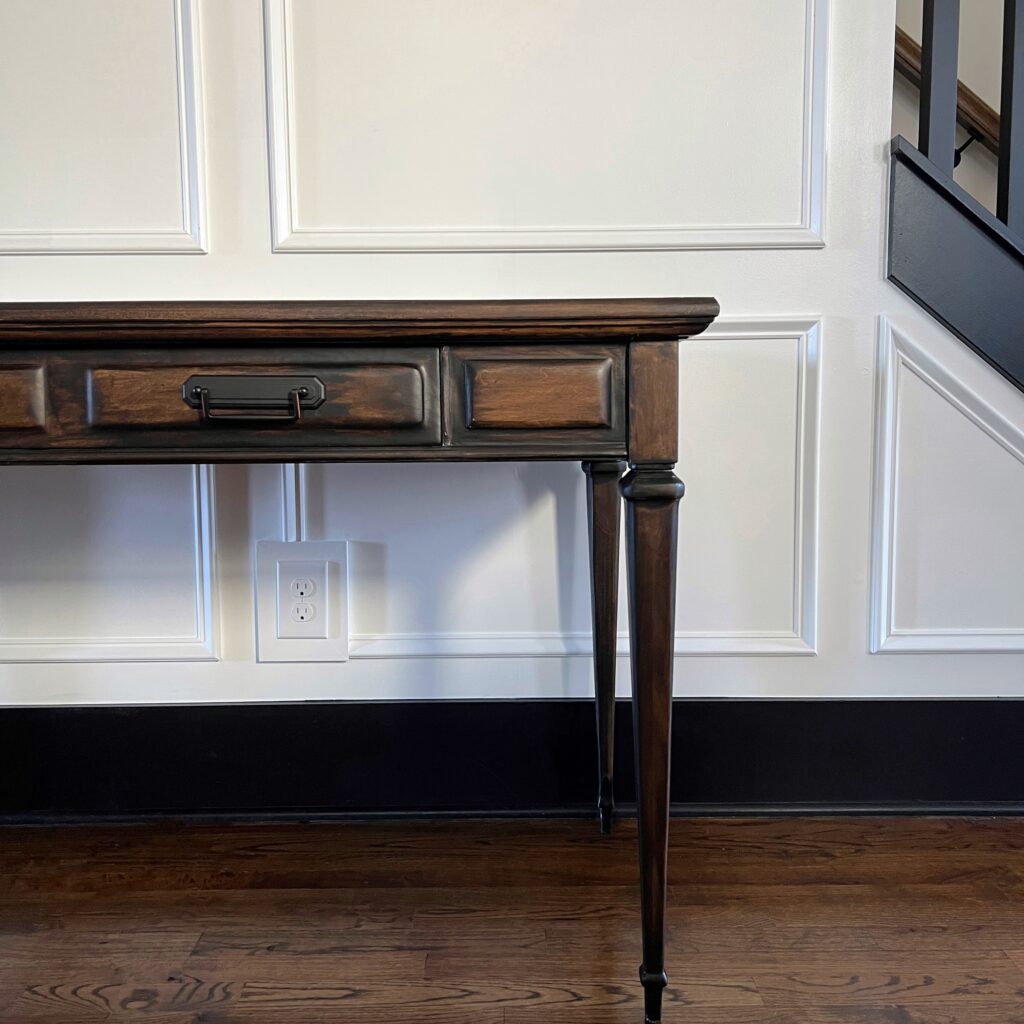
Look #3: Minwax Coffee Gel Stain
I was truly so happy with how look #2 came out and I enjoyed it for 1.5 years. But I recently decided to give my office a makeover by painting my arched built-ins. Get the tutorial for my billy bookcase hack here!
Once I painted my built-ins this beautiful color, I wanted more of a rich, chocolatey look for my desk.

The best dark gel stain
My favorite dark stain is Minwax coffee gel stain! I used it on both my dining table and this DIY fluted coffee table I made.
Do you have to prep for gel stain?
Yes, you do! While the prep isn’t as much work as it might be when using regular stain, there’s still some things you need to do to before staining.
You’ll need to do a light scuff sand with a high-grit sandpaper like 220. (If your furniture piece previously had a finish, you don’t have to sand down to the bare wood- you’re just doing a light sand to rough up the surface).
Don’t forget to remove any dust with a tack cloth or a damp rag!
Do you need to use wood conditioner with gel stain?
It’s not necessary, but it definitely helps for a smoother looking finish.
I definitely recommend using a wood conditioner if you’re staining wood that’s uneven or if you’re applying a dark stain onto a light wood. (I was doing both)
How not to apply gel stain
When I first started using gel stain, I would just apply it and leave it without wiping off the excess. You can do it this way, but I wouldn’t recommend it.
Not only is it more likely to leave a streaky finish like you see below, but it also takes forever to dry. It will remain tacky (and stinky) for days or even weeks depending on how heavily you apply it.
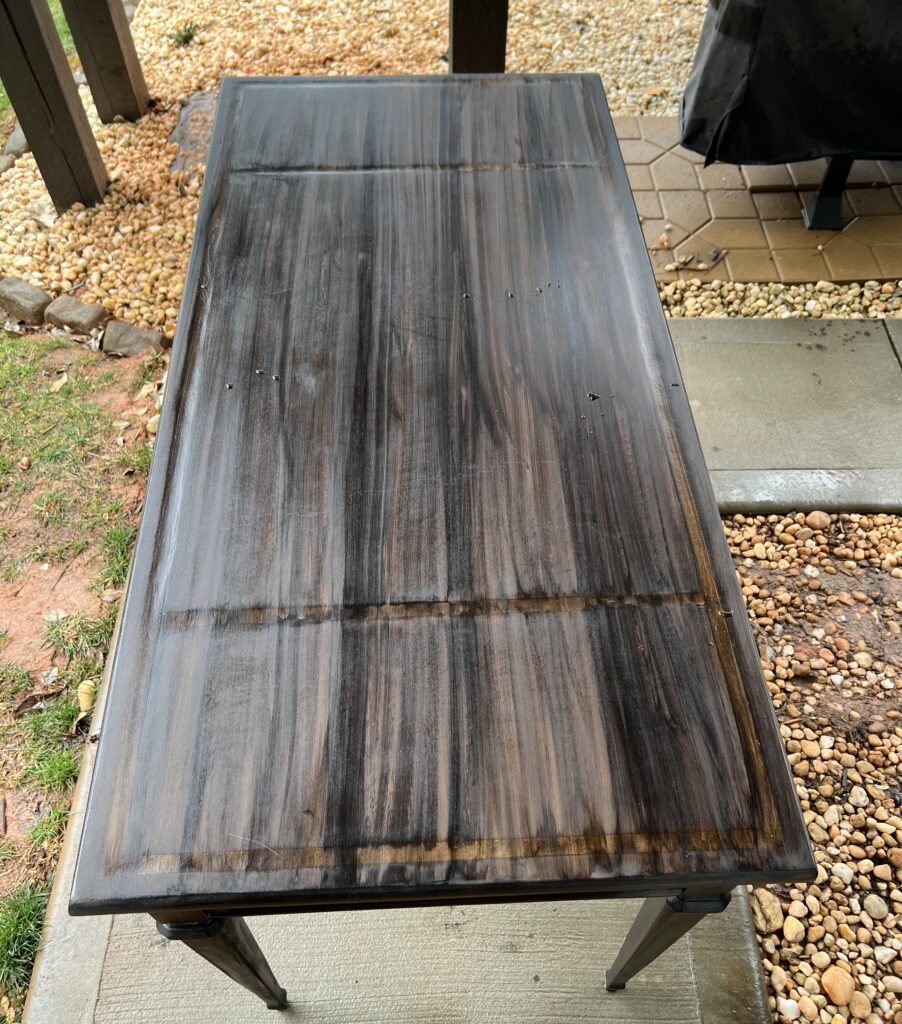
It’s really hard to get an even finish when you just apply it without wiping. I ended up sanding this down and I followed Minwax’s video on how to use gel stain to finish and it worked perfectly!
How to apply gel stain
I’ve used gel stain more than any other kind of stain at this point. Having tried out a few different methods in the past, I found that the best method is to apply it in thin coats.
Apply the gel stain generously using a brush.
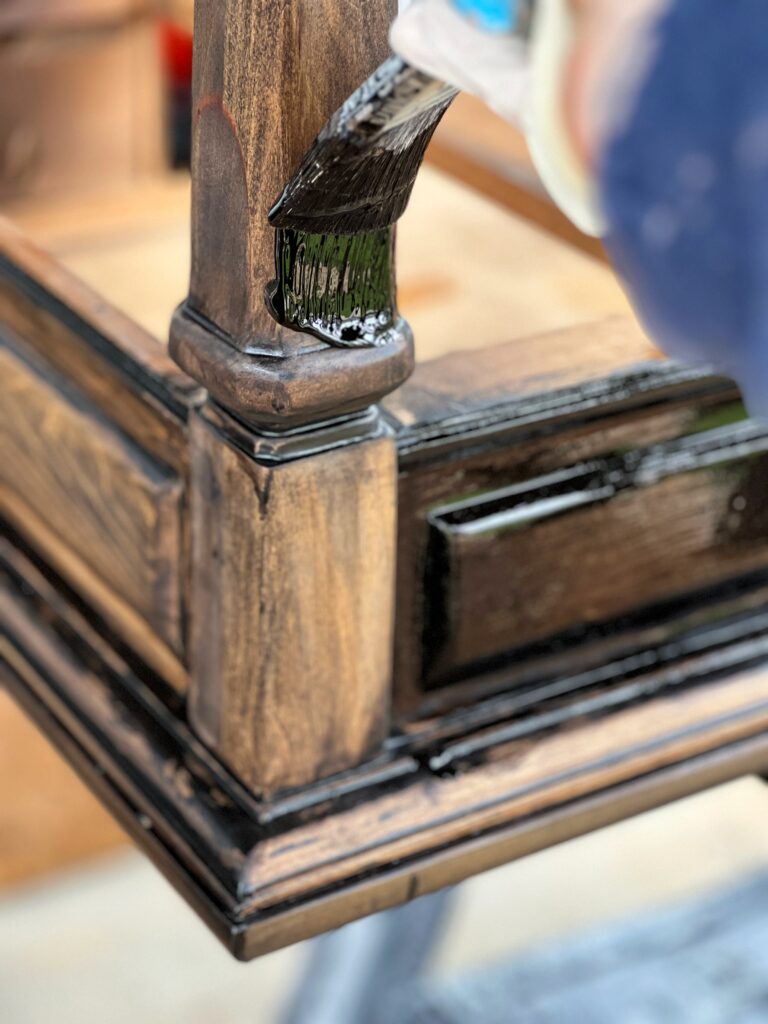
Let the stain sit for 3-5 minutes and then wipe off with a rag. Be careful not to wait too long because if it starts to dry it can be too sticky to work with.
You’ll want to wipe when the stain is still wet and can be manipulated more. When you’re wiping, wipe with the grain. Keep an eye out for any unwanted streaks and give those a second wipe.
Again, it’s important to work fast so the stain doesn’t dry! I stained the desk in 5 separate sections so I had more control over what I was doing. If I tried to do the entire desk at once, the stain would be drying in some areas as I was still applying it to others.
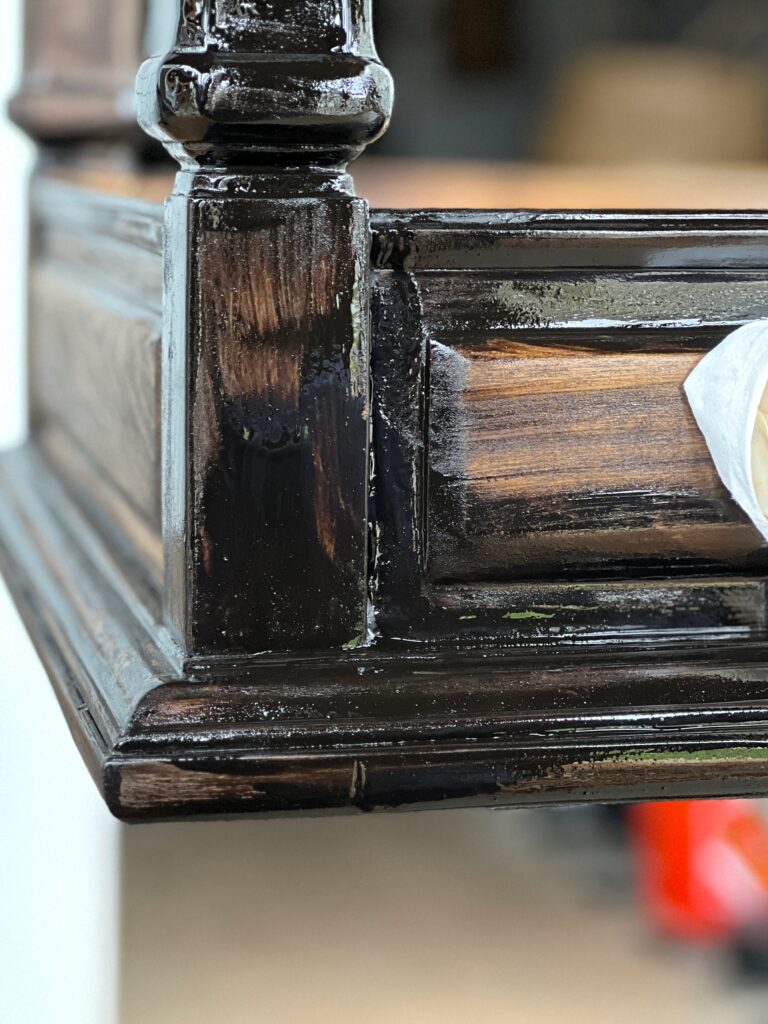
You can apply another coat after 6 hours. Here’s how it looked after two thin coats!
Originally I was planning to do three coats, but I was really happy with the look after the second coat so I decided to stop there!!
Do you put a top coat over gel stain?
Absolutely, yes!
If you don’t plan on using your antique desk much, you can probably get away with just one coat, but it never hurts to do more!
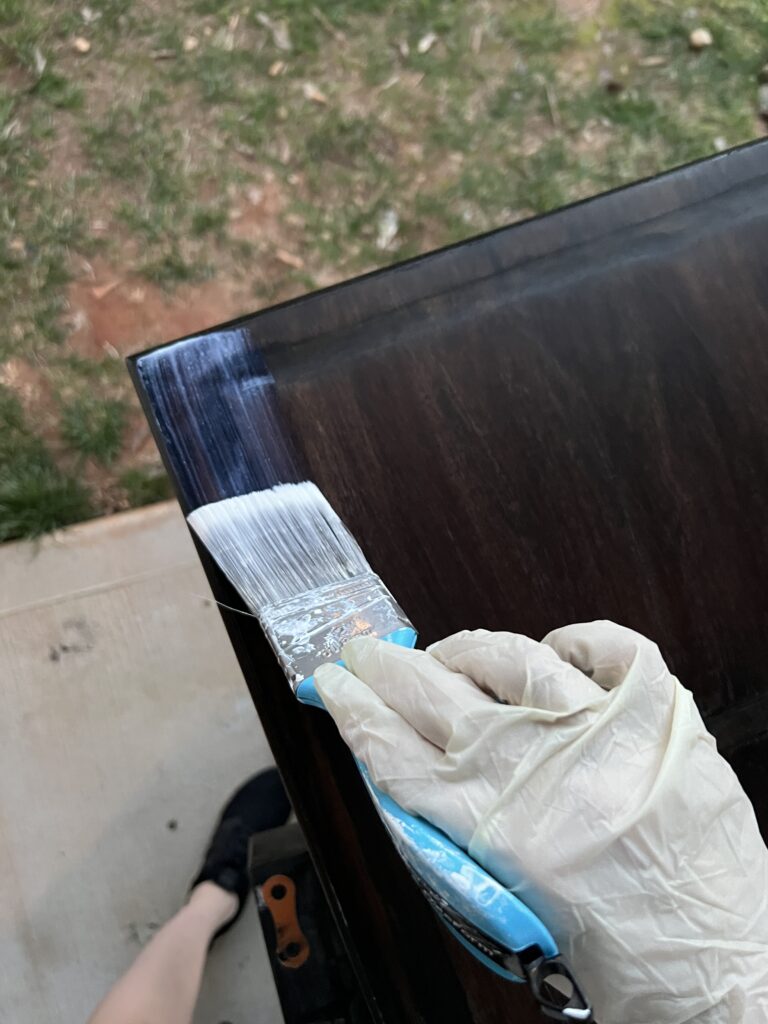
Since I knew i’d be using my desk regularly, I applied 3 coats of my favorite Minwax clear satin polycrylic.
Side note: A great way to get an ultra smooth finish is to use 320 grit or higher grit sandpaper in between coats of poly. I just did a quick, gentle sand by hand. This will smooth out any air bubbles and prep for the next coat!
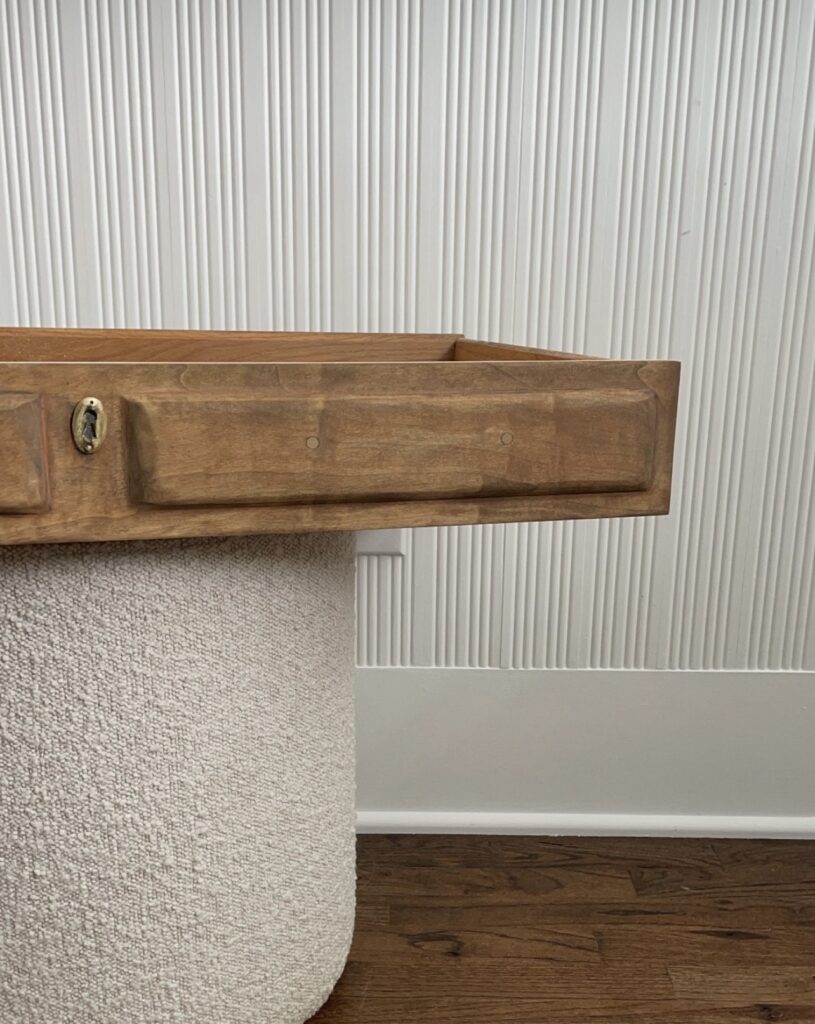
Adding the new hardware
I found these gorgeous pulls that I felt fit this federal style desk perfectly. They’re so classy. Bonus that they worked with the existing holes, making the process of replacing them very simple!
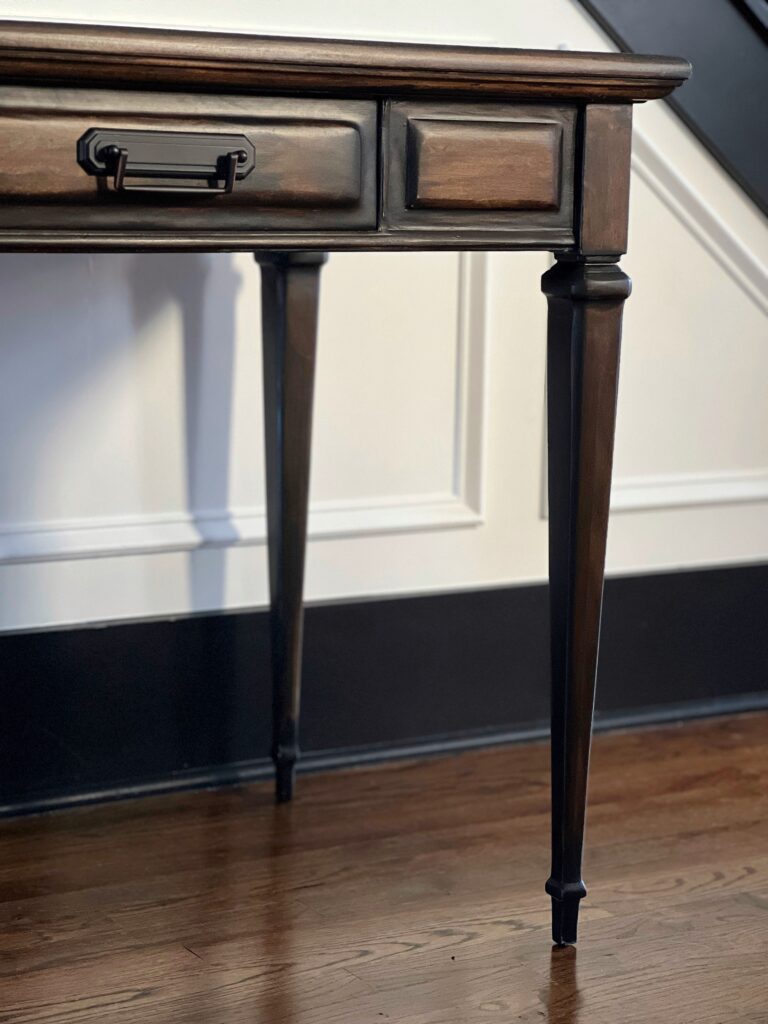
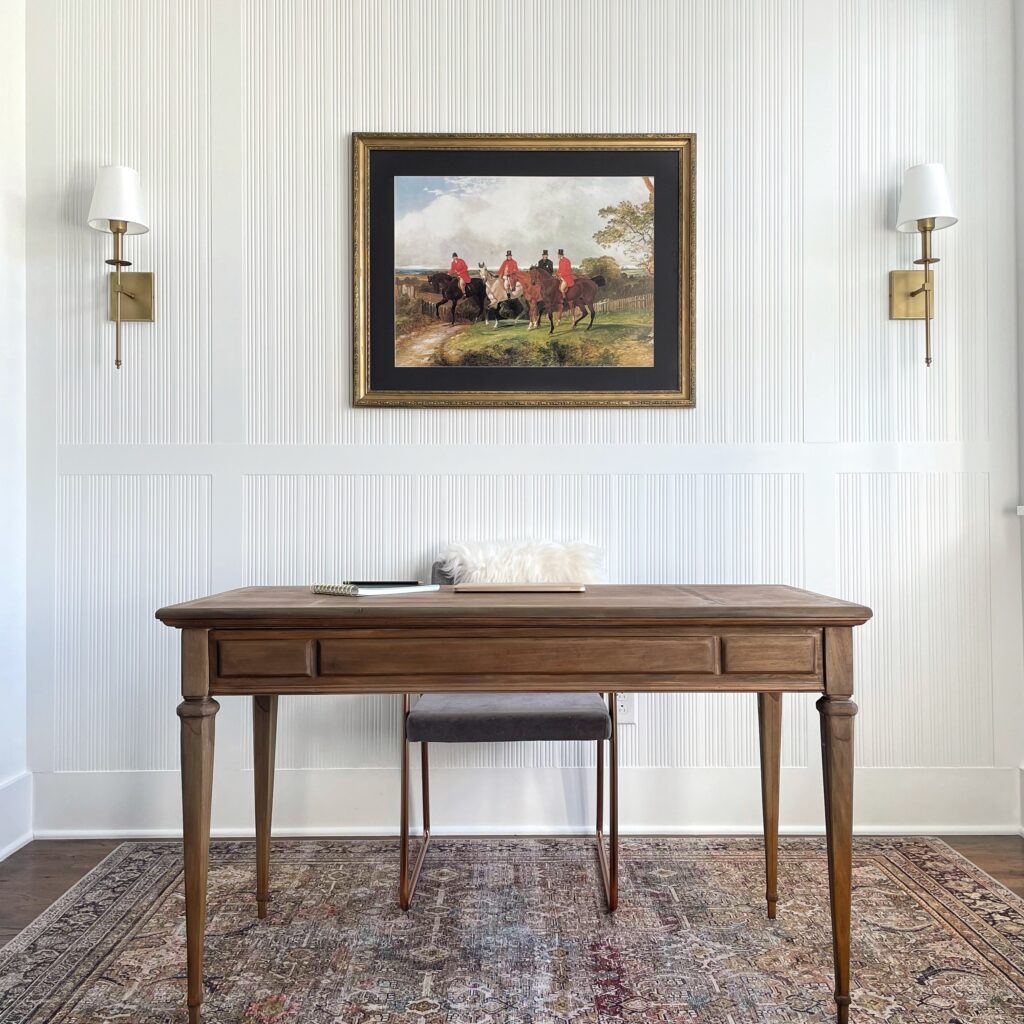
I’m so glad I didn’t give up on staining this desk (at one point I was looking at paint colors ????) because the final result is exactly what I was hoping for!
If you’re a visual learner, you can always watch my Instagram stories on this desk flip!
I hope you learned something new! I’d love to hear about your first Facebook marketplace find in the comments below!! ????

It is stunning! What perseverance you’ve shown!
Thank you so much Robin!! It was a journey for sure but worth it in the end and I learned so much! 🙂
Nice. What is the color of your wood floor & manufacturer? Love the neutral warm brown
Hi Mary! Thank you so much! And UGH I wish I knew because I love it too- but it was here when we moved in so I’m not sure 🙁